How To Color Grade // Fast, Easy & Cinematic
Summary
TLDRThis video script offers a streamlined guide to color grading in Final Cut Pro, emphasizing speed and quality. It introduces a new LUT pack designed for Sony cameras, promoting efficient log footage conversion and creative grading. The tutorial covers the basics of color grading, including log shooting benefits, LUT application, and color correction techniques. Tips on using scopes for accurate color matching and a mention of a future video on skin tones round out the informative and practical overview.
Takeaways
- 🎨 The importance of color grading in video production for achieving high-quality visuals quickly and efficiently.
- 📹 The speaker uses Final Cut Pro for their color grading workflow and is considering switching to Premiere.
- 🆕 Introduction of a new LUT pack called 'Cine Sony LUT Pack' designed for Sony cameras, offering five looks and ten conversion LUTs for S-Log 2 and S-Log 3.
- 💡 The speaker's favorite LUTs are the 'Teal and Orange Filmic' and 'Moody Warm', highlighting personal preference in color grading.
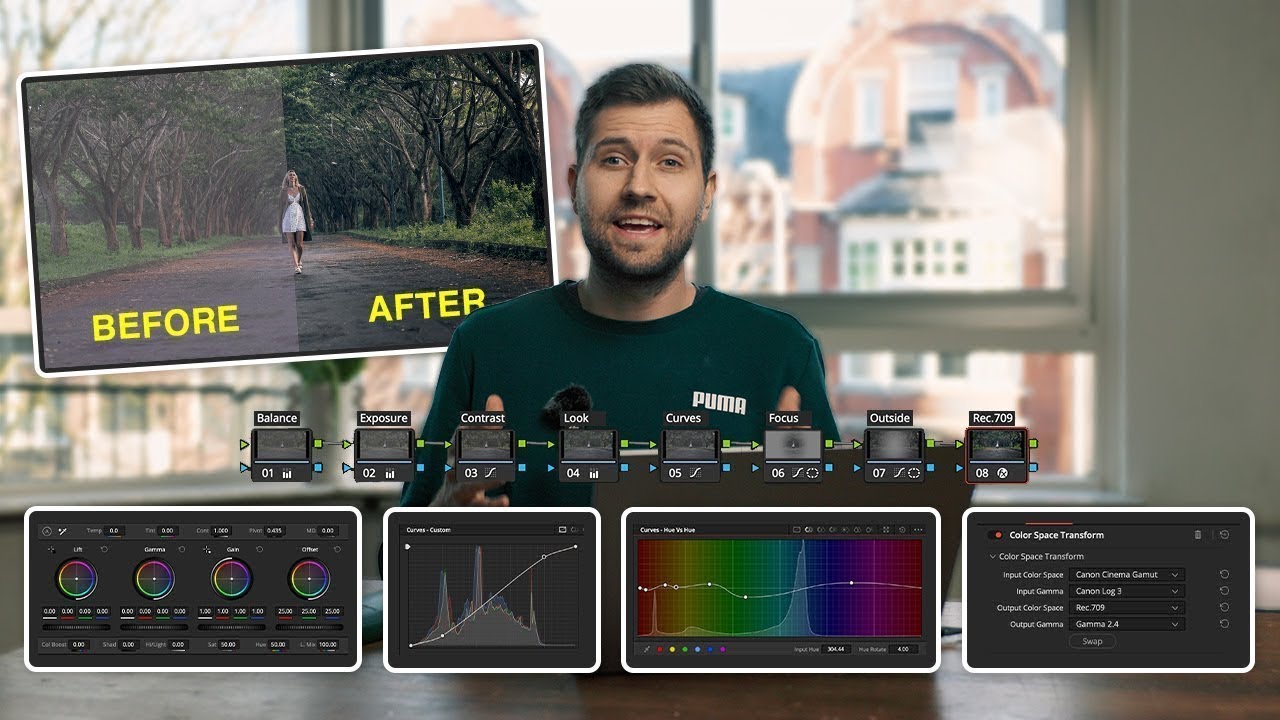
- 🔍 The workflow for color grading involves three steps: converting log footage to Rec 709 or BT 2020, color correcting or matching clips, and adding a creative look or grade.
- 🚀 Tips on speeding up the color grading process by using LUTs, which can drastically reduce the time spent on grading.
- 📈 The benefits of shooting in log, including more data capture, forgiveness in exposure, and greater flexibility in post-production.
- 🖥️ The impact of using a high-quality display for accurate color grading, with a mention of LG's 32-inch 4K OLED display for professionals.
- 🛠️ Techniques for color correction, such as adjusting the entire section of the video at once using an adjustment layer, to save time.
- 📊 The use of scopes like waveform and vector scope for accurate color grading, emphasizing their reliability over human eyes.
- ⚙️ Additional tips on color grading, such as desaturating shadows for a more natural look and the subtle yet significant impact of minor adjustments.
Q & A
What is color grading and why is it important for video quality?
-Color grading is the process of adjusting and enhancing the color of a video to achieve a desired look and feel. It's important for video quality because it allows for the correction of color imbalances, the addition of creative styles, and the optimization of contrast and saturation, resulting in a more professional and visually appealing final product.
Why should one use a log profile when shooting videos?
-A log profile should be used when shooting videos to capture the most data from the camera. It provides more flexibility in post-production by offering a greater dynamic range and forgiveness in exposure, which means minor overexposures or underexposures won't be as noticeable as they would be with a non-log profile.
What is the significance of using LUTs in color grading?
-LUTs, or Look-Up Tables, are used in color grading to apply a specific color style or correction quickly. They streamline the process by providing a base to work from, allowing for faster adjustments and a consistent look across the footage.
What are the three steps involved in color grading according to the script?
-The three steps involved in color grading are: 1) Converting log footage to a natural contrast and saturation using a conversion LUT, 2) Color correcting or matching the clips to ensure consistency, and 3) Adding a creative look or grade using a creative LUT.
Why is it recommended to apply the conversion LUT before the creative LUT in color grading?
-Applying the conversion LUT before the creative LUT ensures that the base color correction is applied first, which corrects the contrast and saturation of the log footage. The creative LUT is then applied on top to add the desired style or look, without affecting the initial color correction.
What is the purpose of using scopes in color grading?
-Scopes are used in color grading to provide an accurate representation of the image's exposure values and color distribution. They help in making precise adjustments to exposure, contrast, and color balance, ensuring that the final video looks consistent and professional.
What is the role of the waveform scope in color grading?
-The waveform scope shows the exposure values of an image, from the darkest shadows to the brightest highlights. It helps in determining whether the image is overexposed or underexposed and assists in adjusting the shadows, mid-tones, and highlights for a balanced exposure.
What is the vector scope used for in color grading?
-The vector scope is used to analyze the color distribution in an image. It helps in identifying if the colors are accurately represented and if the skin tones are following the correct color trajectory, ensuring natural and accurate colors in the final video.
Why is it advised to desaturate the shadows in color grading?
-Desaturating the shadows is advised because naturally, when an object is in deep shadow, it tends to lose color and appears black. By desaturating the shadows, the color grade becomes more realistic and avoids unnatural color casts in the darker parts of the image.
What is the significance of using an adjustment layer in color grading?
-Using an adjustment layer in color grading allows for global changes to be made across all clips in a video. This is efficient for making uniform adjustments, such as color correction or adding a look, without having to apply settings individually to each clip.
How can one make the color grading process faster and more efficient?
-One can make the color grading process faster and more efficient by using LUTs, creating presets for common adjustments, and relying on scopes for accurate color and exposure adjustments. Additionally, understanding the workflow and practicing color grading techniques can significantly speed up the process.
Outlines
🎨 Color Grading Workflow in Final Cut Pro
This paragraph introduces a video tutorial focused on color grading in Final Cut Pro. The speaker discusses the importance of color grading for high-quality video production and shares their streamlined workflow that takes only 5 to 10 minutes per video. They mention the release of a new LUT pack designed for Sony cameras, specifically for S-Log 2 and S-Log 3, and express their preference for certain looks within the pack. The paragraph emphasizes the ease and speed of using LUTs for color grading, especially for those shooting in log profiles, and touches on the benefits of shooting in log for better post-production flexibility.
📹 Utilizing LUTs for Efficient Color Grading
The speaker explains the process of using LUTs (Look-Up Tables) to convert log footage to a natural contrast and saturation, such as Rec 709 or BT 2020, which are standard for normal video color profiles. They detail the steps of adding a conversion LUT and then a creative LUT to an adjustment layer in the editing process. The paragraph highlights the importance of applying the conversion LUT first, followed by the creative LUT, and discusses the benefits of shooting in log for dynamic range and error tolerance during filming. The speaker also underscores the value of a high-quality display for accurate color grading.
🖌️ Creative and Technical Aspects of Color Grading
This paragraph delves into the creative and technical aspects of color grading, including the application of look or grade LUTs and the process of color correction or color matching. The speaker emphasizes the subjectivity of choosing a LUT style and the importance of the order in which LUTs are applied. They also discuss the use of scopes for accurate color grading, explaining how to use the waveform and vector scopes to ensure proper exposure and color saturation. The paragraph concludes with tips on desaturating shadows for a more natural look and the importance of using scopes over relying on the eyes for color accuracy.
🚀 Streamlining the Color Grading Process with Presets
The final paragraph focuses on streamlining the color grading process by using presets for LUTs and other adjustments. The speaker shares their method of creating presets to quickly apply their preferred color grading settings with a simple drag-and-drop action. They also mention the possibility of using different plugins and LUTs to find the best fit for individual needs. The paragraph concludes with a reminder to not be intimidated by log footage and to not neglect color grading, as it can significantly enhance the quality of the footage with minimal effort.
Mindmap
Keywords
💡Color Grading
💡Log Profile
💡LUTs (Look-Up Tables)
💡Rec 709 / BT 2020
💡S-Log 2 / S-Log 3
💡Dynamic Range
💡Adjustment Layer
💡Waveform and Vector Scope
💡Skin Tones
💡Desaturating Shadows
💡Film Convert
Highlights
The speaker discusses the importance of color grading in video production for achieving high-quality visuals.
They mention their optimized color grading workflow that takes only 5-10 minutes, emphasizing speed without compromising quality.
Introduction of a new LUT pack specifically designed for Sony cameras, offering five looks and ten conversion LUTs for S-Log 2 and S-Log 3.
Personal preference for the 'teal and orange filmic' and 'moody warm' looks from the new LUT pack.
A simple, fast, and easy color grading process for 2022 is outlined, focusing on shooting in log for better data capture.
Explanation of why log profiles are beneficial, offering more flexibility and forgiveness in post-production.
The three-step process of color grading: converting log footage, color correcting, and adding a look or grade.
A quick method to convert log footage to Rec 709 or BT 2020 using a conversion LUT for efficiency.
The significance of using a high-quality display for accurate color grading and the mention of LG's 4K OLED display.
How to add a creative look or grade LUT after the conversion LUT for a personalized video style.
The importance of applying the conversion LUT first, followed by the look LUT for correct color grading order.
Tips for color correcting footage, including using adjustment layers for efficiency and consistency.
Using scopes like the waveform and vector scope for accurate color grading instead of relying on eyes alone.
Techniques for achieving perfect skin tones by adjusting them to follow the flesh line on the vector scope.
The option to further refine the color grade with power windows for localized adjustments.
Adding film grain for a cinematic look using plugins like Film Convert, enhancing the final video quality.
Creating presets for a rapid color grading process, allowing for quick adjustments and consistency across videos.
Encouragement to not be intimidated by log footage and to prioritize color grading for enhancing video quality.
Transcripts
[Music]
what are you guys doing
playing games oh kookaburra what's wrong
are you okay
should we teach you about color grading
today do you know anything about color
grading um
no
[Music]
i think everybody misses you a lot
there's gotta go high five
[Applause]
[Music]
so
[Music]
ah
[Music]
[Applause]
note to self don't be lazy and scared of
the cold i thought you know it's cold
outside i'll just fly through the window
don't do that
the drone is fine though
good job buddy
i think we can all agree that we want
high quality colors in our videos done
fast we don't want to be spending hours
on color grading and you know how long
it takes me to color grade my videos
like 5 10 minutes at most my color
grading workflow over time has really
been optimized for speed while still
keeping a pretty professional high
quality look i figured out ways to do it
super fast and efficiently and that's
what i'm going to show you today i'm
going to be doing it in final cut pro
because that's what i've been using
lately although i have been thinking
about switching to premiere
is that a mistake oh and we just
launched a new lup pack made
specifically for sony cameras the cine
sony lup pack we made five looks and 10
conversion luts so you can work with s
log 2 or s log 3 really fast these are
the luts that i use exclusively and now
you have access to them too i absolutely
love the teal and orange filmic that's
what i've been using for like the last
few months but i also very very much
like the moody warm those are my
favorites but all five looks are really
great anyways this is how i color grade
in 2022
spoiler it's simple fast and pretty easy
now i'm gonna assume that all of us are
shooting in log because you really
should be using a log profile to get the
most out of your camera and it's not as
scary as you think it saves so much more
data while you're filming so that you
have more room in post to take it this
way or that way and it's more forgiving
while you're filming so if you
overexposed or underexposed a little bit
it's not gonna matter as much as if
you're not using a log profile you're
not gonna have as much information in
the highlights or the shadows and you're
just not going to get as much out of
your camera there's this idea that it's
so much harder working with log footage
in my opinion it's the exact opposite it
just gives you way more options and it
allows for some errors to be made while
you're filming i'll show you how to work
with log it's very simple i prefer s-log
3 right now and i made a whole video
about my sony camera settings if you're
interested color grading consists of
three steps first you're gonna convert
your log footage to a natural contrast
and saturation rec 709 or bt 2020 those
are just fancy versions for saying
normal amount of contrast and saturation
number two you're gonna color correct or
color match your clips and then number
three you're gonna add your look or
grade now for me i actually like to do
the color correcting last and at the end
of this i'm gonna show you a way to do
all three of these
even faster like lightning fast all
right number one what i do here is i've
finished my edit i'm gonna add an
adjustment layer over all of my footage
and i'm gonna add to it two custom luts
the first slot i'm gonna add is just the
conversion lut that's going to bring my
log footage to a good amount of contrast
and saturation in my case it's the s-log
3 madi special bam done
if you've been scared of log that's
basically it that's
that's it now you could add contrast and
saturation and tweak it yourself but
this is just so much faster and there's
other conversion luts for free that you
can find some of them are okay but
actually we made 10 different conversion
luts depending on which uh gamma profile
you're using s-log 2 or s-log 3 and then
for a few different color profiles for
example if you're using s-log 2 as
cinetone bam you just add that
conversion light you're ready to go it's
literally
that easy or if you're using my the the
maddie special it's s log 3 with s
cinetone add 15 saturation and sharpness
out minus one
you just add the conversion lot boom
done and there's even a dark version to
just give you a little bit more options
again speed is the key here step one
literally took two seconds don't spend
hours doing this each time just use a
lot and again
you might be asking why am i doing this
why am i not just filming with contrast
again two reasons if you make a mistake
exposing you can't get that detail in
the highlights or shadows back you're
screwed and then two you're getting more
dynamic range out of your camera which
is just like it's a key thing for a high
quality image to make it look good you
need more dynamic range so even though
you're adding that contrast and
saturation you could decide how much and
how much of the highlights you're
keeping and all of that oh and it really
helps to have a high quality bigger
display to see exactly what you're doing
while you're color grading this isn't
sponsored but lg sent me this 32 inch 4k
oled display for design and video
professionals it's really nice to color
grade with they also sent me this
ridiculously
big monitor
which uh
look at all the screen real estate like
look at that timeline it's not i could
be doing so much at once tyler's been
absolutely loving this thing having a
good display is huge because you could
color grade absolutely perfectly but if
your display is not good and doesn't
show colors accurately when other people
see that footage they're going to be
like
what were you doing with your color
grade and it's something that we can't
fully avoid even if you use the best
monitors it's still somebody's going to
be watching it on some other weird
random color profile and all of a sudden
your skin tones are so saturated it's
just something that you have to deal
with but it does help to have a great
display so that you are
starting from a good place step two is
to add your look or grade lut and this
is completely creative and subjective to
your style there are some like color
sciency things that make certain color
grades look better but this is 100
percent creative subjective and we made
five different looks in the cine sony
lip pack there's cold vibes which has
this nice cool tones look then there's
warm moody which i really like and i try
to name these so they're kind of obvious
what they do and not just some like
random name that you're like wait what
was that again you have to like try it
out you know that warm moody is gonna be
warm and moody soft filmic has kind of
this california warm teal and orange
glowy look to it really cool neutral
film mick this one is pretty light and
gives a nice cinematic look but it's not
heavy-handed at all and finally my
favorite is the teal and orange filmic
this is what i've been using for months
now jake really killed it on these we
were working back and forth with them
and you could use these luts on any
camera but the conversions are for
specifically sony cameras working in
s-log 2 and s-log 3. key thing here is
make sure that the conversion lut is
being applied first and then your look
after that that's very very important
you don't want to be
converting the lut look on final cut
that means you want to have the
conversion at the top and then the look
under that if you're using premiere you
can actually put the conversion lut in
the basic settings and then the creative
you can use whatever look light you want
and the best part about this workflow is
that you can dial in the look lut you
can turn it down or turn it up as you
like without changing the contrast and
saturation whereas if everything was on
one light you would dial it in dial down
a little bit and it would change the
contrast and saturation then you'd have
to go back and add contrast and
saturation and all that stuff this is
way better way faster and look at the
difference
all i did was add two let's took me two
seconds and look at the difference it
looks great already and i'm gonna show
you how to do this even faster at the
end step three is to color correct or
color match your footage and this is the
hardest part it's the part that takes
the most practice and now a lot of times
i do just add the two luts and i'm like
that looks good that looks great i just
go with that but if you want to go the
extra 10 20 then you're gonna need to
color correct especially if your
shooting wasn't that good and the way i
usually do this is if a bunch of clips
all have the same issue then i'm gonna
do that color correction straight on the
adjustment layer i might cut the
adjustment layer for the different
scenarios in my video but this means i
don't have to go through each clip and
add a color correction to that one and
that one that one i can just do it all
at once for that section for example if
i wanted this to look a little bit
warmer quick adjustment done on the
whole thing or you can see this section
is a little bit too blue and dark and
desaturated we can just make those
adjustments really quickly to the
adjustment layer boom done ready to go
and again it's very important that this
adjustment comes before your look and
your conversion lut it would be right at
the top first thing you want to affect
your footage and if you want just a
little bit more quality even though i
love the teal and orange look it's just
not natural to have blue in the deep
dark black areas of your image naturally
when we see things and something is like
really dark black there's no color to it
and so you shouldn't have this blue tint
over all of the really dark areas on
your video but it's actually really easy
to solve this you just need to
desaturate your shadows and maybe even
your highlights just take your hue
saturation curve go to the luma versus
saturation and this is your saturation
from the shadows to the highlights you
can bring up or down the saturation of a
specific exposure on your clip so we can
just go to the shadows and bring that
down
and there we go we've desaturated the
darkest parts of our image it's very
subtle
but it's these little changes that make
a really big difference in the end just
make sure you're not desaturating your
mid tones and make sure this is being
added last you don't want to be
introducing colors after this so this
should be the last thing on your list of
corrections and then go through each of
those sections and make sure the clips
match each other in both exposure
contrast and in colors and saturation
pro tip here is to use scopes our eyes
constantly lie to us they get used to
colors and maybe there's you know a blue
light shining and so your eyes will
actually adjust to all of those things
but scopes never lie they always tell
the truth and that's why you really need
to get used to relying on these scopes i
love the waveform and the vector scope
the waveform just shows your exposure
values from zero ire which is the
darkest on the bottom to a hundred ire
which is the brightest on the top and so
you can see really quickly whether
you're overexposed or underexposed
basically you would want your shadows to
be touching that zero ire and your
highlights if you have something really
bright like the sun that should be
touching the 100 ire there is some
nuance to that but that's kind of the
basics if the contrastor exposure looks
different on one clip just open up your
waveform and check out are your are your
shadows raised or are your highlights
too crushed and then fix it and notice
as you adjust the shadows you're also
adjusting the mid tones and maybe even
the highlights a little bit and same
thing if you're adjusting the highlights
it's going to affect different parts of
your image so you kind of have to go
back and forth and finesse them you
can't just do one adjustment and then
you're done and for colors we want to
use the vector scope and this is really
just showing you where your colors are
shifting to they should be around that
center dot and then the further out they
go the more saturated your image is the
key thing we're looking at here is the
skin tones and there's actually this
little flesh line and so all skin tones
no matter what your complexion should
follow this flesh line if they're not
then your skin tones are going to be
looking too green or too magenta and
protip here is if you're like i don't
know what's going on here just take a
mask mask around your skin tones and now
you know exactly where your skin tones
lie and then you can just make the
adjustments so that the skin tones are
on that flesh line that's how you get
perfect skin tones every time i'm gonna
make a whole video on how to deal with
skin tones because that's probably the
hardest thing about color correcting and
color grading in general
we could go on forever about this but
that's basically all i do now you could
go further with your color grade and do
things like power windows and affect
certain areas of your image separately
but honestly for most of my videos i do
these adjustments pretty quickly the
only other thing i've been doing lately
is adding a little bit of grain using
film convert i don't actually use their
looks but i like how
grain can be applied with their plug-in
because you can affect uh what parts
what exposures it's affecting and how it
affects it
i don't know it just gives it a little
bit of a film look so that's my little
extra spice it is a paid plugin so
uh it's really good but you don't need
it there's other ways to do
grain also but that's it super easy add
the conversion lut add your look let's
small adjustments that's it how do you
do this faster well of course use those
luts like i showed you but once you have
this set up just make a preset then it's
literally just drag drop adjust a tiny
bit you're done like it's that fast and
that's how i'm able to color grade a
whole video within just a few minutes
and remember you don't have to use my
luts i i really like my luts and i think
you will also but there's tons of luts
and conversion luts and all of that
stuff out there find what works best for
you but i really highly recommend using
luts and then figure out what plugins
you want to use which ones you like best
and make a preset and then just drag and
drop done that's the same thing i do
with my audio i have audio presets if
you didn't know i just drag and drop
done sounds way better than just
straight out of camera and it took me
two seconds to drag and drop that don't
be scared of log and do not neglect your
color grade because with really little
effort very fast you can make your
footage look so much better get
everything you can out of your footage
okay that's it for me i'll do a whole
video on how i deal with skin tones but
i hope this helped you like it has for
me it's taken years to streamline it
like this hopefully it doesn't take you
years just watch this video and start
doing it alright see you guys
[Music]
you
Ver Más Videos Relacionados
How To Install USER LUTs On Sony Cameras: a6700, ZV E1, a7c II, FX3, FX30
Color Grading 101 - Everything You Need to Know
The Secret Formula for Cinematic iPhone Videos
Working with HLG / Sony Color Modes / Matching Picture Profiles - FAQ
COLOR GRADING Techniques to bring FOCUS to Anything.
DJI Osmo Pocket 3 is a Fantastic YouTube Studio Camera!
5.0 / 5 (0 votes)