Pressure Testing Cooling Systems -EricTheCarGuy
Summary
TLDRIn this video, Eric the Car Guy tackles a 1999 Honda Civic with an overheating issue, focusing on diagnosing and repairing cooling system leaks. He emphasizes the importance of checking for air in the cooling system and demonstrates how to pressure test the system to identify leaks. Eric uses a pressure tester and explains the process of adding pressure up to the radiator cap's rating. He identifies a leak in the radiator and suggests common areas to check for leaks, including hoses, heater core, and head gaskets. The video concludes with advice on verifying repairs and provides links to additional resources for automotive repair.
Takeaways
- 🔧 The video is part of a series on basic car diagnosis and repair, focusing on a 1999 Honda Civic with an overheating issue.
- 🌡️ The initial step in diagnosing an overheating problem is to check for air in the cooling system, as air can cause many overheating issues.
- 💡 Pressure testing is a method used to test the integrity of a sealed cooling system, which needs to hold pressure to cool efficiently.
- 🛠️ The pressure tester tool is used to add pressure to the cooling system, and different adapters are available for various types of radiator caps and expansion tanks.
- 🚫 It's crucial not to exceed the pressure rating specified on the radiator cap to avoid damaging the cooling system.
- 🧐 The video demonstrates how to use a pressure tester on a vehicle, highlighting the importance of topping off the radiator before testing.
- 💧 The presence of leaks can be identified by observing if the system can hold pressure, with a steady pressure indicating no leaks.
- 🔍 If a leak is suspected, areas to check include hoses, heater hoses, connections at the firewall, the heater core, and gaskets.
- 🔗 The video provides links in the description for additional resources, including videos on bleeding cooling systems, checking for overheats, and head gasket issues.
- 🌐 Eric the Car Guy's website, ericthecarguy.com, offers more information on automotive repairs and can be found on social media platforms like Facebook and Twitter.
Q & A
What is the first step to diagnose an overheating problem in a car?
-The first step to diagnose an overheating problem is to check for air in the cooling system.
Why is it important to check for air in the cooling system?
-Many overheating problems are caused by air getting into the cooling system, which can prevent it from cooling efficiently and cause coolant to boil at a lower temperature.
What is pressure testing and why is it done?
-Pressure testing is a process done to test the integrity of a sealed cooling system. It ensures the system can hold pressure, which is necessary for efficient cooling and preventing leaks.
What tool is used for pressure testing a cooling system?
-A pressure tester is used for testing the cooling system. It can have different configurations and adapters to fit various types of radiator caps and expansion tanks.
How do you determine the correct pressure to add during pressure testing?
-The correct pressure to add during pressure testing is indicated by the radiator cap's pressure rating. It's important not to exceed this pressure to avoid damaging the system.
What should you do before starting the pressure test on a car's cooling system?
-Before starting the pressure test, top off the radiator with coolant or water to ensure accurate results and prevent the system from taking too long to build up pressure.
How can you tell if a cooling system is holding pressure during a test?
-If the pressure tester's needle remains steady and the system holds the pressure for about 5 minutes, it likely indicates that there are no leaks in the system.
What are some signs of a faulty heater core?
-Signs of a faulty heater core include an icky film on the inside of the windshield when the defroster is on, a maple syrup or coolant smell, and wet, greasy-feeling floorboards on the passenger side.
What should you do if the cooling system holds pressure after a leak is found and repaired?
-After repairing a leak, recheck the system for any signs of overheating and perform another pressure test to ensure the repair was successful and the system maintains its integrity.
What other components should be checked if the cooling system cannot hold pressure after a radiator replacement?
-If the cooling system cannot hold pressure after a radiator replacement, check other components like hoses, connections at the firewall, the heater core, and gaskets where coolant passes, such as the intake manifold and throttle bodies.
Outlines

Esta sección está disponible solo para usuarios con suscripción. Por favor, mejora tu plan para acceder a esta parte.
Mejorar ahoraMindmap

Esta sección está disponible solo para usuarios con suscripción. Por favor, mejora tu plan para acceder a esta parte.
Mejorar ahoraKeywords

Esta sección está disponible solo para usuarios con suscripción. Por favor, mejora tu plan para acceder a esta parte.
Mejorar ahoraHighlights

Esta sección está disponible solo para usuarios con suscripción. Por favor, mejora tu plan para acceder a esta parte.
Mejorar ahoraTranscripts

Esta sección está disponible solo para usuarios con suscripción. Por favor, mejora tu plan para acceder a esta parte.
Mejorar ahoraVer Más Videos Relacionados
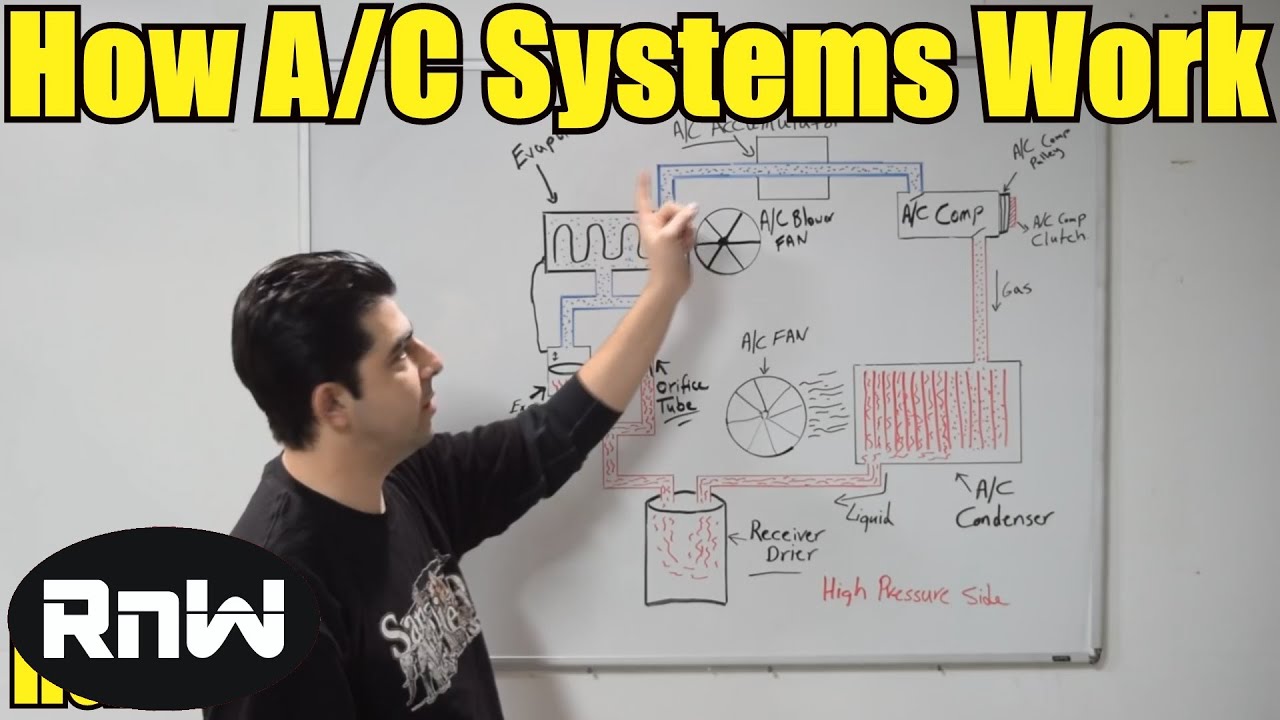
How a Car AC System Works - For Beginners

Pemeliharaan Kendaraan Ringan Sistem Injeksi (Tambahan) Sistem Rem (FATUR RAHMAN)
Automotive Electrical System Basics - EricTheCarGuy

SISTEM PENDINGIN, Part 4: Cara Kerja Sistem Pendingin (Konvensional)

Branick 7600 Spring Compressor Review -EricTheCarGuy

2025 Honda Civic: The Future of Affordable Performance?
5.0 / 5 (0 votes)
