MEMBUAT ALARM BANJIR SEDERHANA

School Science Center SPJ
7 Sept 202118:52

Summary

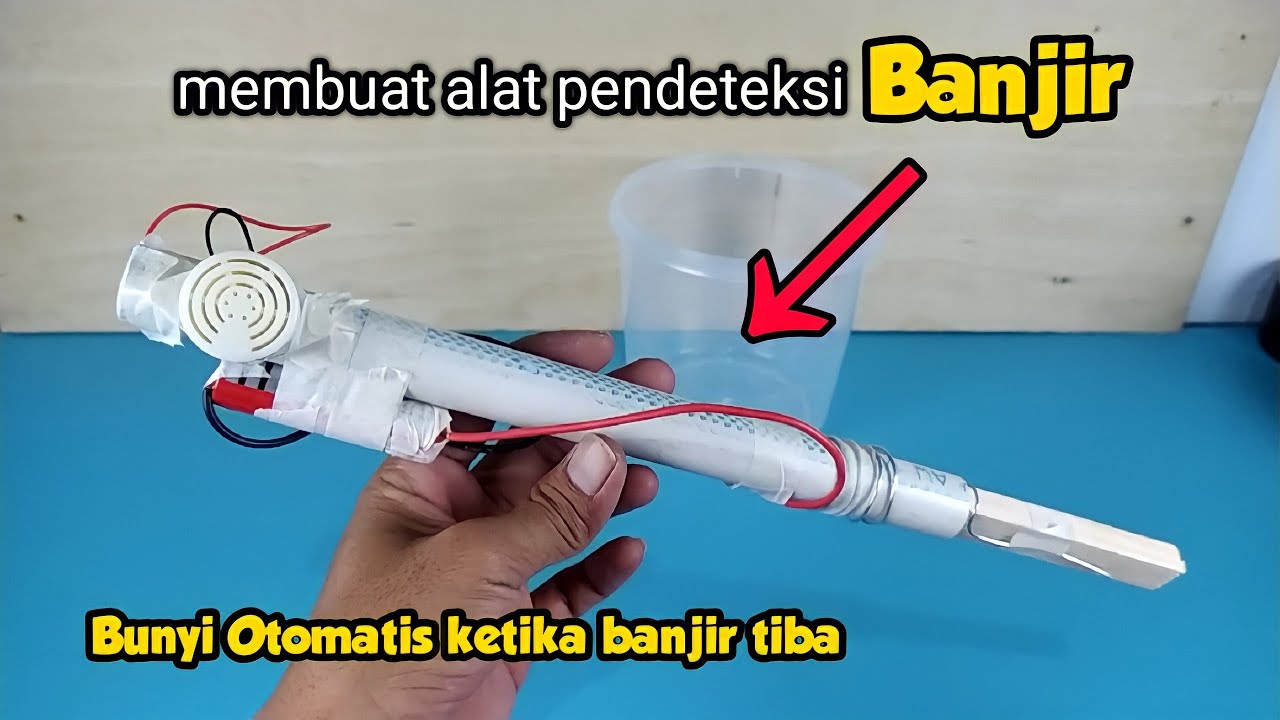
TLDRIn this video, viewers are guided by Bapak SQ through the process of creating a simple flood alarm. The aim is to detect floods early by using a battery, wire, Styrofoam, and aluminum foil. The alarm is assembled into a box with a small and large straw to sense water level rise. When the water touches the alarm, it will sound, indicating a flood. The tutorial is practical, emphasizing safety and seeking adult help for cutting parts. The final test shows the alarm successfully detecting water level increases, providing an early warning system.

Takeaways

  • 😀 The video is a tutorial from School Center Sekolah Pembangunan Jaya, introducing a simple flood alarm device.
  • 🛠️ The main purpose of the flood alarm is to detect rising water levels early to alert people of potential flooding.
  • 🔋 The materials required for the project include a single-use battery, wires, scissors, a ruler, string, Styrofoam, plastic wrap, a small and large diameter straw, aluminum foil, and a marker.
  • 📏 The dimensions for the box are specified as 3 cm by 4 cm, with specific points marked for drilling holes.
  • ✂️ Safety is emphasized when using a cutter, suggesting that children ask for adult assistance to avoid injury.
  • 🚿 The straws are cut to specific lengths, with the larger one being 10 cm and the smaller one being 16 cm, to fit into the holes in the box.
  • 🔩 The assembly process involves attaching the straws to the box and ensuring they stand upright for proper functioning.
  • 🏷️ Aluminum foil is used to cover the Styrofoam, and a marker is used to label the parts for clarity during assembly.
  • 🔌 The electrical wiring involves connecting a black wire from the battery to the circuit and a red wire to the floor, with careful placement to ensure the alarm works correctly.
  • 💧 The flood alarm is tested by simulating a flood condition, where the rising water level causes the alarm to sound, indicating a high water level.

Q & A

  • What is the main purpose of the simple flood alarm being made in the script?

    -The main purpose of the simple flood alarm is to detect floods early so that people can be alerted in advance when a flood occurs.

  • What are the materials required to make the flood alarm according to the script?

    -The materials required include a single-use battery, wire, scissors, a stick, string, a small and large diameter straw, plastic wrap, aluminum foil, and a marker.

  • What is the size of the box that needs to be made for the flood alarm?

    -The size of the box is 3 cm by 4 cm, meaning it is 30 cm long and 4 cm wide.

  • How far apart should the two points be that are marked on the box?

    -The distance between the first and second points marked on the box should be 4 centimeters.

  • Why is it recommended to ask for adult help when using a cutter in this project?

    -It is recommended to ask for adult help when using a cutter because it can be dangerous, and children should be supervised by an adult to ensure safety.

  • What is the length that the large diameter straw should be cut to?

    -The large diameter straw should be cut to a length of 10 centimeters.

  • How long should the small diameter straw be cut for the flood alarm?

    -The small diameter straw should be cut to a length of 16 centimeters.

  • What is the purpose of the aluminum foil and styrofoam in the flood alarm project?

    -The aluminum foil and styrofoam are used to create a barrier that will be affected by the rising water level, triggering the alarm when the water reaches a certain height.

  • How are the battery and wires attached to the styrofoam in the flood alarm?

    -The battery and wires are attached to the styrofoam using glue and are positioned such that the wires will make contact when the water level rises and the floating straw touches the upper styrofoam piece.

  • What happens when the water level rises and the small straw touches the upper styrofoam piece in the alarm?

    -When the water level rises and the small straw touches the upper styrofoam piece, the buzzer will automatically sound, indicating that the water level has risen and a flood is occurring.

  • What is the final step to test the flood alarm after assembling all the parts?

    -The final step to test the flood alarm is to simulate a flood by pouring water into the container and observing if the alarm sounds when the water level reaches the trigger point.

Outlines

00:00

🔧 Introduction to Flood Alarm Project

The video begins with an introduction to a DIY flood alarm project by School Center Sekolah Pembangunan Jaya, featuring Mr. SQ. The main objective of the project is to create a simple flood alarm to detect rising water levels early. The necessary materials include a single battery, wire, scissors, a stick, string, a small and large diameter straw, aluminum foil, and a marker. The first step involves creating a box with dimensions of 3x4 cm. After making the box, specific points are marked at a distance of four centimeters apart. The video then proceeds to demonstrate how to make holes in the box using a cutter, emphasizing the need for adult supervision due to the potential danger of the tool.

05:02

📏 Crafting the Alarm Structure

The second paragraph details the process of cutting a large diameter straw to a length of 10 cm and a smaller one to 16 cm. The straws are then prepared to be inserted into the holes made in the box. The video demonstrates how to stand the straws upright using tape and a marker to ensure they are straight. Next, the largest straw is inserted into the hole, leaving about 1 cm of the straw exposed above the box. The edges are then sealed with tape. The video also shows how to attach a piece of styrofoam and aluminum foil to the structure, securing them with tape. The process is carefully explained, with reminders to wait for the tape to dry before proceeding.

10:05

🔌 Wiring the Flood Alarm

Paragraph three focuses on the electrical assembly of the flood alarm. It begins with the preparation of the electrical components, including connecting a black wire from the battery to the base and a red wire to the floor. The video instructs viewers to connect the red wire to the engineer, ensuring a complete circuit. The assembly is then tested by attaching the battery, and the video demonstrates how to attach the battery and wires to the styrofoam using tape. The process includes attaching the black and red wires to the bottom and top of the styrofoam, respectively, and securing them with tape. The video concludes with a test to ensure the alarm is functional and ready for use.

15:10

💧 Testing the Flood Alarm

The final paragraph demonstrates the testing of the flood alarm. It explains that the alarm works by detecting the rise of water levels. When the water level reaches the top of the styrofoam, the small straw will touch the longer straw, triggering the buzzer to sound, indicating a flood. The video shows a simulation of a flood by pouring water into the holes of the alarm. As the water level rises, the alarm is triggered, and the buzzer sounds, signaling that the alarm is working effectively. The video concludes with a reminder to always be prepared and to seek help when needed, and it invites viewers to join more experiments in future School Center videos.

Mindmap

Keywords

💡School Center

School Center refers to an educational institution or facility that provides learning resources and activities. In the context of the video, it is likely the place where the tutorial is being conducted, and it suggests that the video is educational in nature, focusing on a practical project. The script mentions 'School Center Sekolah Pembangunan Jaya,' indicating a specific institution where the activity is taking place.

💡Flood Alarm

A flood alarm is a device designed to alert people of rising water levels, typically used in areas prone to flooding. The main theme of the video is the creation of a simple flood alarm. The script describes the process of making this alarm, which is intended to detect floods early, thereby providing a practical solution to a common problem in areas susceptible to flooding.

💡Materials

Materials refer to the substances or ingredients required to make something. In the video script, various materials are listed as necessary for constructing the flood alarm, such as a battery, wire, scissors, glue, straws of different diameters, aluminum foil, and a marker. These materials are essential for the viewers to follow along and replicate the project at home.

💡Measurement

Measurement is the process of determining the size, amount, or degree of something. The script provides specific measurements for constructing the flood alarm, such as the box size being 'three times 4 cm' and the distance between certain points being 'four centimeters.' These measurements are crucial for ensuring that the flood alarm is built to the correct specifications and functions as intended.

💡Cutting

Cutting involves using a tool, like scissors or a cutter, to separate an object into parts. In the script, cutting is mentioned in the context of creating holes in the box and shaping the materials needed for the flood alarm. This is a key step in the assembly process, demonstrating the hands-on nature of the project.

💡Straw

A straw is a tube used for sucking up liquids. In the video, straws of different diameters are used as part of the flood alarm mechanism. The script specifies measuring and cutting straws to specific lengths, indicating their importance in the functioning of the alarm, likely as a way to detect water levels.

💡Glue

Glue is a substance used for sticking objects together. The script mentions using glue to secure various components of the flood alarm, such as the straws and the battery. Glue is essential for assembling the project and ensuring that all parts stay in place.

💡Styrofoam

Styrofoam is a type of foam plastic often used for insulation or as a packaging material. In the script, styrofoam is used as part of the flood alarm's construction, likely to provide buoyancy or to elevate certain components. The use of styrofoam is indicative of the creative and resourceful approach taken in the project.

💡Aluminum Foil

Aluminum foil is a thin sheet of aluminum used for various purposes, including cooking and crafts. The script mentions using aluminum foil in the construction of the flood alarm, possibly for its reflective properties or to create a waterproof seal. This material choice shows the versatility in the materials used for the project.

💡Electrical Circuit

An electrical circuit is a path through which electric current flows. The script describes the process of creating an electrical circuit for the flood alarm, involving connecting a battery with wires. This is a key aspect of the alarm's functionality, as the circuit will power the alarm when the water level rises and completes the circuit.

💡Simulation

Simulation refers to the act of imitating a real situation or process. In the script, simulation is mentioned in the context of testing the flood alarm by pouring water into a container to mimic a flood. This step is crucial for demonstrating how the alarm would work in a real-life scenario and ensuring that it functions as intended.

Highlights

Introduction to creating a simple flood alarm with Mr. SQ.

Purpose of the flood alarm is to detect floods early.

List of materials needed: single battery, wire, scissors, glue, straws, tape, Styrofoam, plastic wrap, aluminum foil, and a marker.

Instructions to create a 3x4 cm box for the alarm casing.

Marking points on the box for future assembly steps.

Cutting the box with a cutter, emphasizing safety with adult supervision.

Marking and cutting the straws to specific lengths for the alarm mechanism.

Assembling the straws and ensuring they stand upright within the box.

Attaching the straws to the box with glue for stability.

Preparing the Styrofoam and aluminum foil for the alarm's float mechanism.

Instructions on attaching the Styrofoam and aluminum foil to the straws.

Setting up the electrical circuit with the battery and wires.

Connecting the red and black wires to the battery and the alarm buzzer.

Securing the wires and battery to the alarm box with glue.

Final assembly and testing of the flood alarm in a simulated flood condition.

Demonstration of the alarm's functionality when the water level rises.

Conclusion of the flood alarm creation tutorial with a reminder to seek adult help if needed.

Transcripts

play00:00

yo yo

play00:02

cewek

play00:08

Halo semua apa kabar kembali lagi dengan

play00:11

school center sekolah Pembangunan Jaya

play00:14

kenalkan nama bapak SQ dan Pada

play00:18

kesempatan ini kita akan membuat alat

play00:21

peraga alarm banjir sederhana tujuannya

play00:25

membuat alarm hanya

play00:27

yaitu agar kalian ketika

play00:31

terjadi banjir kalian bisa mendeteksinya

play00:35

lebih awal

play00:37

Oke Langsung aja kita ke alat dan bahan

play00:40

yang dibutuhkan

play00:42

ada baterai single dan kancing

play00:46

baterai kemudian ada gunting

play00:49

Sumpit ada

play00:51

garis ada

play00:54

Hai

play00:55

steropong ada flash plastik ada

play01:01

lem tembak ada sedotan yang diameter

play01:05

kecil dan diameter besar biasanya

play01:08

alumunium foil dan aja spidol

play01:12

Baiklah langsung saja kita masuk ke

play01:16

langkah kegiatan

play01:19

Baiklah Langsung aja kita masuk ke

play01:21

langkah yang pertama membuat

play01:24

alarm banjir Nah kita siapkan dulu

play01:29

ya dan tutupnya kalau kalian lihat di

play01:33

sini di sini ada kotak

play01:36

nah kalian nanti bikin kotak ini

play01:39

ukurannya adalah tiga kali 4 cm

play01:44

berarti panjang Irfan lebarnya 30

play01:50

Hai kemudian kalau kalian lihat di sini

play01:52

ada juga titik

play01:54

Setelah kalian bikin kotak di sini

play01:56

kalian bikin juga titik ini nah Jarak

play01:59

antara titik pertama ke titik kedua ini

play02:04

Empat senti

play02:05

[Musik]

play02:07

Baiklah Langsung aja kita mulai yaitu

play02:10

kita akan melubangi

play02:12

kotak yang ada di tutup toples ini yang

play02:16

ukuran 4kg 3 cm dengan menggunakan

play02:20

cutter nah padesky

play02:22

himbau bahwa penggunaan kateter ini

play02:25

kalian lebih baik meminta bantuan orang

play02:28

dewasa meminta bantuan Papa meminta

play02:32

bantuan Mama karena ini sangat berbahaya

play02:35

Tia OK kita mulai aja

play02:40

hai eh kita mulai mengubah ini sini

play02:46

[Musik]

play02:57

Baiklah sudah kita

play03:01

Ayo kita lubangi

play03:03

seperti ini jadinya kotak ini

play03:08

nah kemudian langkah selanjutnya

play03:11

kita akan melubangi lagi yaitu titik

play03:15

yang ada disebelah sini

play03:18

Hai Anjing ada dua titik kita akan

play03:20

lubangnya disiangi sebelah kirimu

play03:23

Hai

play03:23

Sebesar apa nanti lubangnya akan sebesar

play03:27

diameter sedotan yang ini diameter

play03:32

sedotan besar

play03:32

[Musik]

play03:46

Hai setengahnya segini

play03:50

Hai

play03:53

Syiah sudah dilubangi dan

play03:56

sedotannya sudah bisa kita masukkan

play04:00

Oke selanjutnya kita siapkan sedotan

play04:03

berdiameter besar yang sedotan dan

play04:06

dengan diameter yang kecil dan sempit

play04:10

namun Cup sepenting diameter besar kita

play04:13

ukur dia 10 cm

play04:19

KYT

play04:21

identik Cak

play04:24

sini kau pria

play04:30

di sepanjang 10 cm Benci Tapi tanda

play04:34

disini

play04:36

kemudian the gunting

play04:40

hai oke sudah diberi tanda kita gunting

play04:44

Oke

play04:46

kemudian yang sedotan kedua diameter

play04:51

kecil ini

play04:53

kita ukur panjangnya 16 cm2

play05:01

itu pertanda

play05:04

kemudian kita gunting kain

play05:09

Hai

play05:11

Yeh Din Sumpit Sumpit itu

play05:16

kita ukur panjangnya 10 cm

play05:22

panjangnya 10 service

play05:26

Hai selangkangan di bawah supaya mudah

play05:29

Korea

play05:30

ini kita beritanya

play05:33

hai hai

play05:35

[Musik]

play05:37

hai hai

play05:40

[Musik]

play05:56

Hai 10 senti di 10 centini 16 cm

play06:03

Ki sekarang kita ambil

play06:06

Sumpit yang sudah dipotong kemudian kita

play06:09

letakkan di titik yang ada ya sudah kita

play06:12

beri Tante tadi steam ini ya lurus ya

play06:17

kita

play06:20

kita dirikan

play06:22

lurus jangan sampai miring-miring

play06:27

Hai banget

play06:28

kmudian kita lem tembak supaya dia bisa

play06:31

berdiri

play06:33

[Musik]

play06:49

Nah kita lihat setelah tadi kita lem

play06:52

tembak dibagian bawahnya sekarang sudah

play06:55

kering kemudian langkah selanjutnya kita

play06:58

siapkan sebutan ini terbesar kita

play07:02

masukkan ke

play07:03

lubang yang sudah disediakan ya

play07:07

oke nah kita masukkan tapi Sisakan

play07:11

diatas Sisakan

play07:14

sedotan ini di atas kurang lebih satu

play07:17

sentimeter di atas ya kurang lebih 1 cm

play07:22

di sini kemudian pinggirnya kita

play07:27

berikan lem tembak

play07:30

[Musik]

play07:42

oke baiklah kita tadi sudah

play07:46

lem tembak-tembak dan sekarang sudah

play07:49

kering selanjutnya kita akan tetap kita

play07:53

seneng-seneng yang pertama itu kita

play07:56

siapkan sedotan yang diameter kecil

play07:59

kemudian ada sterofom di sini

play08:02

kita letakkan di tengah-tengahnya

play08:05

kemudian kita by supaya

play08:12

lebih mengelilingi

play08:16

[Musik]

play08:22

Halo

play08:25

sesok sambil menunggu ini kering

play08:28

kemudian kita lihat di sini ada

play08:30

styrofoam kemudian di sini ada aluminium

play08:33

foil by ingin menempel sini seperti ini

play08:39

Nah dengan menggunakan genteng

play08:43

oke ya beri lem tembak

play08:47

[Musik]

play08:49

hai sedikit saja tidak usah tidak perlu

play08:52

banyak-banyak kamu

play08:53

[Musik]

play08:56

Hai seperi di pinggirannya

play08:58

[Musik]

play09:02

hai hai

play09:04

Oh ya cukup

play09:07

Letakkan

play09:09

diatasnya ini juga

play09:12

[Musik]

play09:17

Hai semuanya kita tunggu kering dan

play09:19

selanjutnya ini juga ada sterofom ke

play09:23

lebih enak sih

play09:31

hai hai

play09:37

cukup

play09:39

install akan

play09:42

sebelumnya fly di atasnya hati-hati lem

play09:45

tembaknya panas jangan sampai terkena

play09:47

lem

play09:48

[Musik]

play09:50

Hai tipe sudah kering kita singkirkan

play09:53

dulu ya kemudian kita ambilnya gini dan

play09:57

kita lepas

play09:59

three

play10:00

nah kemudian kita masukkan dari bawah ya

play10:04

eh

play10:07

Hai mungkin itu kita masukkan dari bahwa

play10:10

[Musik]

play10:13

agenbni46 nya kita tempel dia dengan

play10:16

sterofom gini kita

play10:20

apa namanya kita lem dengan Lenteng

play10:25

sih

play10:27

Hai Nikita harus

play10:29

[Musik]

play10:30

tampilannya namanya seperti ini

play10:33

kalau kamu tidak ke suara kalau kamu

play10:37

menemukan kesulitan boleh minta bantuan

play10:40

dengan

play10:42

manfaat ngomongnya biar lebih mudah

play10:48

Rizky bisa sendiri Tapi kalau kamu

play10:50

kesulitan kamu bisa minta bantuan orang

play10:55

lain

play10:55

[Musik]

play10:57

untuk membantu and tembak dibagian bawah

play11:02

hai hai

play11:05

Hai lihat sini sudah kering Ya sudah

play11:08

nempel dan segini nanti jadinya

play11:12

Hai Oke selanjutnya ciptakan pasang yang

play11:17

xeroform ini ke Sumpit

play11:20

Cara pasangnya seperti ini

play11:24

kemudian nanti di lem tembak

play11:28

[Musik]

play11:31

Hai Oke

play11:32

kalau kalian kesulitan kalian bisa minta

play11:37

tolong orang dewasa ya Papa atau Mama

play11:41

[Musik]

play11:49

Kin sekarang sudah kering seperti ini

play11:52

kemudian kita masukkan ke

play11:57

Hai ini

play11:59

kita bincangkan

play12:01

Hai

play12:03

Baiklah selanjutnya kita akan merangkai

play12:05

rangkaian listrik kita langsung saja

play12:08

kita mulai

play12:10

masang kabelnya dimana kabel hitam dari

play12:14

baterai

play12:16

[Musik]

play12:18

kabel dan

play12:23

[Musik]

play12:31

hai hai

play12:33

hai hai

play12:34

[Musik]

play12:39

hai hai

play12:44

hai hai

play12:49

ampuh

play12:54

[Musik]

play12:56

ingin kau disini kita siapkan kabel

play12:59

merah ke Sambungkan dengan kabel merah

play13:02

yang ada di lantai

play13:08

Hai

play13:10

[Musik]

play13:19

najmuddin kiri cabe merah ini kita

play13:23

sambung lagi ke kabel

play13:26

Insinyur ini

play13:30

hai hai

play13:33

hai hai

play13:34

[Musik]

play13:46

Hai Oke sudah selesai rangkaiannya Giant

play13:49

kita akan tempelkan nya di toples

play13:52

baterainya blazer dan kita tempel juga

play13:57

kabel yang

play13:58

merah dan hitam bunyi untuk hitam itu

play14:03

dia di di bawah mimpi sterofom yang

play14:07

bawah model untuk merah setempel dia di

play14:10

sterofom yang atas sini

play14:14

kita buka

play14:17

oke baiklah kita tempel saja dengan

play14:20

menggunakan lem tembak

play14:22

kita akan menempel baterai

play14:28

[Musik]

play14:30

MPEG4 kan sih

play14:34

Oh

play14:35

ya kemudian kita

play14:39

ngajerit

play14:41

gini kita lem dulu dengan

play14:47

[Musik]

play14:49

nempel disini dan

play14:53

Hai ini sudah

play14:56

Nah Dian di sini ada kabel hitam dan

play15:01

merah

play15:02

dimana kabel hitam ini Kita tempel di

play15:04

bawah ya kalau kalian lihat sini ya dan

play15:09

praktikkan di bawah kemudian kabel

play15:13

merahnya ini kita tempel di atas

play15:15

[Musik]

play15:29

kita sudah jadi

play15:31

[Musik]

play15:33

Hai alatnya juga sudah jadi hal

play15:37

Hai mendeteksi alarm Lancip sini kita

play15:40

lihat aja baterai sebagai sumber

play15:44

ngetik jangan kemudian si ada bazar jadi

play15:47

ketika Nanti airnya sudah

play15:50

KMU tinggi Widya henti negeri ini akan

play15:54

bunyi memarkan bunyi bahwa pertanda

play15:56

bahwa

play15:58

air sudah naik tinggi

play16:01

itu oke sekarang Langsung aja kita coba

play16:04

simulasikan disini kondisi dimana

play16:08

akhirnya kosongnya kondisi dimana air

play16:11

kosong berarti kondisi dimana dia itu

play16:14

belum banjir

play16:15

Biasanya kan kalau banjir itu berarti

play16:18

permukaan air di sini kita udah siapkan

play16:21

air

play16:23

Nah langsung aja kita tuang ini simulasi

play16:26

jika terjadi banjir yaitu naiknya

play16:29

permukaan air kita tuangkan di lubang

play16:32

yang sudah kita

play16:34

ditutup yang sudah kita lebih the mulai

play16:37

[Musik]

play16:39

Hai

play16:40

[Musik]

play16:49

[Musik]

play16:52

nah sebelum sampai ke atas barizki

play16:56

Jelaskan dulu

play16:57

disini ketika air sudah naik kepermukaan

play17:01

sterofom yang ini lama-lama makin keatas

play17:04

makin mendekati sterofom yang panjang

play17:07

diatas

play17:08

semakin tinggi permukaan air semakin

play17:11

naik juga

play17:14

sterofom yang kecil ini nanti dia akan

play17:17

menyentuh stereo panen atas Ketika nanti

play17:21

sudah menyentuh diatas maka bazer

play17:23

otomatis akan bunyi maka menunjukkan

play17:25

bahwa

play17:27

banjir

play17:28

permukaan yang sudah tinggi naik karena

play17:31

bazarnya menyala berarti ini akan

play17:34

memberikan peringatan pada orang-orang

play17:36

yang ada di rumah atau yang ada di

play17:38

lingkungan tersebut bahwa telah terjadi

play17:41

banjir

play17:42

lanjutkan ya kita akan coba tambahin

play17:45

airnya ini

play17:49

[Musik]

play17:50

hai hai

play17:55

MP3

play17:58

Oh

play18:02

ya seperti itu

play18:04

melihat bahwa disini blazernya telah

play18:07

berbunyi

play18:08

hai hai

play18:11

Oh baiklah demikianlah percobaan kita

play18:14

pada hari ini dari school center sekolah

play18:17

Pembangunan Jaya yaitu membuat alarm

play18:20

banjir sederhana Sampai jumpa kembali di

play18:23

percobaan-percobaan school center

play18:26

berikutnya

play18:28

dadah er

play18:30

[Musik]

Rate This

5.0 / 5 (0 votes)

Etiquetas Relacionadas
Flood AlarmDIY ProjectSchool CenterEmergency AlertSafety DeviceCraftsmanshipEducational ActivityPreventive MeasureDisaster PreparednessCommunity Safety
¿Necesitas un resumen en inglés?