Weekly Worm Farm Check-In Aug 21, 2024
Summary
TLDRSteve from Urban Warm Company introduces a new series, the 'Weekly Worm Farm Check-In,' where he shares hands-on experience with his worm farm. He discusses the importance of temperature and moisture, identifies red wigglers versus Indian Blues, and demonstrates feeding the worms with a mix of food waste and pit moss. The video offers practical tips for maintaining a healthy worm bin and encourages viewers to share their feedback on this new format.
Takeaways
- 📹 Steve from Urban Worm Company introduces a new series of 'weekly worm farm check-ins' to share hands-on vermiculture experiences.
- 🌡️ Steve discusses the importance of monitoring both the external and internal temperatures of the worm farm, as well as the humidity, to ensure optimal conditions for the worms.
- 🐛 The video features a rubber-made bin with bedding, worms, and food waste, which is a simple setup for a worm farm.
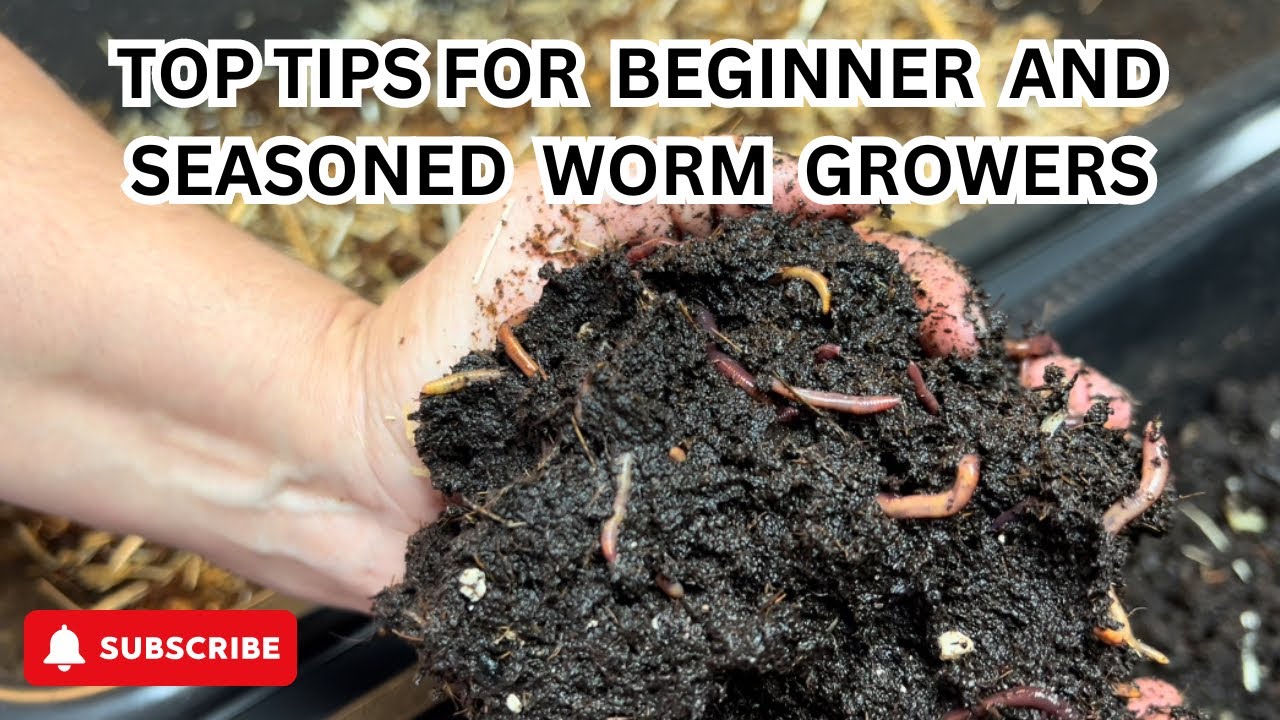
- 🔍 Steve highlights the difference between red wigglers and Indian blues, emphasizing the raised clitellum as a distinctive feature of red wigglers.
- 🍌 Steve demonstrates feeding the worm farm with a mix of food waste, including banana peels, apple cores, and coffee grounds, which are common in his household.
- 🌿 He introduces 'pit moss' as an alternative bedding material, which is made from recycled paper and helps to balance the moisture in the worm farm.
- 💧 Steve addresses the issue of excess moisture in the worm farm, explaining that it can lead to anaerobic pockets and affect the health of the worms.
- 👐 Steve shows that it's possible to be a 'lazy vermicomposter' by not chopping up the food waste and simply adding it to the bin as is.
- 🚫 He advises against adding too much water directly to the worm farm, as worms breathe through their skin and require a certain level of moisture, not saturation.
- 📈 Steve emphasizes the importance of mixing new food waste with existing material in the bin to ensure even distribution and breakdown of the waste.
- 📅 He plans to check on the worm farm again in about a week or two, indicating a regular monitoring schedule for maintaining a healthy worm farm.
Q & A
What is the purpose of the video by Steve from the Urban Worm Company?
-The purpose of the video is to provide a hands-on demonstration of maintaining a worm farm, including checking its conditions and feeding the worms, in a weekly check-in format.
What type of bin is used for the worm farm in the video?
-A simple rubber-made bin is used for the worm farm in the video.
What are the key aspects Steve checks in his weekly worm farm check-in?
-Steve checks the outside temperature, inside barn temperature, temperature and appearance of the vermicompost, what was fed last time, and any issues he observes.
How does Steve determine the type of worms in his worm farm?
-Steve determines the type of worms by looking for a raised clitellum and a yellowish tail, which are characteristics of red wigglers.
What is the ideal moisture level for a worm farm according to Steve?
-The ideal moisture level for a worm farm is around 70%, with only one or two drops of water when squeezed.
What does Steve use as a food source for his worm farm in the video?
-Steve uses a mix of banana peels, apple cores, coffee grounds, and possibly some pine needles as a food source for his worm farm.
What is the role of pit moss in the worm farm feeding process shown in the video?
-Pit moss is used as a dry bedding material to balance out the moisture from the wet vermicompost and food waste in the worm farm.
Why does Steve not worry about the moisture content of the coffee grounds?
-Steve does not worry about the moisture content of the coffee grounds because they do not hold much water and do not release a lot of water when they break down.
What issue can excess moisture cause in a worm farm?
-Excess moisture can cause anaerobic pockets in the vermicompost, which can be harmful to the worms and the composting process.
What material does Steve use to cover the worm farm, and why?
-Steve uses bubble wrap to cover the worm farm because it creates condensation on the underside, which helps to pull the worms higher and regulate moisture.
How often does Steve plan to check on the worm farm after the feeding shown in the video?
-Steve plans to check on the worm farm in about a week or two after the feeding.
Outlines
🌱 Introduction to Weekly Worm Farm Check-In
Steve from the Urban Worm Company introduces a new series called 'Weekly Worm Farm Check-In,' where he will provide hands-on demonstrations and discussions about maintaining a worm farm. He explains the setup of his simple rubber bin worm farm, which includes bedding, worms, and food waste. The weekly check-ins will cover the external and internal temperatures, the state of the vermicompost, feeding schedules, and any issues observed. Steve emphasizes the excitement viewers have for hands-on content and plans to provide practical advice and recommendations for worm farm maintenance.
🍌 Feeding the Worm Farm with Food Waste
In this segment, Steve demonstrates how to feed the worm farm using a mix of food waste, including banana peels, apple cores, and coffee grounds. He addresses the issue of excess moisture in the vermicompost by adding dry materials like pit moss to balance the moisture levels. Steve explains the importance of maintaining the right moisture content for the worms and how to adjust the feeding mix to accommodate this. He also discusses the benefits of using pit moss as a bedding material and how it compares to other options like coconut coir. The video shows a practical approach to worm farm maintenance, emphasizing the flexibility and simplicity of the process.
📅 Wrapping Up and Future Check-Ins
Steve concludes the video by discussing the frequency of future check-ins, which may not be strictly weekly due to the nature of worm farm maintenance. He invites viewer feedback on the new format and encourages them to subscribe for more content. He also hints at future topics, such as the use of different bedding materials like paper and coconut coir. The video ends with Steve covering the worm farm with bubble wrap to maintain moisture and regulate temperature, emphasizing the use of budget-friendly materials for effective worm farm management.
Mindmap
Keywords
💡Urban Warm Company
💡Worm Farm
💡Vermac Compost
💡Red Wigglers
💡Temperature
💡Humidity
💡Bedding
💡Food Waste
💡Moisture Content
💡Anaerobic Pockets
💡Bubble Wrap
Highlights
Introduction to a new series on the Urban Worm Company's YouTube channel focusing on hands-on worm farm check-ins.
Demonstration of a simple rubber-made bin worm farm setup with bedding, worms, and food waste.
Weekly check-in routine including outside and inside temperatures, and Verma compost appearance.
Observation of the worm farm's condition after a long period without feeding.
Identification of red wigglers and distinguishing them from Indian Blues worms.
Assessment of the worm farm's moisture level and the importance of not exceeding 70%.
Discussion on the worm farm's readiness for feeding despite excess moisture.
Feeding the worm farm with a mix of banana peels, apple cores, and coffee grounds.
Use of pit Moss as an alternative bedding material and its benefits.
Explanation of the moisture balance between the dry pit Moss and the wet existing compost.
Mixing the food waste and pit Moss, adjusting the moisture for optimal worm health.
Avoiding the creation of anaerobic pockets in the worm farm due to excess moisture.
The impact of feeding on the worm population and their distribution within the farm.
Use of bubble wrap as a budget-friendly cover for the worm farm to regulate moisture and temperature.
Planned check-in for the worm farm in one to two weeks to monitor changes.
Invitation for feedback on the new series and a prompt for subscribers to engage.
Transcripts
what's going on guys Steve from the
urban warm company here we're going to
change things up just a little bit I
normally uh talk to you on YouTube
videos it's me talking to you like this
and it's a little bit scripted and all
you see is just text and a little bit of
video on the screen we're going to do
something where we get our hands a
little bit dirty each week with
something that right now I'm just going
to call the weekly worm farm check-in so
I've got this uh worm farm right here
it's uh just simple rubber made bin it's
got bedding it's got worms it's got food
waste all the stuff you'd have in a worm
farm we're just going to check on it
every week we're going to kind of talk
about a few of the same things every
week like what's the outside temperature
what's the inside temperature inside the
barn here what's the temperature inside
the Verma compost we going to say what's
the Verma compost look like what did we
feed last time when did we feed uh and
if I see any issues and I'm going to
give my recommendations to myself and to
you about how I would go ahead and fix
the issues that I'm seeing in this
budget wor Farm I noticed that people
get really a lot more excited about
videos when I actually show Hands-On
type stuff and that's what we're going
to do here all right so I'm just going
to shut my mouth we're going to put the
uh camera right there put my cell phone
right on top of there we're going to
look down into this worm farm talk about
things and uh yeah we'll let you know
what's going on inside this bin so let's
get
[Music]
started all right guys uncovering the uh
the worm farm here uh apologize for the
audio right now uh my mic is uh still
charging so sorry about that anyway one
thing I wanted to show you guys was
we've got uh I've got a few different
thermometers here so just check my phone
temperature is 70° outside it's
currently
77° in uh inside the barn 53% humidity
and uh as you can see the temperature is
about uh 65° in the vermac compost we're
uh coming out of the really hot season
here in Philadelphia and uh yeah it's
it's August but it feels like it's
actually September October which is
which is gorgeous so I don't expect the
temperatures to stay this way anyway
this is a uh this is a worm farm I
actually started a long time ago um this
uh was actually the basis for my how to
start a worm farm video that you guys
can find on the channel elsewhere um
there really there's actually a decent
amount of worms in here actually had
most of them towards the surface but um
this worm farm has not been fed in a
long time and we're going to actually
feed it today but you can see that we've
got some you know pretty decent Siz red
wigglers in here um one of the things I
wanted to tell you guys about was if you
look at this worm actually this this is
still a red wiggler cuz I can still see
a little bit of a raised cellum let me
go ahead and find a different one um
this is a good this is a better example
so one of the things people get confused
on is what kind of worms they have a lot
of people think they have red wigglers
when what they really have are Indian
Blues Indian Blues are uh are a little
different they're different shaped a
little bit I mean they're they're pretty
similar to the to the red wiggler but if
you look right here you can see the
raised cellum and that's a tell tail
sign there of the red wiggler as is this
yellowish tail Indian Blues are actually
going to be a little bit skinnier
they're not going to have a raise
clitellum and uh they're going to thrash
around a bit more in your hand so these
are kind of the normal red wigglers that
you would expect um this bin has been
processed really well you can see most
everything is is crumbly and dark um not
much that is showing up that's like not
been processed you see a couple little
things like that but um this bin is is
pretty much ready to be ready to be fed
it feels like if I go ahead and squeeze
it in my hands you can actually see some
water coming out so this is a little bit
wetter than what we'd really want you
want like one or two drops and I'm
getting a lot more than that if you can
see that stuff coming out of coming out
of my fingers right about 70% is where
we really want this um where we want
this worm farm to be and we're probably
more like 75 or 80 so if I dig around in
here a little bit more we're going to
find little pockets of worms and these
things are pretty evenly distributed but
if we had just fed this thing something
like a watermelon or cantalope or
something like that you would see a lot
of these worms right at the surface
eaten away at that waist and it would
look a lot more dense but these worms
are pretty evenly distributed uh
throughout this uh worm farm what I'm
going to do is we're going to go ahead
and feed this bad boy I've got a mix of
some stuff that was just outside my
patio door I eat a lot of bananas we eat
some apples and we eat we drink a lot of
coffee so we have a lot of coffee
grounds around around here around the
Churchill household so we're going to go
ahead and make a mix of that food waste
and probably today use pit Moss which is
a nice easy bedding to use I just find
that it breaks down really nicely we
also use coconut core uh paper I think
today we're just going to stick with pit
Moss just to keep things simple and
maybe in the next few weeks we'll talk
about paper coconut corn stuff like that
here we go all right let's go ahead and
get started here I showed you uh the
food waste I was talking about before
with the apple core and the banana peels
and the coffee and I'm just going to go
ahead and dump this all in as is and see
it's a ton of coffee grounds looks like
we got some pine needles in there I
really don't like having those in there
those just kind of blew in with the uh
with some of the wind storms that we've
had here lately so we'll go ahead and
get rid of those I could go ahead and
chop up some of these things like the
banana peels and you know the filters
and the apple core but I just want to
show you that you can be a really lazy
vermac composter and still have it make
still have it work for for you so I'm
just going to leave this stuff as is
going to go ahead and take stuff called
pit moss and if you're not familiar with
pit Moss it is recycled paper it's p i t
t m o s it's made by the company called
pit moss and it's meant to be like a
Pete Moss kind of alternative and I'm
going to use about an equal amount of
this pit Moss to the food waste in terms
of volume I normally would recommend you
being more like two: one but again with
coffee grounds they don't they don't
hold that much water they're not going
to break down and release a ton of water
so I'm okay going down to one to one and
even sometimes I'll just put coffee
grounds in my worm farm and not even add
bedding so normally I would recommend
that you add bedding in this case we're
not going to do that now this stuff is
pretty dry our bin like I was talking
about earlier is wetter than you
typically want it to be so one thing we
could do is probably take this feeding
we're going to mix this up here right
now I'm just adding a bit of water cuz
the pit Moss is really dry um is to take
this and mix it up with all the other
material in the bin you know from top to
bottom I'm really not worried about
doing a continuous flow style uh worm
farm just yet there's really not that
much material in the bin and what I do
have is sort of wet so this stuff can be
dry going in because the existing vermac
compost in our warm Farm is already too
wet so we can use some of this really
dry material to soak up the excess
moisture that already exists in our
current warm Farm but this is really
really dry and I don't want it to dry
out too much worms breathe through their
skin so they love they they really need
moisture so I don't want to underdo the
moisture too much so I'm just going to
add a few sprays of this uh of water
here going to mix it up by hand and then
we'll go ahead and put it in worm
farm it's really dry stuff I'll go ahead
and break apart this apple core most
food waste is actually around 80 to 90%
water which is way wetter than what you
want a normal worm farm to be apple
cores are probably like 90% water they
break down fairly quickly we only have
one apple corn here so we really don't
have that much so this is still a bit
dry to the touch so I'm just going to go
ahead you know what I'm going to speed
things up a little bit I would never
recommend pouring water into a worm form
of course this isn't our warm farm this
is just the mortar tray that we're uh
using to uh prepare our food waste or
prepare our feeding here so I'm just
going to take this do this by hand it's
pretty tacky to the touch right now it's
not wet it's not it's not clumpy so the
water content isn't that High um but I
think it's going to be good considering
what else is going on in our our warm
bin in terms of excess moisture so we'
got this mixed up let's go ahead and put
it into our warm Farm now this is a big
feeding I'm probably adding 25% to it
with just this single feeding but I'm
not worried about it because so much of
it is that pit Moss so just empty all of
it in there and I'm just going to mix
this up by hand got a decent warm
population in there so I'm just going to
mix all of this stuff together it's
actually going to help it all break down
when it's all exposed to uh the moisture
and all the microbes that are existing
in the in the Verma compost worms aren't
enjoying what I'm doing right now maybe
some of them are breeding down there and
I just screwed them up but that's okay
they'll forgive me so I'm not going to
feed this thing for probably another
week or two probably two weeks I will
come back and check uh the moisture and
So speaking of moisture if I pick this
up and this is mixed with a lot of that
pit Moss if I squeeze it in my hands I'm
still getting more more than more than
like a single drop I'm getting quite a
quite a bit so you can see that even
even with the dry stuff I put in there
was a lot of excess moisture in there um
problem with excess moisture is it can
cause Anor robic Pockets uh in your
vermac compost uh as the water displaces
the air the microbes use up the
available oxygen in that water or in
that liquid and it be can become
anerobic your nose is going to tell you
when things are are getting Anor robic
again you can kind of see some water
that's dripping out of between my
fingers so this is still plenty uh still
plenty moist I'm not really worried
about that so at this point we're going
to just put our bubble wrap on top of
there I really like bubble wrap for a
budget worm farm like this uh it's just
it it creates condensation on the
underside of the bubble wrap and sort of
pulls the worms higher and um and it's
cheap um so you can get something more
fancy like the urban warm blanket um
doesn't actually trap the water sort of
absorbs some moisture and and and in
that way it can kind of regulate the
moist the moisture and the warm bin but
in this case I'm going to use as many
budget materials as I can possibly find
so we're just going to put this bubble
wrap right on here we're going to poke
this uh thermometer through here and
we're going to check on this worm farm
here in about uh we'll call it a week or
two all right we'll see you guys all
right guys hope you enjoyed that uh
we're going to check in here maybe next
week maybe a couple weeks may not truly
be the weekly worm farm check-in if you
would please let me know in the comments
if you found this helpful or if you just
want me to ditch it and go back to the
normal stuff I was doing before I'm
still going to do the instructional
videos like I was doing but I want to
see if this is something you'd like to
see more of so uh drop me a note in the
comments hit subscribe if you want to
see more of these and uh yeah hopefully
see you next week
[Music]
Ver Más Videos Relacionados
How to Start Vermicomposting (Worm Composting for Beginners!)
How We Are Worm Farming Indoors And It Keeps Growing
Breeder Bin Managing to Success - Module 4: Breeder Cycle Length 21 Days or ??!
What to do When your worm castings dry out
ReSetting Breeder Bin - New Method of Separating the Adults from the Cocoons
Overcoming Worm Farm Pest Issues with Natural Bacteria - African Night Crawlers- Vermi Bag
5.0 / 5 (0 votes)