Intro to Oxy-Acetylene Welding - Part 1

We Build Stuff
15 Feb 201911:54

Summary

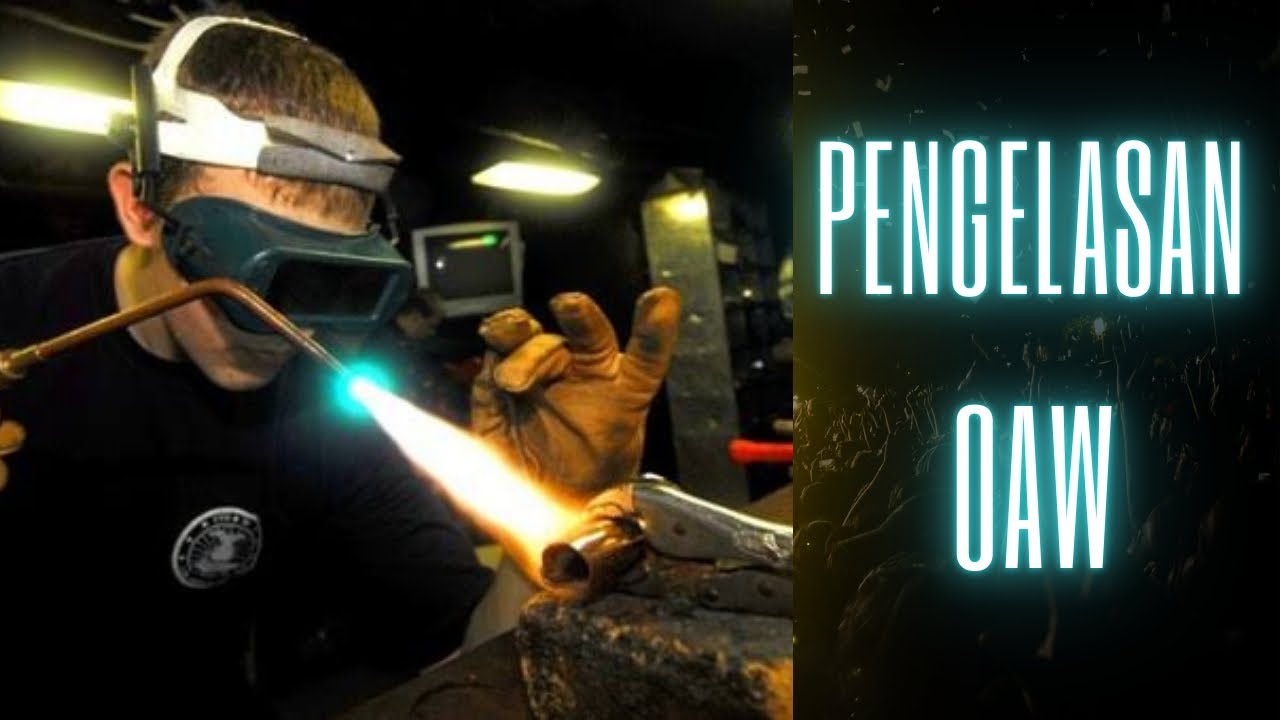
TLDRIn this instructional video, the host demonstrates oxy-acetylene welding, starting with setting up the regulator tanks for oxygen and acetylene. They emphasize safety, including using eye protection and gloves. The tutorial covers adjusting the torch for the right flame, tacking to join metal pieces, and performing a fusion weld. The host highlights the importance of controlling the heat and movement for a successful weld, resulting in a flat, well-penetrated joint.

Takeaways

  • 🔥 Safety First: Always remember the rhyme 'Acetylene before Oxygen' to avoid mistakes.
  • 🛠️ Check Equipment: Ensure the torch tip is clean and the correct size for welding.
  • 💧 Purge Valves: Purge the valves to release any residual pressure before use.
  • 📈 Adjust Pressure: Set acetylene pressure to about 6 psi and oxygen between 8 to 10 psi for optimal welding.
  • 🚨 PSI Limit: Never exceed 15 psi for acetylene to prevent dangerous pressure buildup.
  • 🥽 Protect Your Eyes: Use a number 9 screen for eye and face protection against heat and sparks.
  • 🧤 Use Gloves: Always wear leather gloves to protect your hands from burns.
  • 🔨 Handle Hot Material: Use pliers to handle hot materials to avoid burns.
  • 🔨 Set Up Metal: Place flat bars with a slight gap for better penetration during welding.
  • 🔥 Flame Adjustment: Start with acetylene and adjust the flame to get rid of black smoke, then add oxygen for a clean weld.
  • 💧 Tacking: Start welding by tacking both ends of the metal pieces to hold them in place.
  • 🌐 Fusion Welding: Practice fusion welding by pushing the molten puddle along the length of the joint.

Q & A

  • What is the purpose of the rhyme 'always acetylene before oxygen'?

    -The rhyme 'always acetylene before oxygen' is a mnemonic to help remember the correct sequence of setting up oxy-acetylene welding equipment, ensuring safety by following the proper steps.

  • Why is it important to ensure the torch tip is clean before welding?

    -A clean torch tip is crucial for proper gas flow and flame control during welding. A dirty or clogged tip can lead to an uneven flame, which can affect the quality of the weld.

  • What is the significance of the half-turn rule when opening the main valve of the acetylene tank?

    -Turning the main valve half a turn is a standard practice to ensure that the valve is opened correctly and not over-tightened, which could lead to safety issues or damage to the valve.

  • Why is it necessary to purge the valves before starting to weld?

    -Purging the valves removes any residual gas that could mix with the fresh gas and cause an unsafe mixture, ensuring a clean and safe start to the welding process.

  • How does adjusting the regulator knob on the torch handle affect the acetylene pressure?

    -Adjusting the regulator knob on the torch handle allows the welder to control the acetylene pressure, which in turn affects the intensity of the flame produced during welding.

  • What is the recommended pressure range for acetylene when setting up for welding?

    -The recommended pressure range for acetylene when setting up for welding is about 6 psi, as mentioned in the script.

  • Why is it advised not to exceed 15 psi for acetylene?

    -Exceeding 15 psi for acetylene can lead to an overly powerful flame that may cause safety hazards or damage to the equipment, which is why it's important to stay within the recommended pressure range.

  • What type of eye protection is recommended for oxy-acetylene welding?

    -A number 9 screen is recommended for eye protection during oxy-acetylene welding to shield the eyes and face from the intense heat and light produced during the process.

  • Why are leather gloves and pliers necessary when welding?

    -Leather gloves protect the hands from burns, while pliers are used to handle hot materials after welding to prevent burns and injuries.

  • What is the purpose of using fire bricks when setting up the welding area?

    -Fire bricks are used to protect the welding surface from the heat generated during welding, as they can withstand high temperatures without exploding or cracking.

  • How does the welder create a molten puddle during the welding process?

    -The welder creates a molten puddle by heating the metal pieces until they become molten, then moving the torch back and forth to allow the shiny, molten parts to join together into one puddle.

Outlines

00:00

🔥 Setting Up for Oxy-Acetylene Welding

This paragraph introduces the basics of oxy-acetylene welding, including setting up the oxygen and acetylene tanks. The speaker emphasizes the importance of following a specific order for safety: 'acetylene before oxygen'. They also stress the need to ensure the torch tip is clean and the correct size for welding. The process of setting up the tanks involves opening the main valve half a turn, purging the valves if necessary, and adjusting the regulator to achieve the desired pressure (6 psi for acetylene and between 5-10 psi for oxygen). The speaker also highlights the importance of safety gear such as eye protection and gloves, and the use of pliers to handle hot materials.

05:01

🔥 Starting the Welding Process

In this paragraph, the speaker describes the process of starting the welding process. They begin by lighting the torch with a striker, adjusting the acetylene valve to achieve a clean, feathered flame without black smoke. The speaker then adds oxygen to the mix, which changes the flame's appearance, creating two distinct cones of flame. The goal is to adjust the oxygen until the flame becomes a small, concentrated cone. The welding process involves heating both ends of the flat bar to create a molten puddle that joins the two pieces together. The speaker demonstrates tacking, which is the initial joining of the metal, and then proceeds to a fusion weld, pushing the molten puddle along the length of the joint. The technique involves maintaining a 45-degree angle with the torch and using a zigzag motion to evenly distribute the heat and push the puddle along the weld.

10:05

🔥 Completing the Weld and Post-Weld Cooling

The final paragraph covers the completion of the weld and the post-weld cooling process. The speaker demonstrates how to continue the weld by maintaining even heat and pushing the molten puddle along the metal, using either zigzag or circular movements based on personal preference. They caution against moving too quickly to prevent burning through the metal. Once the weld is complete, the speaker advises turning off the acetylene and then the oxygen valves. They discuss the cooling process, noting that while it's acceptable to cool the weld in water for practice, it's better to let it cool naturally to avoid cracking and becoming brittle. The speaker also mentions cleaning the weld with a brush once it's dry and provides a final assessment of the weld's quality, noting that it appears flat and well-penetrated. They suggest increasing the gap between the metal for more penetration if desired.

Mindmap

Keywords

💡oxy acetylene welding

Oxy acetylene welding is a type of welding that uses a mixture of oxygen and acetylene gases to create a high-temperature flame. This process is used to join metals by heating them to their melting point and fusing them together. In the video, the presenter demonstrates how to set up the necessary equipment, including the tanks and torch, and how to perform basic fusion welding with flat bar steel.

💡regulator tanks

Regulator tanks are used to control the flow of gases such as oxygen and acetylene in welding processes. They are equipped with pressure regulators to ensure a safe and consistent gas flow. In the script, the presenter explains how to set up these tanks correctly, emphasizing the importance of the correct sequence: 'always going to be a before oh, acetylene before oxygen or up you go'.

💡torch

A welding torch is a tool used in welding to produce a localized heat source. It is connected to the gas supply and has a nozzle to control the flame. The script describes the importance of ensuring the torch tip is clean and the correct size for the welding task, which is crucial for achieving a proper weld.

💡tip cleaner

A tip cleaner is a device used to clean the nozzle of a welding torch. It is necessary for maintaining the correct size hole for the gas to pass through, which affects the flame and the quality of the weld. The presenter mentions using a tip cleaner if the torch tip needs cleaning, indicating its role in the welding setup process.

💡acetylene

Acetylene is a gas used as a fuel in oxy-acetylene welding. It is known for producing a very hot flame when combined with oxygen. In the script, the presenter demonstrates how to adjust the acetylene valve to achieve the desired pressure for the welding process.

💡psi

PSI stands for pounds per square inch and is a unit of pressure. In welding, it is used to measure the pressure of the gases coming out of the regulator tanks. The script mentions setting the acetylene pressure to about 6 psi and the oxygen pressure between 8 and 10 psi to achieve the right welding conditions.

💡eye protection

Eye protection is essential when welding to shield the eyes from the intense light and heat produced during the process. The script specifies the use of a number 9 screen for this purpose, highlighting the importance of safety measures in welding.

💡leather gloves

Leather gloves are used to protect the hands from heat and burns during welding. The presenter mentions using them to handle hot materials after welding, which demonstrates the need for proper protective gear in this craft.

💡fire brick

Fire bricks are heat-resistant materials used to protect surfaces from the high temperatures generated during welding. In the script, the presenter uses fire bricks to prevent the table from getting too hot, illustrating a practical application of fire safety in welding.

💡tack weld

A tack weld is a temporary weld used to hold parts of a weldment together while the final weld is being made. The script describes the process of tacking both ends of the flat bar before performing a fusion weld, which is an important step in ensuring the pieces stay in place during the welding process.

💡fusion weld

A fusion weld is a type of weld where the base metals are melted and joined together without the use of a filler material. The presenter demonstrates how to create a fusion weld by melting the ends of the flat bar and allowing the molten metal to join together, which is the main focus of the instructional video.

Highlights

Introduction to oxy acetylene welding and setup of regulator tanks

Safety tips for using a welding torch

Basic fusion welding technique using flat bar steel

Setting up the torch with a clean tip for optimal performance

How to use a tip cleaner for maintaining the torch

Regulator tank setup with a rhyme for remembering the sequence

Opening the main valve for the acetylene tank

Purging the valves to ensure safety

Adjusting the regulator to control the acetylene pressure

Setting the acetylene pressure to 6 psi for optimal welding

Oxygen tank setup and adjusting the pressure between 5 to 10 psi

Importance of eye protection during welding

Use of leather gloves to prevent burns

Setting up the welding area with fire bricks to protect the table

Torch lighting technique to achieve a clean flame

Adjusting the acetylene valve to eliminate black smoke for a clear flame

Adding oxygen to the flame to create a hotter welding temperature

Tack welding to join both ends of the flat bar

Fusion welding technique by pushing the molten puddle along the joint

Cooling down the weld naturally to prevent cracking

Inspecting the weld for quality and penetration

Transcripts

play00:01

[Music]

play00:15

[Music]

play00:18

hi everyone today we're gonna do some

play00:20

oxy acetylene welding I'm gonna show you

play00:23

how to set up your regulator tanks how

play00:28

to safely use your torch and how to do

play00:33

some basic fusion welding with some flat

play00:36

bar this is just regular steel so first

play00:42

off setting up your tanks we've got two

play00:44

here we have an oxygen tank and we have

play00:48

an acetylene tank I have a little rhyme

play00:50

that I follow for all of these steps

play00:52

it's always going to be a before oh

play00:56

acetylene before oxygen or up you go

play00:59

don't ask me why but it's going to help

play01:02

you remember every single step so before

play01:05

I get started setting up my tanks I need

play01:07

to make sure that my torch and

play01:08

everything has been set up correctly we

play01:11

need to make sure that the tip is a tiny

play01:13

little hole here we need to make sure

play01:15

that the tip is clean it's hard to see

play01:18

need to make sure the tip is clean if

play01:21

you do need to clean it and you can tell

play01:23

once you actually start welding you can

play01:25

use a tip cleaner tip cleaners look

play01:30

something like this you need to pick the

play01:32

right size for the one that fits in that

play01:35

hole first we're gonna do the acetylene

play01:37

first we're gonna open up the main valve

play01:40

here half a turn so if this is my start

play01:43

I want it to get to here and I've drawn

play01:45

a little line here to help remember half

play01:48

a turn now the last person who used this

play01:51

did not purge the valves but usually

play01:54

when you get to it let me just purge

play01:55

that valve for a second

play01:59

really some pressure on my regulator

play02:01

there we go

play02:02

this is basically how much fuel is left

play02:04

in the cylinder and this is how much

play02:08

pressure will be coming through so in

play02:10

order for me to increase pressure that

play02:12

is going to be coming out of my torch

play02:16

I'm gonna have to adjust the regulator

play02:18

I'm gonna open up the knob on my torch

play02:21

handle for the acetylene or the fuel

play02:23

just opened up don't worry about how big

play02:26

it is yet and I'm going to adjust the

play02:29

regulator here I'm going in the plus you

play02:33

can see plus or minus I'm going plus and

play02:36

I'm going to increase it to about 6 psi

play02:38

there we go we're at three four five six

play02:43

if you look very closely there and you

play02:46

can hear the acetylene actually coming

play02:49

out go ahead and turn off your knob this

play02:51

one is set and ready to go next we have

play02:54

our oxygen tank we need to adjust this

play02:57

to we have between I'm gonna say 5 and

play02:59

10 psi coming out of this we're gonna

play03:02

open this valve all the way until it

play03:05

stops we're gonna take our torch handle

play03:09

open up the oxygen adjust the regulator

play03:16

until we have between 8 and 10 psi it's

play03:21

hard to see the numbers but we just need

play03:23

that little valve needle to show it just

play03:26

a little bit right there that's good

play03:28

turn off your torch valve so if you look

play03:32

closely you can see that the needle on

play03:33

the left is just open a little bit and

play03:36

down on the acetylene it's around 6

play03:41

that's a zoom in there a little bit you

play03:45

can see that the PSI is just about 6 if

play03:48

you look on the left dial you can see

play03:50

that there's a red zone

play03:51

do not push acetylene pass 15 psi next

play03:55

you need to have some sort of eye

play03:57

protection we're gonna be using a number

play03:58

9 screen here this allows it to protect

play04:01

your eyes and your face from the heat

play04:04

mostly your eyes so that your eyes don't

play04:06

hurt while welding welding with just

play04:09

bare eyes is going to

play04:10

for a while you need to have a set of

play04:13

gloves ready we're using leather gloves

play04:14

here to protect from burns and I've got

play04:17

pliers here to pick up hot material

play04:19

after we've been welding if you pick up

play04:22

hot material with bare hands you're

play04:23

gonna get all blistery I'm going to set

play04:27

up my two pieces of flat bar here with a

play04:28

slight gap in between and I'm using fire

play04:34

brick to prevent my table from getting

play04:36

hot and fire bricks will not explode

play04:39

when heated or anything so now that I

play04:41

have my metal set up I have my torch all

play04:45

ready to go all I have to do is open my

play04:48

acetylene valve just a little bit or

play04:51

fuel valve this one's using acetylene

play04:53

open up just enough that you can feel it

play04:56

on your hands or you can put it up on

play04:58

your ear and actually listen I'm wearing

play05:00

these wicked glasses just enough to feel

play05:03

it take your striker hold it on a slight

play05:06

angle side here and you get a nice city

play05:11

flame all that black stuff is carbon we

play05:14

want to get rid of that or it makes a

play05:15

big mess I'm going to open up my

play05:17

acetylene valve until that black smoke

play05:20

goes away and I have a nice feathered

play05:22

flame delicious if you're doing thinner

play05:27

material you don't need as hot of a

play05:29

flame in this case we're doing eight

play05:30

inch flat bar so I'm gonna open that up

play05:33

so I get a nice roar I don't have a

play05:36

special number for this beautiful next

play05:40

we're going to open up our oxygen and

play05:42

add some oxygen to this mix watch

play05:44

carefully what happens to the flame

play05:51

now if you look at it it looks like we

play05:54

have two different cones here we've got

play05:57

a very bright one we have a longer one

play05:59

here

play05:59

don't try to get tough don't try to

play06:01

touch it but you can get pretty close

play06:03

without feeling any heat I'm not gonna

play06:05

purposely do that though all right I'm

play06:07

gonna adjust some more oxygen until that

play06:09

one cone gets nice and tiny so here's

play06:12

just I'd set the exposure on the camera

play06:13

down a little bit so you can see the two

play06:14

different cones when you first have just

play06:17

acetylene you've got that add your

play06:19

oxygen and you're gonna see two

play06:21

different color flames essentially

play06:23

coming out we've got a short bright one

play06:26

and a long one there I'm gonna add more

play06:28

oxygen until I have a very nice little

play06:31

cone that's maybe less than a centimeter

play06:33

long all right let's do some welding so

play06:39

I have my flat bar set up with a very

play06:41

slight gap in between I want to have a

play06:43

little bit of a gap to allow the metal

play06:45

to penetrate when it gets welded

play06:47

together I'm going to start by tacking

play06:49

both ends and then I'm gonna do a fusion

play06:51

weld it's attack first can get heated up

play06:55

and they'll hold my torch on about a 45

play06:57

degree angle and kind of zigzag between

play06:59

the two pieces we'll concentrate on one

play07:02

area if this is taken too long you can

play07:08

increase the pressure and get more heat

play07:11

what we're looking for is both pieces of

play07:13

metal to basically turn molten you'll

play07:16

see it start to get shiny on both sides

play07:18

and then those two shiny parts will join

play07:21

together into one puddle

play07:27

back and forth let them join a row there

play07:30

we have a now a little puddle I'm gonna

play07:32

do the same thing to the other side I've

play07:35

dropped the exposure on the camera so

play07:37

you can get a better look at what's

play07:38

going on here so I'm holding my torch on

play07:40

about a 45 degree angle zigzagging back

play07:42

and forth between the two pieces

play07:46

I'll hold the torch on the other side so

play07:48

you can see better and I want to get a

play07:52

nice little puddle going back and forth

play07:55

between the two

play07:58

but I'm just hovering above the metal I

play08:01

don't want the torch to actually touch

play08:03

the metal there comes my puddle should

play08:07

join soon the two sides are getting

play08:09

molten and I want those two little

play08:12

puddles there to become one wait for

play08:14

that moment these little circles or

play08:19

zigzags there it is to see that now we

play08:21

have a nice little joint

play08:29

now that I got my two sides tacked I'm

play08:31

gonna practice lay in a fusion weld

play08:34

which is basically taking that puddle

play08:36

and pushing it down the length of my

play08:40

joint here whether you're left-handed or

play08:43

right-handed it doesn't matter you got

play08:45

to find a way that works for you I'm

play08:47

gonna go in this direction and push my

play08:49

puddle that way so I'm gonna heat it up

play08:53

get that puddle molten again I'm holding

play08:56

my torch on about a 45 degree angle

play09:01

if that thing heat it up then I'm gonna

play09:03

push the puddle if I stay in one place

play09:10

for too long

play09:11

once my puddle is going I risk to run

play09:13

the risk of actually burning through and

play09:15

burnin aiding my metal there we go keep

play09:22

your heat even on both parts of your

play09:24

metal or we go it's getting shiny I'm

play09:27

waiting for that puddle to join here it

play09:28

is I'm slowly gonna zigzag and push

play09:32

forward with my torch now this flame is

play09:40

extremely hot you're probably looking at

play09:43

over 3,000 degrees

play09:52

keep pushing that puddle all the way

play09:54

down the length of your metal ID zigzags

play09:58

but you could also do circle movements

play10:00

I think that's personal preference you

play10:05

can see that small molten puddle moving

play10:07

towards the end

play10:17

you don't have to do giant circles this

play10:19

is fairly thin material I just want to

play10:21

work it down to the end don't go faster

play10:24

than your puddle slow down and let it go

play10:30

once you're finished your weld turn off

play10:34

using the acetylene first a and then o

play10:41

you can take this to a bucket of water

play10:44

or to the shop sink to cool it down be

play10:47

careful of the steam when this goes

play10:49

don't put your face directly above

play10:59

normal in welding I'm not gonna cool it

play11:02

down in a sink I'm gonna let it cool

play11:03

naturally I don't want the weld to crack

play11:05

and become brittle but when we're just

play11:09

practicing I think it's okay once it's

play11:12

dried off you can shine it up with a

play11:14

brush

play11:22

we can take a closer look at our fusion

play11:24

well it's nice and flat I think this

play11:27

looks pretty good

play11:28

you flip it over when you flip it over

play11:34

you can see that the metal did not

play11:36

really penetrate too much through the

play11:38

gap there if you wanted to get more

play11:40

penetration you can put a little bit

play11:42

more space in between your metal

Rate This

5.0 / 5 (0 votes)

الوسوم ذات الصلة
Welding TutorialOxy AcetyleneRegulator SetupSafety TipsFlame ControlMetal JoiningWelding TechniquesTool MaintenanceSteel WeldingDIY Project
هل تحتاج إلى تلخيص باللغة الإنجليزية؟