The Concept of Order Blocks - Smart Money Trading

Smart Risk
24 Sept 202205:06

Summary

TLDRThis video script introduces 'order blocks,' a crucial concept for traders to identify significant supply and demand zones in the market. Formed by large asset accumulations by central banks or financial institutions, these zones are characterized by price imbalances. The script explains how to visually identify order blocks on a chart and emphasizes four key rules for their validity: imbalance, structural break, inefficiency, and being unmitigated. It stresses the importance of recognizing these zones for anticipating market reactions and making informed trading decisions.

Takeaways

  • 📈 Importance of Identifying Levels: The script emphasizes the importance of identifying significant demand and supply zones, known as order blocks, in the market to avoid potential losses from trading at less significant levels.
  • 🏛 Formation of Order Blocks: Order blocks form when large financial entities accumulate significant quantities of an asset through large orders, leading to substantial price movements and market imbalances.
  • 🔍 Reaction to Order Blocks: Prices are expected to show a significant reaction when they reach an order block, which is crucial for traders to anticipate market movements.
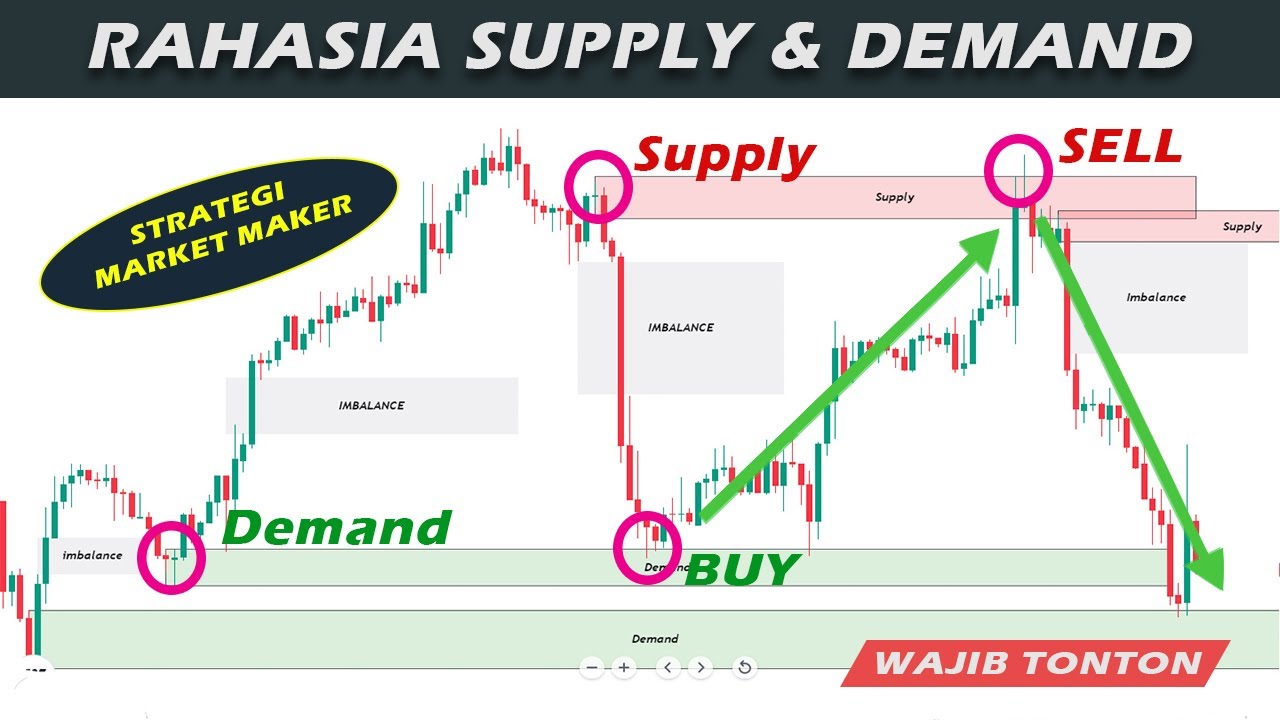
  • 🐂 Bullish Scenario: In a bullish scenario, the last bearish candlestick before a significant bullish move is considered the order block zone.
  • 🐻 Bearish Scenario: Conversely, in a bearish scenario, the first weak bullish candlestick before a significant bearish move is identified as the order block zone.
  • 👀 Spotting Order Blocks: Traders are encouraged to look for the last bearish or first weak bullish candlestick before a drastic market move to identify order blocks.
  • 📊 Candlestick Shadows: When identifying order blocks, the shadow of a candlestick, if larger than the rest, should be considered the zone of the order block.
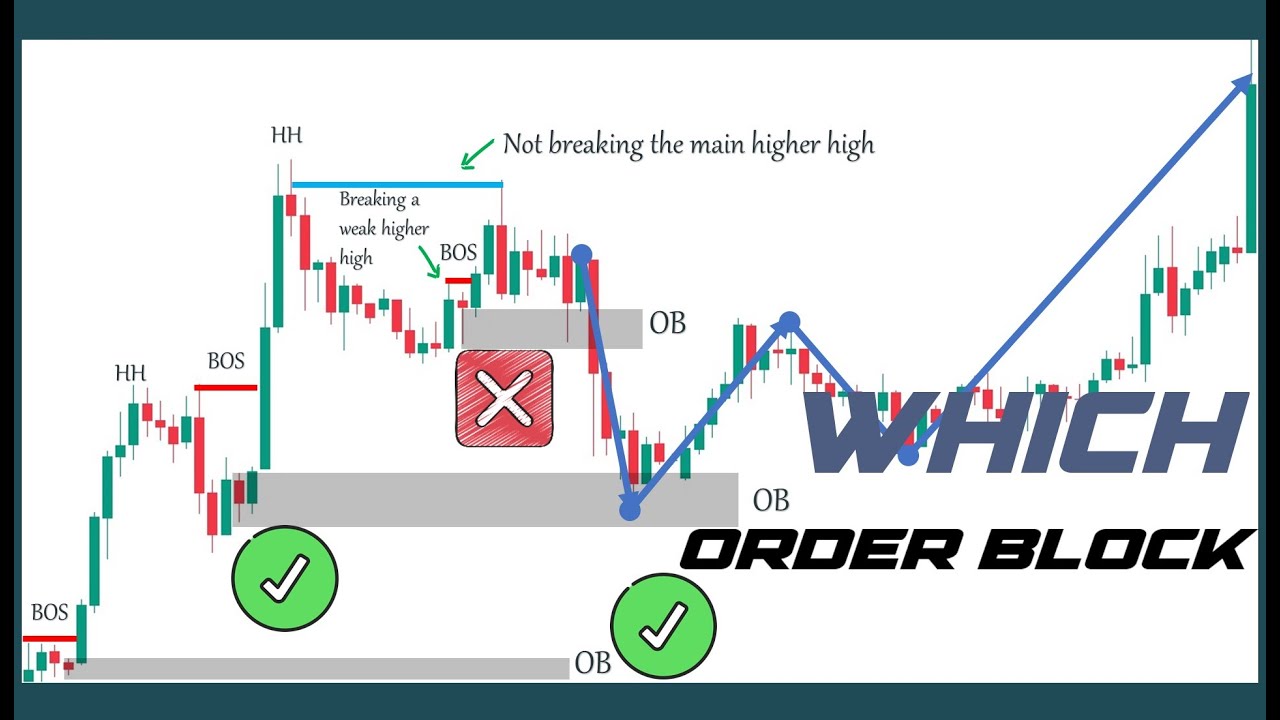
  • 🚧 Four Rules for Order Blocks: For order blocks to be effective, they must meet four criteria: imbalance, break of structure, inefficiency, and being unmitigated.
  • 💥 Breaking of Structure: An order block must occur when the price breaks through a structural level, indicating a significant market movement.
  • 🛑 Inefficiency Concept: Order blocks are more effective when they represent a level where orders have not yet been filled, ensuring a reaction when the price reaches that level.
  • 🚫 One-Time Use: Order blocks are considered one-time use; if the price has already reacted to an order block, it should not be used again for placing trades.

Q & A

  • What is the main focus of the 'smart risk' episode discussed in the transcript?

    -The main focus of the episode is on identifying and understanding 'order blocks,' which are powerful demand and supply zones in the market formed by large financial institutions or central banks.

  • Why are demand and supply zones important in trading?

    -Demand and supply zones are important because they represent areas of potential price reaction when the market reaches them, which can be crucial for making informed trading decisions.

  • What is meant by an 'order block' in the context of trading?

    -An 'order block' refers to an area of optimized supply and demand that forms when there is an imbalance between buyers and sellers in the market, often due to large orders from central banks or financial institutions.

  • How do order blocks form in the market?

    -Order blocks form when large quantities of a particular asset are accumulated through big orders by central banks or large financial institutions, resulting in a massive price move.

  • What is the significance of the last bearish candlestick before a bullish move in identifying an order block?

    -The last bearish candlestick before a bullish move is significant as it can be identified as the order block zone, indicating a potential area of strong price reaction.

  • What are the four rules that order blocks must meet to work effectively?

    -The four rules are having an imbalance, breaking of structure, inefficiency, and being unmitigated. These rules ensure that the order block is a valid and effective area for trading.

  • What does 'breaking of structure' mean in the context of order blocks?

    -'Breaking of structure' means that for an order block to be valid, the price must break through a previously established structural level, indicating a significant market move.

  • Why is inefficiency important when identifying an order block?

    -Inefficiency is important because it implies that not all orders have been filled, and there is still potential for a price reaction when the market reaches that level, making it a valid order block.

  • What does it mean for an order block to be 'unmitigated'?

    -An order block being 'unmitigated' means it has not yet reacted to the price, and it is still a one-time use area for potential trading opportunities.

  • How should the shadow of a candlestick be considered when identifying an order block?

    -If the shadow of a candlestick is larger than the rest of the candle, the shadow should be taken as the zone of the order block, as it represents a significant price movement.

  • What should traders do after identifying an order block according to the episode?

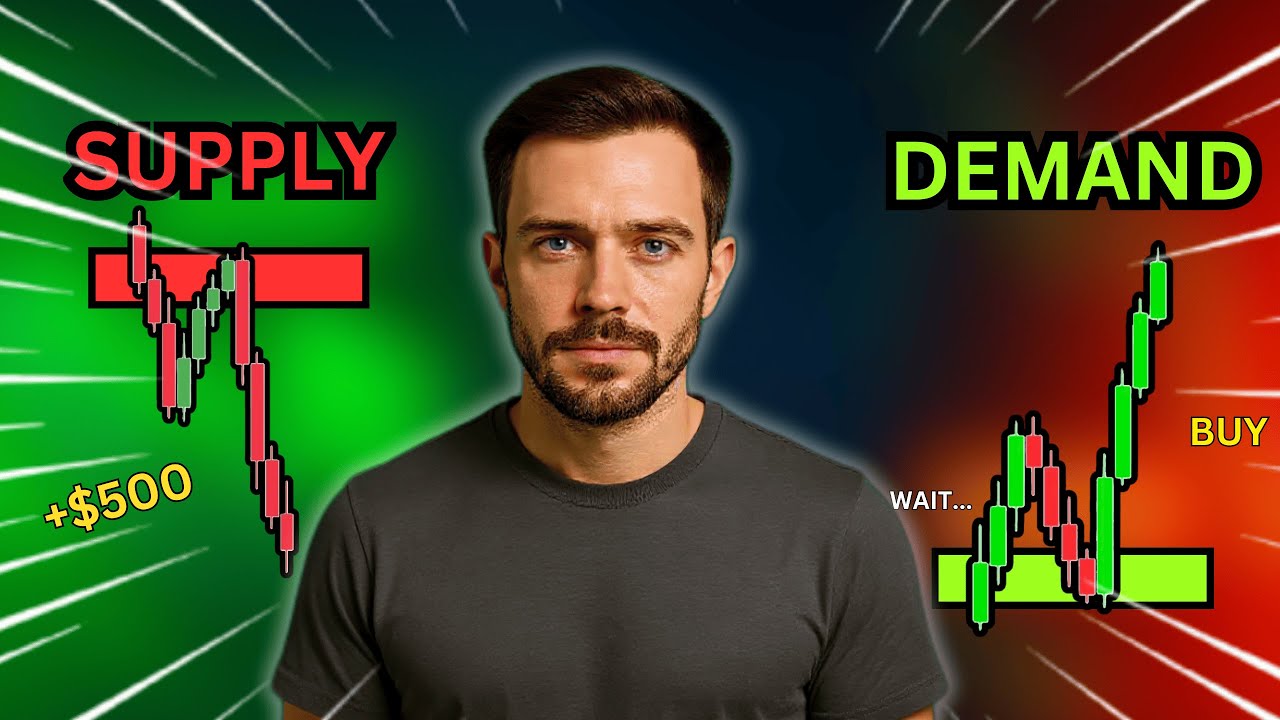
    -Traders should use the identified order blocks to make informed trading decisions, buying in the demand zone and selling in the supply zone, while also considering the four rules for order blocks.

Outlines

00:00

📈 Introduction to Order Blocks in Trading

This paragraph introduces the concept of 'order blocks,' which are critical areas of supply and demand in trading. It explains that these zones form when large financial entities accumulate significant assets, causing substantial price movements. The importance of order blocks is highlighted, as they often lead to significant price reactions when reached. The paragraph sets the stage for a detailed explanation of how to identify and utilize these zones effectively in trading strategies.

05:02

🔍 Identifying Order Blocks and Their Rules

This section delves deeper into the specifics of identifying order blocks. It emphasizes the need to spot the last bearish or first weak bullish candlesticks before a significant price move, which can indicate the presence of an order block. The importance of considering the candlestick's shadow as part of the order block is mentioned. Furthermore, four rules for order blocks to be effective are introduced: imbalance, breaking of structure, inefficiency, and being unmitigated. Each rule is briefly explained with examples to illustrate their significance in trading.

👋 Conclusion and Invitation for Further Engagement

The final paragraph serves as a conclusion to the video script, summarizing the importance of understanding order blocks for successful trading. It invites viewers to support the channel through likes, subscriptions, and comments, encouraging further interaction and questions from the audience. This paragraph leaves the viewers with a call to action, fostering a community and opening the door for continued learning and discussion.

Mindmap

Keywords

💡Smart Risk

Smart Risk refers to a strategic approach to trading that involves taking calculated risks based on market analysis and understanding of potential outcomes. In the video, it is the theme around which the concept of order blocks is introduced, emphasizing the importance of identifying key levels in the market to place trades intelligently.

💡Demand Zone

A Demand Zone is an area on a price chart where there is a high concentration of buying interest, typically indicated by a significant increase in volume. It is a concept used in the video to illustrate where traders should consider buying, as it represents a potential support level where the price may reverse.

💡Supply Zone

Supply Zone is the opposite of a Demand Zone, representing an area on the chart where there is a high concentration of selling pressure. The video explains that selling in the Supply Zone is a common trading strategy, but it also emphasizes the importance of identifying the right zones to avoid unnecessary risk.

💡Order Blocks

Order Blocks are specific areas of concentrated supply and demand that form when large market participants, such as central banks or financial institutions, accumulate significant quantities of an asset. The video discusses how to identify and trade using order blocks, which are critical for anticipating significant price reactions.

💡Central Banks

Central Banks are the monetary authority in a country, responsible for monetary policy and financial stability. In the context of the video, they are mentioned as entities that can influence the formation of order blocks through large-scale asset accumulation, impacting market prices significantly.

💡Price Imbalance

Price Imbalance occurs when there is a disparity between the number of buyers and sellers in the market, leading to rapid price movements. The video script uses this term to explain the conditions under which order blocks form, indicating a significant market shift.

💡Bullish Scenario

A Bullish Scenario in trading indicates a market condition where prices are expected to rise. The video uses this term to describe situations where the last bearish candlestick before a significant bullish move can be identified as an order block zone.

💡Bearish Scenario

Conversely, a Bearish Scenario suggests that prices are expected to fall. The video explains that in a bearish market, the identification of order blocks can also be crucial for anticipating price reactions and potential sell opportunities.

💡Candlestick

A Candlestick is a graphical representation used in financial charts to show the opening, closing, high, and low prices of a security for a specific period. The video script refers to bullish and bearish candlesticks to illustrate the formation of order blocks and the importance of their shadows in defining these zones.

💡Imbalance Break of Structure

Imbalance Break of Structure is one of the four rules for identifying valid order blocks mentioned in the video. It refers to a situation where the price breaks through a previously established pattern or level, indicating a significant shift in market dynamics.

💡Inefficiency

Inefficiency in the context of the video refers to the lack of order accumulation at a certain price level, which is necessary for an order block to be effective. The script explains that if all orders have been filled at a certain level, it becomes inefficient for further trading decisions.

💡Unmitigated

Unmitigated, as used in the video, means that an order block should be a one-time use level. If the price has already reacted to an order block, it should not be considered for further trades, ensuring the block's effectiveness is not diminished by repeated use.

Highlights

Introduction to the concept of smart risk in trading and the importance of identifying important levels in the market.

Explanation of the demand and supply zones and the potential risk of trading on less significant levels.

Introduction of 'order blocks' as a powerful tool for identifying significant demand and supply zones.

Formation of order blocks due to large quantities of asset accumulation by central banks or financial institutions.

Importance of order blocks in anticipating significant price reactions when the market reaches these zones.

Identification of order block zones in bullish scenarios through the last bearish candlestick before a drastic move.

Identification of order block zones in bearish scenarios through the first weak bullish candlestick before a drastic move.

Visual examples of order blocks in a heavy bullish uptrend and the significance of spotting them.

Instruction on considering the shadow of a candlestick as the order block zone if it's larger than the rest.

The four rules for order blocks to work effectively: imbalance, break of structure, inefficiency, and being unmitigated.

Explanation of the 'breaking of structure' rule and its necessity for an order block to be valid.

Illustration of the 'inefficiency' rule with examples showing the difference in candlestick shadows and their impact on order accumulation.

The 'unmitigated' rule, emphasizing that order blocks are one-time use and should not be traded on if previously reacted to.

Encouragement for traders to support the channel through likes, subscriptions, and comments for questions.

Anticipation of the next episode to further explore trading strategies and concepts.

Transcripts

play00:00

hello Traders

play00:02

welcome to the smart risk

play00:04

usually we place our orders at important

play00:08

levels in the chart

play00:09

We Buy in the demand Zone and sell in

play00:12

the supply Zone

play00:14

but what if these demand and Supply

play00:15

zones are not important enough to place

play00:18

a trade

play00:19

probably we will end up losing if we

play00:21

execute a trade on them

play00:23

so identifying important levels in the

play00:26

market is vital

play00:27

in this episode we will cover one of the

play00:30

most powerful demand and Supply zones

play00:32

called order blocks

play00:34

we will show you how to draw order block

play00:37

zones in the chart along with the rules

play00:39

to identify valid order blocks

play00:42

let's get started

play00:46

so what is an order block

play00:48

order blocks are the optimized areas of

play00:51

supply and demand

play00:52

order blocks form when central banks or

play00:55

large financial institutions accumulate

play00:57

large quantities of a particular asset

play01:00

through big orders resulting in a

play01:02

massive price move

play01:04

in other words they form when there is

play01:06

an imbalance between the buyers and

play01:08

sellers in the market

play01:10

and why are order blocks important

play01:12

because whenever the price reaches them

play01:14

we can expect a price to show a

play01:16

significant reaction to them

play01:20

in the bullish scenario the last bearish

play01:22

Candlestick before starting a drastic

play01:24

bullish move will be identified as the

play01:27

order block Zone

play01:30

or the first weak bullish Candlestick

play01:32

before the start of a drastic bullish

play01:34

move

play01:36

the same thing applies to the bearish

play01:38

scenario

play01:40

so let's look at these examples and see

play01:43

if we can identify the order blocks

play01:48

here we have a heavy bullish uptrend

play01:51

and you can quickly point out the

play01:52

DraStic moves caused by the market and

play01:55

balance between the buyers and sellers

play01:57

look and see if you can spot the order

play01:59

block zones by definition

play02:02

the last bearish Candlestick before

play02:04

starting a heavy bullish move or the

play02:07

first week bullish candlestick

play02:10

here we see a bearish candle before a

play02:12

big move so we point it out

play02:16

here we have a weak bullish candle

play02:18

before a big move so again we highlight

play02:21

it

play02:23

again a bearish candle before a big

play02:26

bullish move

play02:27

and the rest just like the others

play02:31

keep in mind that whenever the shadow of

play02:34

a Candlestick is bigger than the rest of

play02:36

it we take the shadow as the zone of our

play02:39

order block

play02:42

so far you have a vision of order blocks

play02:45

but here is the key point

play02:47

order blocks must meet four rules to

play02:50

work effectively

play02:51

and those rules are

play02:53

having imbalance break of structure

play02:56

inefficiency and being unmitigated

play02:59

we have already discussed the imbalance

play03:02

let's talk about the other rules

play03:06

breaking of a structure

play03:08

take a look at this example

play03:10

here the price made a move to the

play03:12

downside

play03:14

made structural level and had a pullback

play03:16

on the way down we can notice this move

play03:19

within balance but we can't identify

play03:21

this level as an order block because the

play03:24

price never broke below the structure

play03:27

so for having an order block price must

play03:30

break through the structure

play03:33

rule number three

play03:35

and efficiency

play03:37

take a look at this example

play03:39

if I only draw the body of candles we

play03:42

have the same heavy bullish move to the

play03:45

upside

play03:46

but see if you can notice the difference

play03:47

when I add the Shadows

play03:51

in the first case the price went up to

play03:54

this level and then pulled back here and

play03:57

gathered all of the orders that have

play03:58

been waiting for a pullback

play04:00

so if we identify this level as an order

play04:03

block and expect a price to react to

play04:06

this level it will have minor chance to

play04:08

work

play04:09

because there exists no orders since all

play04:12

of them have been gathered before

play04:15

but look at the other scenario

play04:18

if someone were waiting for a pullback

play04:20

they would have missed this trade so on

play04:22

the way back everyone is waiting to

play04:25

place orders in the demand Zone

play04:27

this is the concept of inefficiency

play04:31

let's talk about the last rule which is

play04:34

so simple

play04:35

the order block must be unmitigated

play04:38

order blocks are one-time use so if the

play04:41

price has reacted to an order block

play04:43

before we won't consider placing a trade

play04:46

on it

play04:47

therefore the order block must be

play04:49

unmitigated

play04:52

so that's it Traders

play04:54

thanks for watching

play04:56

please support us by like And subscribe

play04:58

and comment down below if you have any

play05:01

questions

play05:02

see you in the next episode

Rate This

5.0 / 5 (0 votes)

相关标签
Order BlocksMarket ImbalanceTrading StrategiesDemand ZonesSupply ZonesFinancial InstitutionsAsset AccumulationPrice ReactionCandlestick AnalysisTrading Rules
您是否需要英文摘要?