Membuat Kipas Otomatis Berdasarkan Suhu Berbasis Arduino || Sensor Suhu DHT-11
Summary
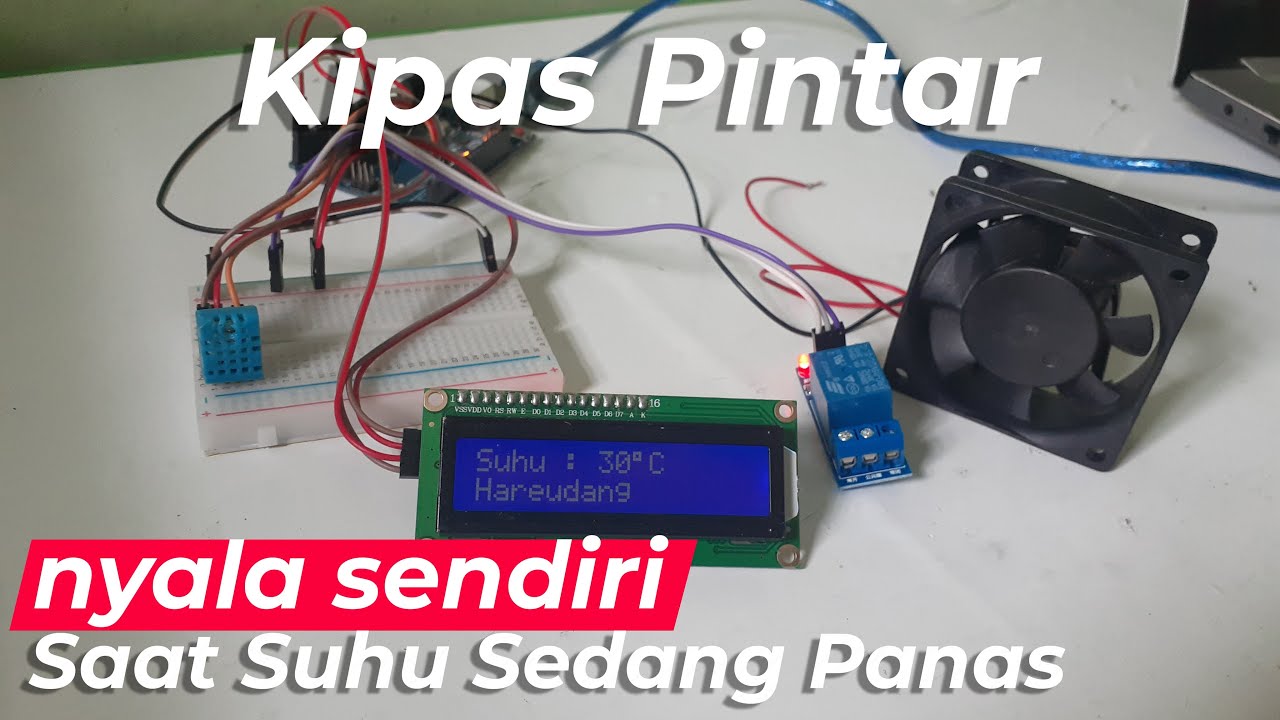
TLDRThis video showcases a project on an automatic fan control system using Arduino Uno and a DHT 11 temperature sensor. Presenters Poppy Musyarofah and Sridevi Lusianti demonstrate the setup process, including connections of an LCD, relay, and fan to the Arduino board. The system is programmed to turn the fan on when the temperature exceeds 30 degrees Celsius and off when it's below. The video guides through the hardware assembly and coding steps, concluding with a test of the system's functionality in response to temperature changes.
Takeaways
- 📝 The video presents a project on an automatic fan control system based on Arduino Uno and a temperature sensor (DHT 11).
- 🔧 The main components required for the project include an Arduino Uno, an LCD with I2C, a 1-channel relay, a DHT 11 temperature sensor, jumper cables, a 12V fan, a 9V adapter, and a USB cable for PC connection.
- 🔌 The setup involves connecting the ground of the LCD to the Arduino's ground, the 5V of the LCD to the Arduino's 5V, and the SDA and SCL pins of the LCD to the A4 and A5 pins on the Arduino Uno, respectively.
- 🔩 The DHT 11 temperature sensor is connected to the Arduino Uno with its ground to the Arduino's ground and its VCC to the Arduino's 5V.
- 🔄 The 1-channel relay is connected to pin 5 on the Arduino Uno, with its ground to the Arduino's ground and VCC to the Arduino's 5V.
- 🌡️ The fan and the 9V adapter are connected such that the black (negative) wire of the fan is connected to the black (negative) wire of the adapter, and the red (positive) wire of the fan is connected to the COM terminal of the relay.
- 💻 The coding process involves importing the necessary libraries and setting up pins for the fan, temperature sensor, and power supply.
- 📈 The fan is programmed to turn on when the temperature exceeds 30 degrees Celsius and to turn off when it is below 30 degrees Celsius.
- 🖥️ The LCD display is used to show the temperature and indicate whether the fan is on or off, with an initial display of 29 degrees Celsius.
- 🔧 The demonstration includes heating the DHT 11 sensor to activate the fan and then cooling it to see the fan turn off as the temperature drops below the threshold.
- 🔬 The project serves as a practical example of using Arduino for home automation and temperature control.
Q & A
What is the main topic of the video?
-The main topic of the video is about showcasing the results of a project involving an automatic fan control system based on Arduino Uno and a temperature sensor (DHT 11).
Who are the presenters of the video?
-The presenters of the video are Poppy musyarofah with NIM 4320706190143 and Sridevi lusianti with NIM 432076190170.
What is the purpose of using an Arduino Uno in this project?
-The Arduino Uno is used as a microcontroller in the project to control the fan based on the temperature readings from the DHT 11 sensor.
What is the role of the LCD in the project setup?
-The LCD is used to display the temperature and indicate whether the fan is on or off automatically based on the temperature readings.
What is the function of the 1-channel relay in the project?
-The 1-channel relay is used to control the power supply to the fan, turning it on or off based on the temperature conditions set in the code.
What type of sensor is used to measure temperature in this project?
-A DHT 11 sensor is used to measure the temperature in the project.
What is the significance of the jumper cables in the project setup?
-Jumper cables are used to connect various components such as the LCD, sensor, relay, and fan to the Arduino Uno.
What is the voltage of the fan used in the project?
-A 12V fan is used in the project.
How is the fan connected to the power source in the project?
-The fan is connected to a 9V adapter which is then connected to the COM port of the relay to control the power supply.
What is the temperature threshold set in the code for the fan to turn on?
-The fan turns on when the temperature goes above 30 degrees Celsius.
How can the fan be turned off according to the project setup?
-The fan can be turned off by cooling the DHT 11 sensor below 30 degrees Celsius, which will trigger the relay to disconnect the power to the fan.
Outlines
🛠️ Introduction to the Automatic Fan Control System Project
The video script introduces a project on an automatic fan control system using Arduino Uno and a temperature sensor, the DHT 11. The presenters, Poppy Musyarofah and Sridevi Lusianti, provide their student identification numbers and begin by listing the required materials, including an Arduino Uno, an LCD display with I2C, a 1-channel relay, the DHT 11 temperature sensor, jumper cables, a 12V fan, a 9V adapter, and a USB cable for PC connection. They then proceed to demonstrate the wiring process for the LCD, temperature sensor, relay, fan, and adapter, ensuring secure connections to the Arduino Uno. The script also mentions the coding process, starting with importing the necessary libraries and setting up the pins for the fan, power, and temperature sensor on the Arduino Uno.
🔧 Demonstration of the Automatic Fan Control System
In this paragraph, the script describes the functionality of the automatic fan control system. The fan will turn on when the temperature exceeds 30 degrees Celsius and turn off when it falls below this threshold. The script details the setup process, including connecting the USB to the PC to power the LCD, which displays the current temperature and indicates that the fan is set to operate automatically. The video then demonstrates the system's response to temperature changes by heating the DHT 11 sensor to activate the fan and cooling it to observe the fan turning off. The script concludes with an explanation of how to test the system's functionality by using a cold object to lower the temperature and verify if the fan turns off accordingly.
Mindmap
Keywords
💡Arduino Uno
💡LCD with I2C
💡Relay 1 channel
💡DHT11
💡Jumper cables
💡Kipas Angin 12V
💡Adaptor 9V
💡Cable USB
💡Coding
💡Automatic Fan Control
💡Temperature Threshold
Highlights
Introduction of a project on an automatic fan control system based on Arduino Uno and DHT11 temperature sensor.
Presenters are Poppy Musyarofah with NIM 4320706190143 and Sridevi Lusianti with NIM 432076190170.
Arduino Uno is used as the microcontroller in the project.
An LCD with i2c is included in the project setup.
A 1-channel relay is used for the fan control.
DHT11 temperature sensor is employed for temperature measurement.
Jumper cables are necessary for connecting the components.
A 12V fan and a 9V adapter are part of the hardware setup.
A USB cable is used to connect the system to a PC.
Ground connections are made between the LCD and Arduino Uno.
5V connection is established from the Arduino Uno to the LCD.
SDA and SCL pins are connected between the LCD and Arduino Uno.
Ground and VCC connections are made for the DHT11 temperature sensor.
Relay connections are established for the fan control.
Fan and adapter connections are detailed for power supply.
Coding involves importing necessary libraries for the project.
Fan control logic is based on temperature readings from the DHT11 sensor.
Fan turns on when temperature exceeds 30 degrees Celsius.
Fan turns off when temperature is below 30 degrees Celsius.
Demonstration of the system's functionality with temperature adjustments.
Transcripts
Assalamualaikum warahmatullahi
wabarakatuh pada video kali ini kami
akan memaparkan hasil Project mengenai
sistem kendali kipas otomatis berbasis
Arduino Uno dan sensor suhu di HT 11
saya Poppy musyarofah dengan NIM
4320706190143
[Musik]
dan rekan saya bernama Sridevi lusianti
dengan NIM 432076190170
Apa saja alat yang kita butuhkan yang
pertama Arduino Uno sebagai alat
mikrokontroler
[Musik]
yang kedua
LCD dilengkapi dengan i2c
[Musik]
ketiga relay 1 channel
[Musik]
keempat sensor suhu dht 11
[Musik]
kabel jumper
[Musik]
jangan lupa kabel jumper yang Mel to
female
[Musik]
keenam kipas angin 12v dan adaptor 9v
yang terakhir kabel USB untuk
menghubungkan ke PC
Mari kita coba merangkai alat yang
pertama ground di LCD
[Musik]
kita tancapkan ke ground pada Arduino
Uno PCC di LCD kita tancapkan ke 5 volt
pada Arduino Uno
[Musik]
SDA
ke A4
pada Arduino Uno
scl di LCD kita tancapkan ke A5 di
Arduino Uno
[Musik]
lalu yang kedua sensor suhu di hati 11
ground di suhu kita tancapkan ke ground
pada Arduino Uno
dht di suhu kita tancapkan kedua pada
Arduino Uno
PCC di suhu kita tancapkan ketiga pada
Arduino Uno
yang ketiga relay 1 channel
yang di relay kita tancapkan kelima pada
Arduino Uno
[Musik]
ground di relay kita tancapkan ke ground
pada Arduino Uno
PCC di relay kita tancapkan ke 5 volt
pada Arduino Uno
[Musik]
selanjutnya yang keempat kipas angin dan
adaptor yang sudah dibelah menjadi dua
kabel hitam kipas ke kabel hitam adaptor
atau negatif ke negatif Kita lilitkan
[Musik]
kabel merah kipas atau yang positif ke
ncd kita tancapkan
[Musik]
jangan lupa di obeng agar tidak mudah
lepas
[Musik]
kabel merah adaptor atau yang positif
kita tancapkan ke com di relay
[Musik]
jangan lupa di obeng juga
kita lanjutkan ke codingan langkah
pertama import dulu librarynya Langkah
kedua angka 2 merupakan PIN bat pada
Arduino Uno lalu in kipas sama dengan 4
merupakan inputan dari relay in power =
3 merupakan PIN PCC pada sensor Arduino
Uno
[Musik]
jika suhu di atas 30 derajat maka kipas
akan menyala
[Musik]
tetapi jika kipas di bawah 30° maka kita
seakan mati
lalu kita tancapkan saja USB ke PC
maka LCD akan menyala dengan indikasi
kipas otomatis yaitu suhu 29 derajat
kita langsung coba Panaskan sensor suhu
dhc 11
maka kipas akan menyala dengan suhu di
atas 30 derajat
untuk mematikannya kita coba tancapkan
dengan benda yang bersuhu dingin
kita lihat apakah suhu akan menurun
[Musik]
jika suhu di bawah 30 derajat
maka kipas akan mati
[Musik]
浏览更多相关视频
Monitoring Suhu Dan Kelembaban Menggunakan ESP32 + DHT22 Dengan Protokol MQTT
Automatic Plant Watering System using Arduino & Soil Moisture Sensor | LCD display [with CODE]
INTEGRATION OF SENSOR AND ACTUATORS WITH ARDUINO-I
IMPLEMENTATION OF IOT WITH RASPBERRY PI-I
New Blynk IOT Smart Plant Monitoring System
How to use sensors with Arduino
5.0 / 5 (0 votes)