MG Sinanju OVA Ver. (Review)
Summary
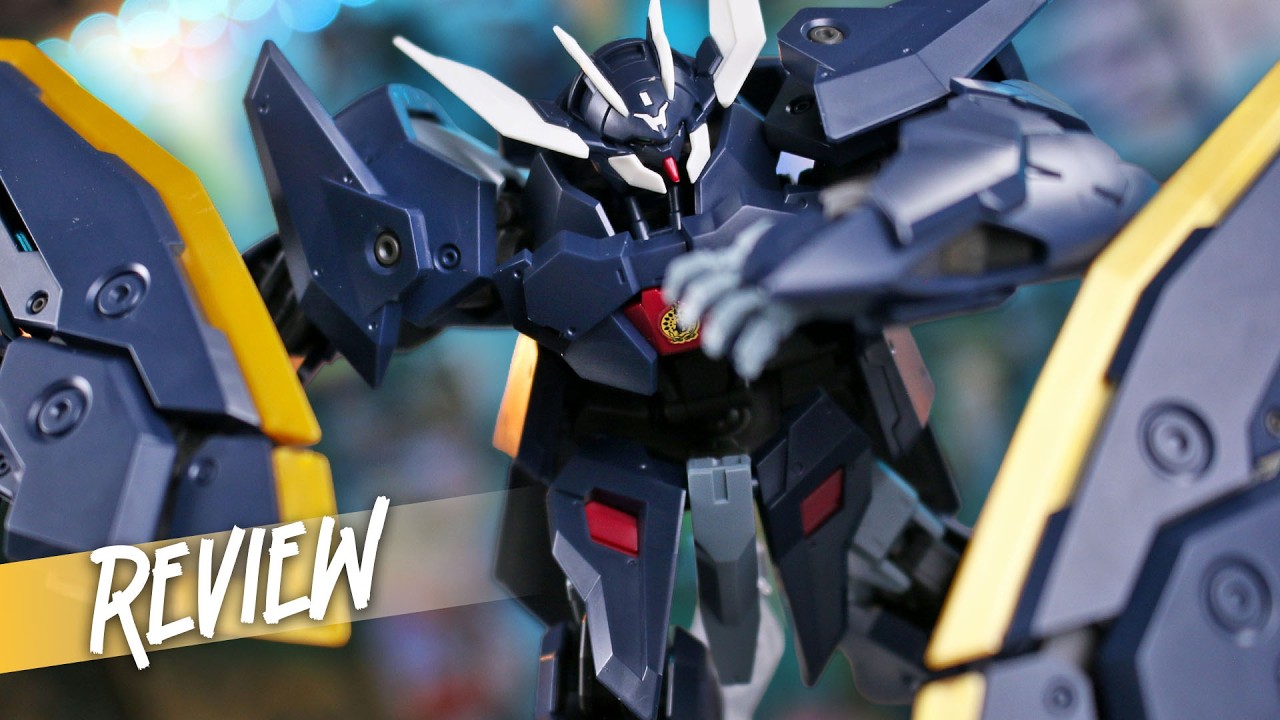
TLDRIn this review, the Master Grade Birkhoff OVA version from 2009 is showcased, highlighting its impressive design and detailed accessories. The kit, available at Gundam Store with a 10% discount, includes a bazooka and various decals. The reviewer praises the model's articulation, weapon combinations, and the option to use foil stickers or waterslide decals. Despite minor seam lines and the wish for more surface detail, the kit is recommended for its size, complexity, and value, especially for fans of the design.
Takeaways
- 🎨 The Master Grade Birkhoff OVA version model kit is praised for its impressive design and detail, even after 10 years since its release.
- 🔧 The OVA version of the kit includes changes in materials, with some parts of the ABS frame being replaced with polystyrene plastic, and it comes with a bazooka not included in the original version.
- 🛍️ For those interested in purchasing, the review recommends buying from a Gundam store using a provided coupon code for a discount.
- 🏷️ The kit offers a variety of decal options including foil stickers, waterslide decals, marking stickers, and dry transfers for customization.
- 🔫 The model comes with an array of weapons and accessories such as a beam rifle, grenade launcher, shield, beam axes, and beam saber effect parts, which can be combined in various ways.
- 🎭 The articulation of the model is commendable, with a wide range of movement in the backpack, head, torso, shoulders, and limbs, though some areas like the waist have limited movement due to the heavy backpack.
- 🤹♂️ The model's size is noted to be quite large compared to most Master Grades, making it a significant presence on any shelf or display.
- 🔄 A unique feature of the model is the ability to store the beam saber handles inside the forearm, which can be easily accessed using the saber effect bar.
- 🛡️ The shield has a different connection piece included for an alternative mounting style on the arm, offering more display options.
- 🚀 The bazooka attachment is a new feature in this version and can be attached to both the beam rifle and the shield, adding to the model's playability and display potential.
- 💸 Despite being a decade old, the reviewer considers the kit's price justified due to its size, complexity, and the amount of detail and customization options included.
Q & A
What is the Master Grade Birkhoff OVA version?
-The Master Grade Birkhoff OVA version is a model kit that originally came out in 2009 as the Master Grade Birkhoff. The OVA version has some material changes, with parts of the ABS frame being changed to polystyrene plastic, and it includes a bazooka which the original version did not.
Why might someone prefer the OVA version over the original Master Grade Birkhoff?
-The OVA version might be preferred because it includes additional features such as the bazooka and changes in material composition. It also comes with different decals, which can be appealing to collectors or builders who want a distinct look.
What is included in the box with the Master Grade Birkhoff OVA version?
-The box includes a large sheet of foil stickers for gold lining, waterslide decals in chrome gold, marking stickers in white, yellow, and red, dry transfers, an action-based connector, and a 1/100 scale standing pilot figure.
What are some of the weapons and accessories included with the Master Grade Birkhoff OVA version?
-The kit includes a beam rifle with clear green parts, a grenade launcher, a shield with stickers, beam axes with effect parts, beam saber effect parts, and a new bazooka exclusive to this version.
How can the weapons be customized or combined with the Master Grade Birkhoff OVA version?
-The weapons can be mixed and matched, and they can be plugged onto the shield and rifle in various ways, providing numerous posing and weaponizing options for the model.
What is the significance of the foil stickers included with the kit?
-The foil stickers are used for the gold lining details on the model. They provide a chrome gold finish that can be a viable alternative to painting or using waterslide decals for those details.
What is the articulation like for the Master Grade Birkhoff OVA version?
-The model has a good range of articulation, including movement in the head, torso, shoulders, arms, legs, and waist. However, there are some limitations due to the heavy backpack and the design of the waist section.
What is the recommended way to purchase the Master Grade Birkhoff OVA version?
-The reviewer highly recommends purchasing the kit from a Gundam store, which offers a 10% discount using a provided coupon code and supports the review.
What are some of the model's limitations mentioned in the script?
-Some limitations include the inability to slide the shield around on the arm like in the original version, a seam line on the back of the head, and the thruster on the fuel tanks. Also, the model has limited waist articulation due to the heavy backpack.
How does the Master Grade Birkhoff OVA version compare in size to other Master Grade kits?
-The Master Grade Birkhoff OVA version is described as a large Master Grade, taking up more shelf space compared to most other Master Grade kits.
What are some of the poseability options with the different weapon combinations?
-Even with the heavier weapon combinations, the model can still achieve cool poses, although it may be limited by the weight of the weapons. The model can hold onto the weapons without dropping them, but may struggle with certain poses due to the weight.
Outlines
🤖 Master Grade Birkhoff OVA Version Review
The script introduces a detailed review of the Master Grade Birkhoff OVA Version, a model kit from 2009 that still impresses with its design. The OVA version differs from the original by incorporating polystyrene plastic and including a bazooka not present in the initial release. The reviewer recommends purchasing this kit for its quality and inclusion of decals, suggesting buying from a Gundam store for a discount. The script mentions the kit's accessories, such as foil stickers for gold lining, waterslide decals, and various marking stickers, as well as the action-based connector and pilot figure. The review also highlights the ability to combine weapons and the overall value for money, urging enthusiasts to build this model at some point.
🔧 Unboxing and Accessory Overview
This paragraph delves into the unboxing experience, showcasing the model kit's accessories. It describes the process of applying foil stickers for gold lining and the option to use waterslide decals for a more ambitious build. The script mentions the inclusion of marking stickers and dry transfers, providing a variety of decal options. The weapons are extensively detailed, with the beam rifle, grenade launcher, and shield being highlighted for their design and functionality. The paragraph also discusses the ability to combine these weapons in various ways, enhancing the model's display and posing options.
🛠️ Articulation and Assembly Details
The script provides an in-depth look at the model's articulation, starting with the backpack's movement and detailing the head's extensive range of motion. It notes the cockpit hatch's opening mechanism and the torso's limited articulation due to the heavy backpack. The shoulder and arm movements are described, including the unique way the shield can be attached. The paragraph also covers the hand articulation, detailing the fingers' design and the beam saber handles' storage within the forearm. The lower body's articulation, including the skirt section and leg movement, is also discussed, emphasizing the model's posing capabilities.
🏹 Poses and Weapon Combinations Showcase
The final paragraph focuses on the model's posing and weapon combination possibilities. It describes the challenges of holding heavier weapons due to their weight and the model's articulation limitations. The script suggests using stands or modifying the model for better posing with heavy weapon configurations. It wraps up by reiterating the reviewer's fondness for the kit, noting its impressive design and the value it offers despite its age. The review concludes with a size comparison to other Master Grade models and a reminder of the kit's comprehensive decal options, including waterslide decals, marking stickers, and dry transfers.
Mindmap
Keywords
💡Master Grade
💡OVA Version
💡Polystyrene Plastic
💡Bazooka
💡Decals
💡Gundam Store
💡Coupon Code
💡Articulation
💡Waterslide Decals
💡Beam Rifle
💡Action Base Connector
Highlights
Review of the Master Grade Birkhoff OVA version, a kit that still impresses despite being 10 years old.
Comparison between the original and OVA versions, noting changes in material and inclusion of the bazooka in the OVA version.
Recommendation to purchase from Gundam Store for support and a 10% discount with a provided coupon code.
Inclusion of a large sheet of foil stickers for gold lining, providing a chrome effect without painting.
Availability of waterslide decals for a more ambitious detailing, despite potential application challenges.
A variety of decals including marking stickers and dry transfers, offering extensive customization options.
Introduction of the beam rifle with a clear green piece and its storage options within the model.
The grenade launcher's design and its compatibility with the shield and rifle for various weapon combinations.
The shield's design with stickers and its attachment options, including a new connector piece for a side mount.
Beam axes with extendable features and their combination for a double beam axes look with effect parts.
Beam saber effect parts with a unique design for a more interesting appearance compared to standard effects.
The bazooka's new inclusion in the OVA version, featuring movable handles and extendable features.
Articulation discussion, including the backpack's movement and connection stability.
Head articulation with an extendable range and clear green mono eye piece.
Torso and waist articulation limitations due to the heavy backpack design.
Shoulder and arm articulation, including the innovative way the shield can be connected.
Leg articulation with a good range of motion and detailed design under the skirt armor.
Size comparison highlighting the Master Grade Birkhoff as a large model in comparison to other Master Grades.
Various weapon combinations and their impact on posing options, despite some weight limitations.
Final thoughts on the kit's quality and recommendation for fans of the design, despite minor seam lines and detail concerns.
Transcripts
hey what is going on guys today we're
taking a look at the master raids two
non-jew ova version and wow it's been a
while since I've built this kit and it
still looks so amazing this is such a
nice looking kit
I just tend to forget after you don't
see it for a while but man I love this
kit so this kid originally came out in
2009 as the master grade Birkhoff later
the OVA version basically just changed
some of the material just some of the
ABS frame got changed to just
polystyrene plastic and also now the OVA
version does also include the bazooka
which the original version did not
include in the box so if you really want
to get this kit basically the only
reason for getting the burka is if you
really want the burqa decals but you can
buy the birdcall decals separately if
you can find them I think sometimes they
can be a little bit hard to find but
ultimately I think probably this is the
best version of this kit to get though
you can still get the perk call if you
do really prefer that but anyway if you
do want to get this kit I highly
recommend you get it from us a Gundam
store so thank you for their support and
sponsoring this review you can get this
kit and everything else there on their
site with 10% off using coupon code
there's a gorilla's 10 listed down there
in the video description as well as the
link to their site so check them out
this kit yeah 10 years old now but man
does it still hold up very nicely and
the weapons accessories everything for
this everything that you get in the box
definitely make it well well worth the
price this is one of those master grades
that you definitely have to build at
some point and I don't really ever say
that very often but this is one that I
definitely recommend that everyone
should build at some point just because
of how great it is and yeah well we'll
get into it so let's just start off by
just going through Evol the accessories
and everything that we get included in
the box here with this alright so first
up this came with a big sheet of foil
stickers for all the gold lining which I
did use on here and I have to say does
look really good I mean if you take the
time to put it on nicely I mean if you
didn't want to paint this or use the
waterslide decal so we also have I'll
show you in a minute then I think using
the stickers for this is a very viable
option I mean if you look really up
close you can see our eye is just
stickers you know but at a distance the
stickers do look really nice and that
gold chrome for those I think very
convincing but if you are feeling a
little bit more ambitious you do all
of course have the waterslide decals
here as well which are also in a really
nice bright chrome gold although I don't
know if I think you're probably infer
would have a challenge using these I
think probably ultimately what I would
do is just do a reverse wash painting
technique but I might give these a try
anyway you also have a set of marking
stickers I didn't use any of these this
is just a bunch of different markings
here in white yellow and red and we do
also have a set of dry transfers as well
so plenty of different decals that you
can put on this in all sorts of shapes
and sizes and of course we have an
action-based connector for this and a
standing pilot figure here 100 scale
full-frontal
and is just kind of standing pose
alright then let's get into the weapons
because we've got a lot to go over here
so first we have the beam rifle which is
very nice you have a clear green piece
in there it's very light clear green and
we actually have two of them one for
like the secondary camera back there
which can rotate out like that or you
can rotate that in to line them up
together otherwise this doesn't really
do anything else doesn't plug on to the
back of the suit anywhere or anything
it's just meant to be held in hand but
we can open up this for storage with
some other combination with some other
weapons which we'll get to in a moment
first of which being the grenade
launcher so you just kind of I guess
that's actually upside down there we go
so this can just be held in the hand as
it is I'm not sure how well though I
think it might be a little bit kind of
wonky to get to actually hold on to that
but we can applaud this up into here
that will just plug on to the underside
of there then you can close this back up
there you go for the more bulk doubt
beam rifle look with the grenade
launcher attachment onto the bottom of
that I love this and that's really in a
really nice you can also attach that
though on to the bottom of the shield or
so here's the shield again with some
more of those cool stickers on there
again these lining bits you know it's
not really all that difficult to get
them put on there straight so again the
stickers do look really nice if you just
take your time with those the shield
just very nice this will just attach
onto the back of the arm unfortunately
no way to kind of slide this around like
with the size of you burqa it's like
kind of on a track you can slide the
shield around to the side of the arm you
don't have that option with this one
that is one of the things that I dislike
about this kit unfortunately
oh excuse me hey guys editing Zaku here
and I realized something that I wanted
to add into the video here so according
to the manual you have this one left of
our extra piece from the bazooka Runner
and I didn't really think about it too
much until I just kind of realized now
that this is actually a different piece
for the shield connector so you can use
this to mount the shield not totally
onto the side of the arm but more off to
the side rather than just straight onto
the back of the arm like with the
regular shield connector so not really
sure why it tells you not to use this
part at all but you can definitely use
that to connect the shield on to the
side of the arm sort of so there you go
you won't see like this at all for the
rest of the review because everything
else is already filmed but I just want
to let you guys know that you do have
that and so don't throw away that extra
part if you do want to use this for the
shield which you probably do but this
arm attachment can be folded up and you
can actually mount this onto a hook like
up on like the shoulder armor which is
kind of wonky it's really weird I'll
show it to you guys any a little bit
later but I've never really found it to
be all really that useful but as I
mentioned you can attach the grenade
launcher here into the back of the
shield we stink that up into there there
you go that can be attached in there so
you can shoot that out the shield
instead then we have the beam axis so
these are really nice these can just be
handheld these actually do slide up like
that as well for their extended form
like that and so these can actually they
have a different connectors there at the
end they can be attached together to
make it double beam acts like this and
we've got some beautiful effect parts
for these to short and to long beam
effects parts again gonna be the same
ones that are included with the subs
beaver car and so you'd be familiar with
these if you built that kit already of
course there's the shorter blade and the
longer more pointy blade and so the
effect parts for these look fantastic
these can also be stored into the back
of the shield though we stick one on
this side and other on opposite side
like that there you go those can be
plugged into the back of the shield like
that and then of course you can use the
effect parts with that as well
like that for a really cool look again
that's half and half of course if you
wanted to make it symmetrical could use
the same ones like that and now that's
going to be very long
not sure how well it's gonna be able to
hold on to that because now it's of
course getting very heavy with all this
on there but can get heavier with our
last accessories well not net last let's
talk about these first so we have these
effect parts as well these beam saber
effect parts the beam saber handles are
stored up inside the forearm I'll show
you in a minute you can just pull those
out and we've got these really nice
beams every effect parts here also in
clear yellow really love the effect on
these rather than just like your
standard beam saber effect parts these
have a much more interesting look to
them they look fantastic but then the
last accessor here is of course the
bazooka which is new to this version of
the kit so here's the full extended form
I guess I should say it like that
it's really really cool the main handle
can move forward and back like that and
does also have a secondary handle up
here which can move side to side like
that and as you saw here it does also
extend it but that's for attaching it
onto some either the rifle or the back
of the shields this also can be attached
on to either one of those as well so the
first thing to do that to remove this
kind of array here on the top I'm gonna
go back to the rifle here and fold out
the secondary camera like that and also
remove this and take the pieces that we
took off the top of the bazooka remove
this part here off the back real quick
so the beam rifles scope on to the top
of here there like that and then take
this piece leave took off put it back
onto there plug this back on to the top
of the beam rifle and it's getting
pretty bulked out now there on the top
it's pretty loaded up with all that
stuff on the top of there and then we're
going to take the bazooka and plug this
on to the bottom of here so you need to
put this down to its fully closed up
form like that and it just plugs on to
the bottom in the same way that the
grenade launcher did clip clip that all
into place and there you go I love this
as well it's SuperDuper heavy though so
it's really not going to be able to hold
this out because it's just too heavy but
it looks fantastic if you can get it to
hold it up then more power to you might
have to use a secondary stand or
something or you know glue or pin the
arm in place to make it totally fixed
pose but this weapon is just too awesome
looking so if you had to the bazookas
you have one attached onto here it could
also attach it onto the back of the
shield though so attached to the back of
the shield we're going to take our out
this handle and then we're gonna put
this connect this
back onto the back part of here plugs
into place up inside there like that is
gonna just plug straight on to the back
of the shield here and then the beam
axis will actually you can see will plug
into these little bits here on the side
like that and then keeps wanting to kind
of extend out on its own there I want to
forgive that but anyway here it is then
attached onto the back of the shield so
really cool so I mean the weapons
themselves are all really cool just by
themselves but the fact that you can mix
and match them and plug them onto the
shield and rifle all sorts of different
ways is just really really cool just
makes for a lot of different posting
options and like weaponizing options you
can do for the shinenju here there
alright now that we're through all of
that let's talk about some of the
articulation I want to go over the
backpack first because then I want to
remove that before going over the rest
of the articulation just so it's out of
the way so first off the big thirst or
pause here at the top can move
side-to-side and also up and down so you
have a pretty wide range of movement
there for those they can also open up
when you open up the top and bottom the
middle part extends out so watch that
carefully like that it's a little bit of
movement but still pretty cool and
especially if you've seen the OVA or the
anime version where that does that in
the anime it's cool field to recreate
that with the model kit here so very
nice and of course everything looks
really good on that fuel tanks here are
also on Baldwin sangkum you can sort of
adjust the angle of those slightly but
not really a whole lot of movement
really with those that's pretty much it
there for the backpack luckily it has a
better connection than the Hg it just
kind of slots down into there and it's
pretty strong pretty secure connection
for that so let's go to the head then
head you can extend up all the way to
there which is actually pretty nice to
think really nice upward movement there
you have a clear green part in there for
the mono eye as well really hard to see
up inside there although I will say I do
wish that de volcans were in molded gray
just if those were molded piece not
really that hard to paint so I'm not
really too worried about that but it
just would've been nice if they were an
actual separate part kind of like with
the unicorn then the head will go all
the way down to there so overall really
nice it does have a little tiny bit of a
seam line here in the back of a head
under like the main top part under his
hat a little bit of seam line right down
the middle of the back of there
it's pretty negligible here for the
cockpit hatch that can't open up you
open up this top bar here first this
second part here that also opens up like
that and then the lower part opens down
you can see our seated pilot figure of
full-frontal is up inside of there but
it's not really going to be all that
easy to see I suppose it'll just close
that back up as for the articulation of
the torso you got a little bit to the
back and maybe just a tiny bit of port
and back movement there side to side
movement also not really gonna be all
that existent and then also rotation we
have a little bit here
side to side not really a whole lot so
towards articulation not really all that
much but again it's got a heavy backpack
so having lower articulation there in
the waist could have been an issue with
that
as for the shoulders those will extend
out to the front all the way to there so
not too bad shoulder armor can move up
by itself to about therefore I'm
noticing the parts kind of sort of
coming apart a little bit like that and
then of course this part here does also
move separately on its own there and
here is where that part will extend out
for connecting the shield this little
part here pops out like that and then it
hangs down and the shield can hang on
that and yeah I've just never really
found it all that practical it really
but it's I guess it's there anyway I
suppose so then the arm can go up all
the way to there which is more than 90
degrees so not too bad upward movement
there for that otherwise the arm will
just work pretty and normally here this
rotation there at the top and then a
double joint there at the elbow to give
you a nice full Bend there like that the
wrist is on a ball jump then also does
have a hinge so you can move that
forward and back a little bit as well
the thumb is one piece just on a ball
joint but the fingers are two pieces
each well that's it's one in three
fingers so you're the first finger then
the second third and fourth finger joint
you can slice those apart if you want
each finger has a single joint they're
in the middle of them so they're kind of
not the fully articulated fingers but
like the mostly articulated fingers I
think is pretty good pretty well enough
and the back of the arm does also open
up the front part kind of bends forward
a little bit in the back part can be
extended out like that and there's where
you got your beam saber handles up
inside there so good easy ways to take
them out is just by using
Sabre effect bar and I'm gonna push that
out the back like that and you've got
your beam saber handle there or if you
put the beam saber effect part in there
you can stick that up inside the arm
like that for some beam tonfa action so
that's pretty cool down here in the
skirt section obviously going to be a
little bit limited by the tubing parts
here the hoses around the waist section
are going to be kind of getting the way
a little bit but you can move the front
skirts up to about there which is not
too bad but it's gonna be a little bit
limiting the side skirts as well we'll
move up to there so I'm not bad at all
for those back here at the back skirts
those will move separately have some
nice color separation with a little bits
of grey poking out around in different
sections on there up underneath the
skirt section as well also got a lot of
really nice detail up underneath there
and up right at the front skirt as well
but it's gonna be kind of hard to see
but you do it's a nice detail up
underneath the skirting armor which is
always nice hip joint is not on a track
or anything so that doesn't move so just
got some rotation here at the top you
can bring the leg out to the side nice
and far no problems with that but
forward to about 290 degrees looks like
it's probably gonna be about the limit
of that where this the front skirts
gonna be getting the way ask for our
knee bend here with this nice knee bend
with some separation of this kind of two
parts of the knee armor there the outer
red part and the inner decorative parts
there for the knee both separating
giving you a really nice full Bend there
at the knee very nice close that back up
this part here on the side of the leg
can be kind of extended out a little bit
aways from there and you can rotate that
forward and back up and down and kind of
move that all around basically just
gonna be kind of stuck on to the side of
the leg as best you can for most of the
time this little piece here on the front
above the ankle does move up and down a
little bit like that here on the back
this part does also move up and down
like that the secondary partners also
move up and down like that for opening
that up and then for the ankles you can
get a pretty good side-to-side movement
there with those I love the kind of
design of these sort of like slimmed it
down Osby feet very very nice for the
design of these the little toe band
there and just a little bit and then the
whole front half the book can also bend
up a little bit like that but not down
so you're only gonna be gonna be able to
put the point the toe down a little bit
but you can bring the whole foot down
all the way to there so that's really
nice
or that's up underneath the feet got
some nice detail up on her there as well
and then I just also want to show you
guys a quick size comparison here cause
addition under is a very big boy it's
going to be a very large master grade
compared to most master grades and so
yeah it's gonna be taking up a lot of
shelf space alright so obviously it was
so many different weapons combinations
there's going to be a lot of imposing
options I'll just go through some of
them now to wrap up the review but I
wanted to start off with some of the
heaviest options here with a bazooka
mounted onto the beam rifle and the long
a huge effect parts mounted onto the
shield ya can hold on to the big giant
rifle and bazooka that's not gonna be
able to hold it up straight by any means
I've tried it it's just not gonna work
so but it can actually it can hold on to
it without dropping it so the hand is at
least strong enough to at least hang on
to that it's just going to be is you're
gonna have a hard time actually having
it like up in a sort of firing pose but
either way it does still look awesome
even though it's not firing it even if
it's just hanging on to it it still
looks really good be among all the
different weapons combinations even if
you are using some of the heavier ones
you can still do some cool poses with
those even though you're going to be a
little bit limited by them but you do
have a lot of different options to work
with so you you have a lot to choose
from anyway maybe you guys couldn't tell
I really really like this kit there was
very little to complain about it aside
from the way the weapons there's the c1
on the back of the head a little tiny
seam line there's the seam line on the
thruster on the fuel tanks on the back
and do wish that the little very little
grey vents a little square vents at the
end of the fuel tanks if that was a
separate piece I feel like if this kit
was made today then that would be a
separate piece otherwise you just have
to mask those while you're painting the
fuel tanks not really a big deal but
it's just one small little thing while
this building I was just reminded like
oh yeah that's like not a separate part
that's that's too bad but otherwise yeah
the kit is is great it still it looks
fantastic despite it may have a little
bit of trouble doing some certain poses
I think whatever pose you put it in
whatever good pose you're able to get it
in its gonna look fantastic and it may
be a little bit expensive but it's very
large and a really complex and really
nicely put together kits so I think
totally justified in the price you get a
lot of different weapon options and
everything in
I get a lot of sticker decal options as
well the fact that it comes with any
waterslides at all is a blessing and
that would just with standard release
master grades if it's not a ver Cod then
normally it doesn't come with any water
sides at all so it's nice to get some
water side decals in there for the
lining the stickers do look pretty good
though if you want to use those
otherwise and then you have the regular
marking stickers and dry transfers as
well so a lot of different decal options
for this to dress it up even better some
people might think that it's a little
bit low on surface detail and I could
sort of understand that yet could have a
little bit more in the way of surface
detail in some areas but not really a
big thing for me I like the look of this
just as it is but of course you could
dress it up adding some more detail on
to that if you wanted if you're so
inclined
but I would say as it is even ten years
later this is still the best version of
the Chinon juice so if you are a fan of
the design then definitely pick up the K
at some point and so that is it for the
review guys again thank you to us at
Gundam store for their support thank you
all for watching if you have further
questions or comments of course as
always feel free to leave those down
below in the comment section and I'll
see you guys next time have a go on back
[Music]
[Music]
[Music]
浏览更多相关视频
In Era Trailblazer - Third Party Throwdown #review #gundam #mecha #model #ガンダム #ガンプラ #thirdparty
I had to pick up the 1/100 Trailblazer after building the Ruling.
劇中の名シーンを完全再現できる高級フィギュア!【メタルロボット魂/イモータルジャスティスガンダム】ジャスティスと同じサーモンピンクになって登場!プロポーションが美しすぎる神デザイン!(HGと比較)
168元狗头量产机?特战工业 哨兵 合金骨架拼装模型【评头论足】
SH Figuarts Spy X Family Yor Forger Action Figure Review Tamashii Nations BANDAI
RingConn Gen 2 from a guy who didn't want one...
5.0 / 5 (0 votes)