Pass The Car Test Every Time!
Summary
TLDRIn this informative audio production tutorial, the speaker shares a technique known as the 'compressor cocktail' to achieve a tight and impactful low end in music production. The process begins with a low cut at 20 Hertz to eliminate unnecessary low frequencies, followed by the use of the FabFilter Pro MB for compression settings that enhance the bass without making it flabby. The speaker emphasizes the importance of using ears and visual cues to find the right crossover point and compression settings. The cocktail continues with an old-school compressor like the Fairchild for a warm, gluey sound that brings the entire mix together. The tutorial also covers side chain filtering and the use of a gain reduction plugin for accurate A/B testing. The speaker provides links for downloading project settings and further learning resources, promising a follow-up video on mastering with Ozone 10.
Takeaways
- 🎚️ **Room Acoustics Impact**: Achieving a tight low end can be difficult in a room that isn't well-treated acoustically.
- 🚗 **Car Test Reference**: A mix that sounds good in your space might not translate well elsewhere, like in a car.
- 🍹 **Compressor Cocktail**: A set of go-to compressor settings can help fix low-end issues and improve translation across different listening environments.
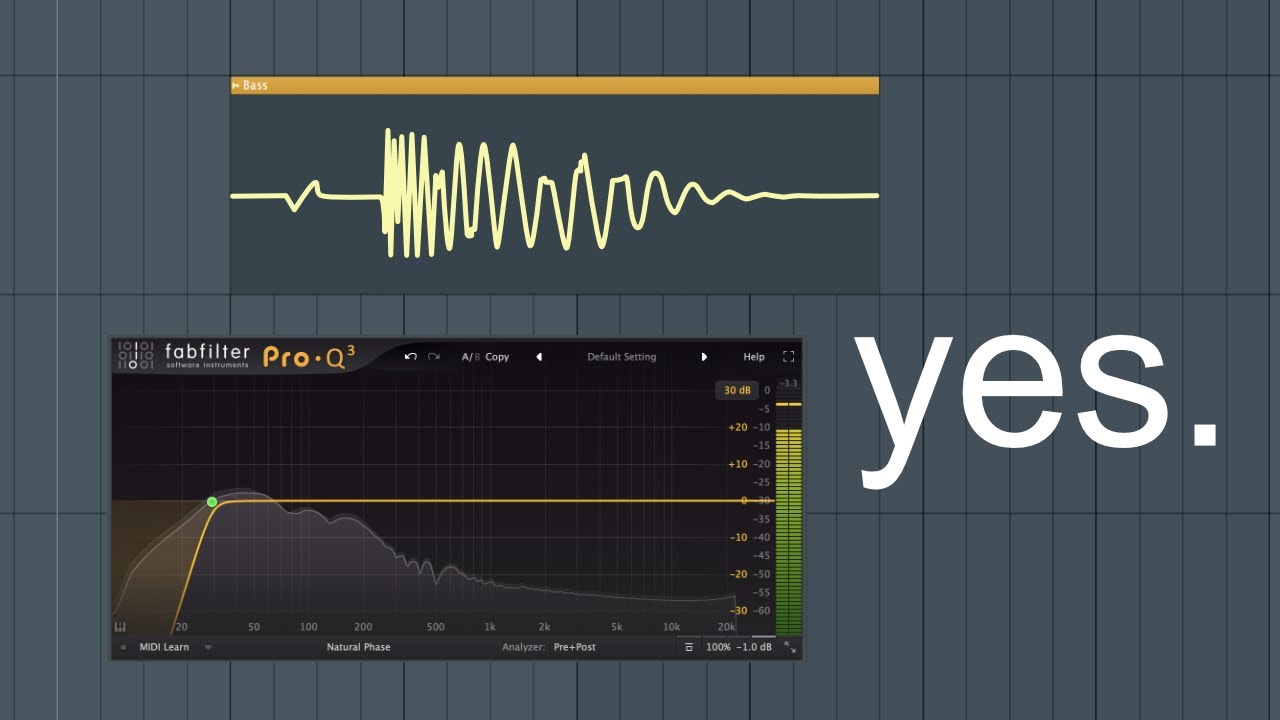
- 🔊 **Low Cut Application**: Using a low cut filter at 20 Hertz can remove unnecessary low frequencies without losing the essential low end.
- 📊 **Visual and Auditory Adjustment**: Set the crossover point on the compressor by using both visual cues from the screen and auditory feedback from your speakers.
- 🔧 **Compression Settings**: A 4:1 ratio, medium knee, midway attack, and fast release are suggested settings for controlling the bass.
- 🎶 **Mono Summing**: Slightly monoing the bass can help tighten it up without going fully mono, which is often unnecessary.
- 📈 **Gain Reduction**: Add a small amount of gain reduction to the low mids to add weight and smack to the low end, but be cautious of muddiness.
- 🔉 **Threshold Adjustment**: Adjust the threshold so the compressor moves quickly to give a nice smack to the low end without losing the kick.
- 🎛️ **Vintage Compressor Use**: An old-sounding compressor like the Fairchild can be used for its warmth and gluey sound without heavy gain reduction.
- ⚙️ **Side Chain Filter**: Use a side chain filter to prevent low-end frequencies from triggering the compressor too much, allowing the mix to come together.
- 📉 **Subtle Compression**: Barely touching the threshold on the Fairchild compressor can add character without significant gain reduction.
- 🔇 **Gain Matching**: Use a gain matching plugin to compare the pre- and post-compression audio levels to ensure a fair comparison.
- 🔗 **Resources for Learning**: Links are provided to download project files and settings, as well as to learn more about mastering and mixing.
Q & A
Why is achieving a tight low end difficult in a room that's not well-treated?
-A tight low end can be challenging to achieve in a room that's not well-treated because the room's acoustics can distort the sound, making it sound good in that space but failing to translate well to other environments, such as a car audio system.
What is the term used in the industry to describe a set of go-to settings that fix bass issues?
-The term used in the industry for a set of go-to settings that address bass issues is the 'compressor cocktail'.
What is the purpose of using a low cut at 20 Hertz?
-Using a low cut at 20 Hertz helps to remove unnecessary low-frequency 'waffle' or rumble that may not be needed and can muddy the sound. It also prepares the sound for the addition of more controlled low-end frequencies.
How does the FabFilter Pro MB contribute to the 'compressor cocktail'?
-The FabFilter Pro MB is used in the 'compressor cocktail' to add compression to the low end, making it tighter and more defined. It also helps to translate well across different listening environments.
What is the significance of setting the crossover point on the compressor?
-The crossover point on the compressor is set to identify where the low end of the kick drum occurs. This helps to focus the compression on the correct frequency range, ensuring that the kick and bass are separate and punchy without being overly compressed.
Why is it important to use your ears when adjusting the gain reduction and threshold on the compressor?
-Using your ears is crucial because it allows you to make subjective judgments about how the compression is affecting the sound. This ensures that the low end is not overly compressed, maintaining a natural and dynamic sound.
What is the role of the Fairchild compressor in the 'compressor cocktail'?
-The Fairchild compressor is used in the 'compressor cocktail' to add warmth and glue to the overall sound. It compresses the top end slightly and brings the entire signal together, resulting in a more cohesive and punchy mix.
How does the side chain filter, or detection filter, affect the compression process?
-The side chain filter allows the compressor to react only to frequencies above a certain threshold, ignoring those below it. This helps to prevent the low end from dominating the compression and ensures that the entire mix is compressed cohesively.
Why is it recommended not to have the Fairchild compressor's output needles moving significantly?
-Not having the output needles move significantly on the Fairchild compressor indicates that the compression is subtle and not overly aggressive. This preserves the vibe and warmth of the sound without over-compressing the signal.
What is the purpose of using a gain matching plugin like iZotope's Insight?
-A gain matching plugin ensures that when comparing different settings (A/B testing), the gain is consistent. This allows for an accurate comparison of the audio without being misled by differences in volume.
How does the 'compressor cocktail' help with achieving a balanced low end in music production?
-The 'compressor cocktail' helps by using a combination of low cut filters, precise compressor settings, and additional compression with a vintage compressor like the Fairchild to achieve a tight, punchy, and well-defined low end that translates well across various listening environments.
What is the next step recommended for those who want to learn more about mastering or mixing?
-The next step for those interested in mastering or mixing is to visit streaky.com, which is suggested in the script as a resource for further learning.
Outlines
🎚️ Achieving a Tight Low End with Compressor Cocktail
The paragraph discusses the challenge of achieving a tight low end in a recording environment without the benefit of a well-treated room. The speaker introduces the concept of a 'compressor cocktail,' a set of go-to settings that can fix common low-end issues. The focus is on using a compressor to address flabby bass sounds and ensure they translate well across different audio systems. The speaker provides a step-by-step guide, starting with a low cut at 20 Hertz to eliminate unnecessary low frequencies and then using the FabFilter Pro MB for dynamic compression to tighten the low end. The settings include a 4:1 ratio, a medium knee, a midway attack, and a fast release, with adjustments made to mono the bass slightly and add some level in the low mids for weight and impact. The paragraph concludes with a demonstration of the improved sound and an introduction to the next part of the compressor cocktail.
🎛️ Adding Warmth and Punch with an Old-School Compressor
This paragraph continues the discussion on enhancing the low end of a mix by introducing an old-school compressor, specifically a Fairchild compressor from UA, to the 'compressor cocktail'. The speaker emphasizes that the goal is not to compress heavily but to achieve a warm, gluey sound that adds vibe to the mix. The Fairchild is set up with a side chain filter to ignore frequencies below 150 Hertz, focusing on the higher frequencies to maintain the low-end control achieved previously. The settings include a quick attack and a threshold that barely engages to avoid significant needle movement, aiming for a subtle effect. The speaker demonstrates the difference the Fairchild makes in the mix, highlighting the tighter bass and cleaner sound. The paragraph ends with a mention of using a gain reduction plugin for A/B testing and a teaser for the next video on mastering in Ozone 10.
Mindmap
Keywords
💡Low End
💡Compressor Cocktail
💡Fabfilter Pro MB
💡Crossover Point
💡Compression Ratio
💡Attack and Release
💡Monoing the Bass
💡Gain Reduction
💡Threshold
💡Fairchild Compressor
💡Side Chain Filter
💡Gain Matching
Highlights
Achieving a tight low end can be difficult without a well-treated room.
The 'compressor cocktail' is a go-to setting to fix low-end issues.
The Fabfilter Pro MB is used with specific settings to enhance the low end.
A low cut at 20 Hertz is recommended to remove unnecessary low frequencies.
The low cut should be gradual, not a straight brick wall cut.
The crossover point on the compressor helps to isolate the low end kick.
Settings include a 4:1 ratio, medium knee, midway attack, and fast release.
Monoing the bass slightly can tighten the low end.
Adding 1 dB of gain at a specific range can enhance the low end without muddiness.
Threshold adjustment is crucial for fast movement and a tight low end.
Using an old-type sounding compressor like the Fairchild can add warmth and vibe.
The Fairchild is used more for its sound than actual compression.
A side chain filter is used to avoid the low end from controlling the compression.
The threshold on the Fairchild should be set to barely affect the gain reduction.
The use of a gain reduction plugin allows for accurate A/B testing.
The final result is a tighter bass sound without losing the kick.
Project files and settings can be downloaded for personal experimentation.
An upcoming video will cover mastering in Ozone 10.
Transcripts
we all crave a really tight low end but
if you're not in a well-treated room to
achieve this it's near impossible it
sounds great in your space but instantly
fails the car test wouldn't it be great
if you had some go-to settings that fix
this issue once and for all well I'm
about to give you those settings and in
the industry we call this the compressor
cocktail so you're at your studio you
don't know what the bass is sounding
like because you haven't got massive
speakers like I've got so I've got some
settings I use them all the time on
tracks where the bass is a bit flabby I
can hear what's going on so I know that
these work and I know these translate to
any other speakers this is going to save
your low end so I'm going to show you
today with a dance track how to do it
then you'll be able to do this on any
type of music it also works for band
music where you've got a sort of flabby
kick and stuff like that so let's have a
quick listen to what we're dealing with
foreign
but it's not very well defined so we
want to get that so that we can hear the
kick and the bass separate and we want
them to be really Punchy so first thing
we do is we are going to get a low cut
now I'm just using logic's standard low
cut we want to do a cut at 20 Hertz now
I can hear loads of dance music people
crying at the moment saying but there's
stuff going on at 20 Hertz I don't want
to cut it off but the fact is it doesn't
matter that you're cutting that off
because we're going to add some again
what is this going to do all the waffle
that's hanging around under 20 Hertz
it's going to move that away now when
you're counting 20 Hertz you're not just
doing a straight down brick wall cut
you're doing a cut so it's like that 20
Hertz is here so you are still getting
some of this low end down to zero it's
not just straight down like that let's
have a listen to the low car and you can
hear what's going on
foreign
when you're in a nightclub I know that
you want it to be smacking through and
that's why I'm going to show you the
next thing that we're going to add to
this this is the fabfilter pro MB this
is the streaky compressor cocktail
setting which you can download from the
link in the description but for the
moment let me just tell you exactly how
this is set up and why I've set it up
this way so what we do is the crossover
point on here when the track is playing
we can see on the um screen whereabouts
the low end kick is happening because
it's like always going to be a duck like
that let me just show you
foreign
so you can see it was around that area
here so that's where we put the
crossover point so you need to use your
ears but you can also use your eyes
because you can roughly see where the
main bit of the kick and stuff is
happening and it's usually you know
around the hundred points so I won't go
any lower than 80 Hertz won't go any
higher than 120. the next thing we want
to do is go through these settings here
we've got it in Dynamic phase ratios
four to one sort of medium knee then
we're going Midway attack and a fast
release we're obviously in compression
mode now this output here what we're
doing is I'm just bringing this outside
down halfway everything that this is
affecting it's Mont taking away level
from the side so this is just monoing
the base a little bit I'm not going to
go four mono just knit a little bit
because then it'll get it a little bit
tighter a lot of the times a lot of the
bass is mono anyway but this is just to
make sure and now the settings up here
now we want to add about 1 DB of game
pain this range so the amount it will
come down is around 3 DB when it comes
to this curve here you need to use your
ears because what we're doing we're
adding some level here so in effect
we're EQ in the low end we're bringing
up a DB of level in the low end and then
we use our ears here because if you can
see this curve is going all the way up
to about 500 Hertz so there's a lot of
other things that are going to get
affected by the level coming up but the
great thing about this is when you're
adding a bit of level in the low mids
that's where it adds some good weight to
the low end and you get a nice smack
going on but it can also start sounding
a little bit muddy so that's why I'm
saying you need to use your ears to like
bring it in a little bit don't go too
tight but don't go Ultra wide because if
you've got vocals if it's a guitar track
and you're going to start getting all
the kind of low end of that coming in
and then you're going to start eq'ing in
other places to kind of get rid of that
so what we're going to do we're just
going to then play with the threshold
until we get it so that this is giving
it some really good fast movement let me
show you that
foreign
so what's going on here is we've lifted
the level in the low end which
counteracts what we did with the cut at
20 Hertz so we've got the cut happening
we're also lifting the level so it's
kind of counteracting a bit of that cut
but that Cut's still there just to get
rid of any kind of waffle that's going
on and because we've got this compressor
moving quite quickly then what that does
it just gives it a really nice smack to
the low end it's not being sort of moved
by the stuff that's happening low down
but it's important to keep the movement
going in the low end we don't want to
just have the compressor just ducking
only we want it to be moving up to so
that we get some movement and we don't
lose all of the kick but this is what
makes it nice and tight and punch
through the speakers which leads me on
to the reason why this is called the
compressor cocktail because the next
thing in our chain is we want an old
type sounding compressor I'm using a
fair child from uad I just want the
sound of it I'm not going to be doing
any compression necessarily with this
I'm just running through it and what
this is doing it's going to be
compressing the top a touch but not
hardly any because I'm hardly touching
it because I've already got the base
under control with the previous
compressor this here is just going to be
compressing all of the signal which
means that it brings it back together as
a whole piece but it does make it really
Punchy but the sound of the compressor
of the Fairchild gives this really warm
gluey sound which just adds so much Vibe
it's insane and it works a peach every
time so for all the people that have had
a go at me in the past when I've said if
your needles are moving on your
compressor you're compressing too much
this is the reason why I say that by
just having the sound of the compressor
and not using it to like do massive gain
reduction we don't want it for that we
just want it for the vibe so first thing
I'm going to do on here is I'm setting
up the side chain filter now another
word for side chain filter is the
detection filter so if I have this at
about 100 150 it's not going to react
from the frequencies below 150 or
whatever I set it to it reacts on the
frequencies above the reason why I'm
doing this is because there's so much
energy in the low end normally the low
end will be the thing that gets detected
first by the compressor and then that's
doing all the kind of hard work we're
already controlling that low end with
the previous compressor so this is
joining it together in effect which is
kind of making the cocktail I've got the
time constraint to one which is quick
and then I've got the threshold I'm just
going to get it so that it's tickling it
and then pull it back so the needles
aren't moving at all I've got these set
on game reductions so you can see and
I'm not touching the input gain at all I
just want to run through it and I'll
show you the difference between it on
and off now let's listen to these
settings on the Fairchild I'll adjust as
we go shouldn't need too much just a bit
of threshold let's hear how it sounds
oh
my God
[Music]
so you can hear that cleans things up
nicely but I can also hear everybody out
there screaming what about the game
difference so this is the next plugin
you should always use this when you're
doing a b testing against stuff so that
you're not fooled by any gain that's
going on on the output bus of here I
have metric a b if I press match when
the track's playing it will then match
the gain of the before so that when we
flick a b I'll be able to hear the exact
difference without any game problems so
let's listen to how it sounds with the
gain exactly the same
mother
s
so now you can hear the bass is much
tighter if you want to try this out for
yourself the links are below where you
can download the project you can
download my settings for the Fab filter
and if you want to learn exactly how to
master or mix go to streaky.com the next
video coming up is me mastering in Ozone
10. so check that out if you have ozone
10 or even ozone 9.
浏览更多相关视频
![](https://i.ytimg.com/vi/EBvYsQS6k50/hq720.jpg)
EQUALIZZAZIONE SOTTRATTIVA: Come Pulire un Mix e Separare i Suoni (Equalizzatore)
![](https://i.ytimg.com/vi/iZToEmjulUw/hq720.jpg)
How Pro Engineers Put Effects On Vocals
![](https://i.ytimg.com/vi/CXtl5_NlTIs/hq720.jpg)
Perfect Compression In 321 Seconds
![](https://i.ytimg.com/vi/txaDbWZVurI/hq720.jpg)
RADIO READY Vocal compression | Pro Engineer Mixing Tutorial
![](https://i.ytimg.com/vi/duEWYC8Zg2s/hq720.jpg)
MOST Mixers Get this WRONG! | Clipping vs Limiting
![](https://i.ytimg.com/vi/sA_fkyweW4g/hq720.jpg)
EVERY TIP to make your Mixes Clean and Loud!
5.0 / 5 (0 votes)