DTI 2.0. | 6.14 Break of Low (BOL) 2.0
Summary
TLDRIn this video, the presenter explains a trading setup called 'Break of the Low' (Bo). The strategy involves using 5 or 15-minute time frames to identify market structure where price forms lower lows and highs. Traders wait for price to close below the low and then enter the trade, placing stop losses above the previous candle's high. The goal is to achieve a 2:1 risk-reward ratio while ensuring sufficient market volume. The presenter also covers the importance of proper stop-loss placement and provides examples to illustrate the approach.
Takeaways
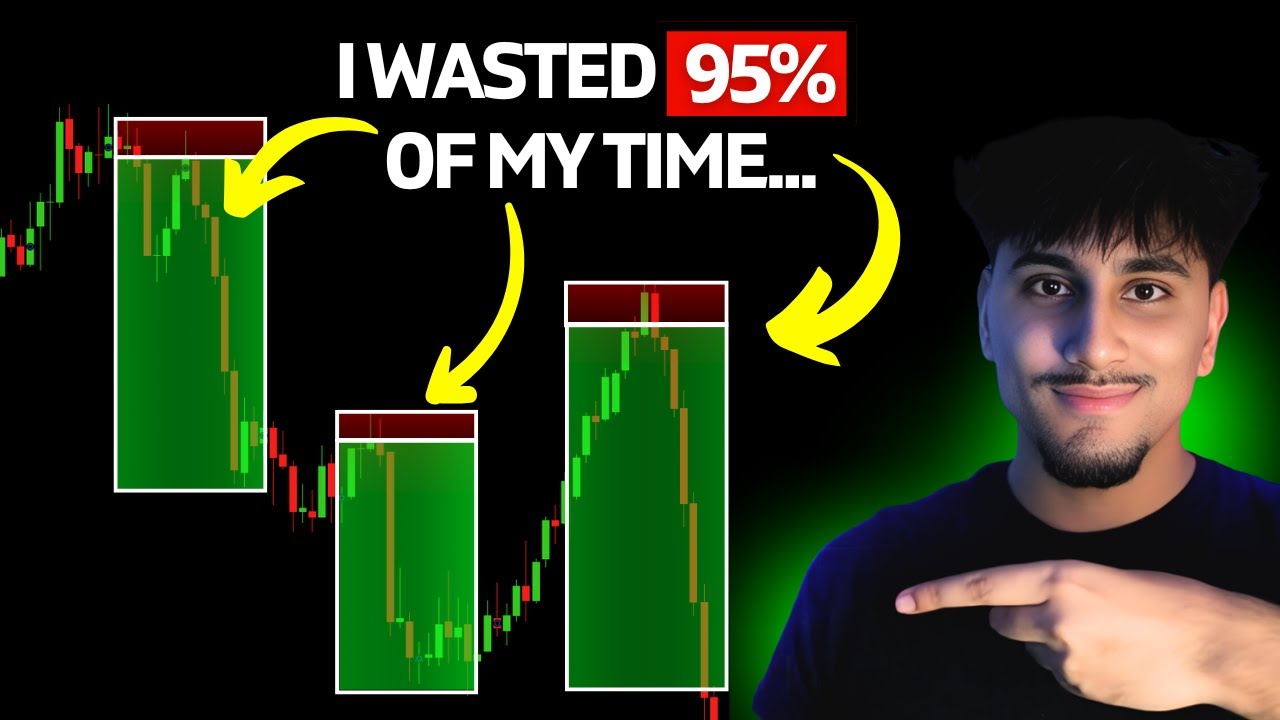
- 📉 The setup discussed is called 'Break of the Low' (Bo), focusing on market structure and not support/resistance.
- ⏱️ The Bo setup uses 5-minute and 15-minute time frames for trading opportunities.
- 📊 Traders should analyze lower lows and lower highs to identify potential trade entries after a break of the low.
- 🔐 The ideal entry point is after the price closes below the low of a candle, with the stop-loss above the high of that same candle.
- 💡 Aim for a 2:1 risk-reward ratio and close the position when that target is met.
- 📈 It's important that price is trading under the moving average and during a bearish trend for a sell setup.
- 🛑 Stop-loss placement should be strategic, either above the current candle or a previous one for more safety.
- 🔄 A retest after a break of the low can be another entry opportunity if the initial move doesn’t offer a good entry.
- 📉 The setup should be used only during high-volume trading sessions for better chances of success.
- ✅ Always back-test and adapt stop-loss and risk-reward strategies based on personal trading style and historical performance.
Q & A
What does 'Bo' stand for in the video?
-'Bo' stands for 'Break of the Low,' which is a trading setup where the price breaks a previous low point, and traders look for opportunities to take a position as the price moves lower.
What time frames are typically used for the 'Break of the Low' setup?
-The 'Break of the Low' setup is usually done on the 5-minute or 15-minute time frames.
What is the key principle behind the 'Break of the Low' trading strategy?
-The key principle is to trade based on market structure. Once the price breaks a low, the goal is to enter a position expecting the price to make a new low, following a bearish trend.
What are the entry and stop-loss placements in this strategy?
-The entry is typically placed right after the price breaks and closes below the low. The stop-loss is set slightly above the high of the candlestick that broke the low, or above the high of the previous candlestick if a safer stop is preferred.
Why is it important to wait for a candlestick to close below the low in this strategy?
-Waiting for the candlestick to close below the low helps confirm the breakout and avoid false signals or 'chop,' where the price might briefly break the low and then reverse.
What is the target for the 'Break of the Low' setup?
-The typical target is a 2:1 risk-reward ratio, meaning the potential reward is twice the risk taken. The goal is to get in and out of the market with a clear profit target.
How do moving averages influence the 'Break of the Low' strategy?
-In this strategy, it’s recommended that the price should be trading below the 21-period simple moving average (SMA) to confirm a bearish trend before executing the trade.
What are the pros and cons of this strategy?
-Pros include the simplicity of the setup and the clear structure-based rules. Cons involve potential false breakouts and the need for volume in the market to support the price movement.
How can traders avoid getting stopped out frequently in this setup?
-To avoid frequent stop-outs, traders can place the stop-loss above the previous high, giving the price more room to breathe. Additionally, waiting for a candlestick to close under the low before entering can help filter out false breakouts.
What should traders do if the breakout candlestick is too large?
-If the breakout candlestick is too large, it's recommended to wait for a retest of the low before entering, to ensure a more favorable risk-reward ratio.
Outlines
📈 Introduction to Break of the Low (Bo) Setup
The video introduces the concept of the 'Break of the Low' (Bo) setup used in trading. This strategy revolves around identifying market structure, particularly the formation of lower lows and lower highs, and executing trades when the price breaks these lows. The setup is primarily used on 5- and 15-minute time frames, and the speaker highlights the importance of reviewing trades in a journal to evaluate the profitability of setups. Additionally, this strategy is not based on support or resistance, but purely on market structure, using examples of live market conditions to explain how to identify break of lows and execute trades accordingly.
📊 Stop-Loss Placement and Entry Techniques
This section explains the details of entering a Bo setup trade, focusing on the importance of stop-loss placement. Two entry strategies are discussed: entering immediately after the break of the low or waiting for the candlestick to close below the low for more confirmation. The video emphasizes using a stop-loss above the previous structure or candlestick high, depending on how aggressive the trader wants to be. The goal of this strategy is to achieve a 2:1 risk-reward ratio, and the speaker stresses backtesting the system to determine the most effective stop-loss strategy.
Mindmap
Keywords
💡Break of the low (Bo)
💡Market structure
💡Stop loss
💡Candlestick
💡Risk-reward ratio
💡Price action
💡21 SMA (Simple Moving Average)
💡Bearish trend
💡Support and resistance
💡Backtesting
Highlights
Introduction to the setup called 'Break of the Low' (Bo), which is focused on market structure rather than support or resistance levels.
Bo setup uses either a 5-minute or 15-minute time frame to identify trades based on lower lows and lower highs in market structure.
Key principle of Bo: Price breaks the low of a previous candlestick, and the goal is to take price into a new low.
When entering a Bo trade, wait for price to close under the low to avoid being stopped out too early.
The preferred entry method: place a stop loss slightly above the high of the candlestick that broke and closed under the low.
Stop loss placement is critical—best to place it above the previous candlestick's high for safety and allow the price room to breathe.
The goal of a Bo setup is a 2:1 risk-reward ratio, where traders aim to exit the position quickly for maximum efficiency.
It's important to ensure that the price is trading under the 21-SMA moving average to confirm the trend direction before entering a Bo trade.
Examples show that if the candlestick closes under the low, a stop loss should be set above the previous high to avoid false breakouts.
Sometimes, it's necessary to wait for a retest of the low to avoid entering a position too early.
Another important aspect is managing trade risks by setting the stop loss realistically based on market structure.
Example: If price closes under the low and the stop loss is above the wick of the previous high, you can avoid getting stopped out prematurely.
The Bo strategy works best when price is trending bearish; if the market is bullish, a 'break of the high' setup would be used instead.
Price often consolidates before making new lows, reinforcing the need for patience when executing Bo trades.
Stop loss strategy: For safer entries, place the stop loss above the second candlestick high to avoid false signals from price fluctuations.
Transcripts
welcome back to another video so in this
video what we're going to be doing is
we're going we're going to be going over
a setup called basically a break of the
low or what I'm going to be referring to
as Bo so we like to abbreviate our
setups so when we go back into our
trading journal and we can look at all
of our winning trades all of our losing
trades we can see what trades won the
most we could see what trades won US the
most money we could see overall what
trading setups are most profitable and
in this situation basically what we're
going to be doing is going over a setup
called a break of the low which is
literally as self-explanatory as it
actually is so on this setup basically
what we do is we use a five and a 15
minute time frame or a 5 minute time
frame or a 15minute time frame to be
able to take these trades now these
trades aren't trades at areas of support
or resistance but these trades are all
based off of Market structure and I'm
going to be giving you guys a few
examples of these types of
setups so in a situation where you're
actually trading and you're in live
market conditions and you see price
actually gave you Market structure where
price is forming lower lows lower highs
lower lows essentially what you're
trying to do is basically take a break
of the low and you're looking to take
price into a new low so in this
situation here right once price formed
this area of support and notice the
actual struggle of this area of support
you have to identify what the low action
is because you could have taken a trade
of a break of a low right here and
possibly gotten stopped out but the low
is actually going to be right here
notice this is the low before price
actually pulled up and came back down so
what we're basically going to be looking
at is one of two options now I'm going
to give you guys obviously the positives
and the negatives so in a situation like
this where this is the actual low of
price right what we actually have is
price actually come down form a low over
here and then price attempted to go down
and form lower which essentially that's
when you would have potentially looked
at taking an entry but in this entry
depending on your stop-loss placement
you would have actually gotten stopped
out you have two different types of
Entry placements and stop-loss
placements with these types of Trades
essentially your entry could be right
after the break of the low itself with
your stop loss above structure your
targets being your next structure point
which ultimately that's not the way I
would look at trading it right to give
you guys a clear-cut example the best
entry method with this is to wait for
price to actually close under the low
itself but you could also look for price
to kind of just break under the low and
take a move off of the fluctuation of
the Candlestick itself so right once
price broke under the low essentially
what you would want to do is look at the
highs and the lows of the candlesticks
themselves right once price broke under
the low which this is going to be the
Candlestick that broke and closed under
the low then you would want to place
your stop loss slightly above the high
of that actual Candlestick itself so in
this situation if you take a trade here
your stop- loss placement is going to be
slightly above the Candlestick itself
and obviously price needs to be trading
under the moving average fore to sell
and our goal here isn't to look for a
massive move our goal here is just to
Simply look for a 2 to1 risk reward
ratio and then we're closing the
position that is going to be the goal
with a break of the low and if you want
from there you can continue to trade
stop loss to look for a bigger move so
that is going to be one example right
once price closed under then you would
have actually looked to take a position
there and that's where your uh price
would have actually played out price
closed under stop loss goes above the
high of the previous candle or if you
want to be safer goes above the high of
the last previous candle because price
could come and actually test the high of
the previous candle and then you would
look for a 2:1 risk reward ratio nothing
more nothing less obviously you guys can
to back test this system and see what
works best for you stop loss P etc etc
this is kind of just what I do as of
right now so you can also do this with
different support trades but ultimately
you would actually want to do it based
off of Market structure and trade this
system simply solely all based off of
Market structure more importantly though
you have to actually be in session in
price there needs to be volume for you
to actually be able to take these types
of Trades so here's another example of a
break of the low where we essentially we
see price come up come down come up come
down come back up so you can identify
that there is a low actually formed
right about here this is going to be the
low where we have structure actually
formed and we have price come all the
way down and close under notice price
closed back above and tested the actual
high of the previous Candlestick so in
this situation you know if your entry is
here that doesn't mean that your stop
loss is going to to be literally right
here you want to be realistic with your
stop losses as well like I said again
you can shoot for the previous stop-
loss High which would be all the way
over here which that would be a pretty
large stop you would aim for a 2 to1
Oris three War ratio which essentially
you would want taken out of the trade
here in a in a in a in a win or
potentially even here but again the goal
is to have your stop loss significantly
above the high of your entry Candlestick
which in this situation would be roughly
around here and price is also trading
under the 21 SMA there as well so that's
also another
example now in a situation where if you
would have taken a trade on this
Candlestick then your stop loss goes
above the high of this Candlestick over
here but then I would obviously put it
above this Candlestick right over here
so that's an example another example at
least of price breaking the lows and
actually going to attempt to try and
make new lows now I only take these
setups again when price is under the 21
smate and we're trending bearish if
price is trending bullish then we're
going to be looking for break of the
high which will go over that in a
different setup scenario now again price
is clearly trending bearish we have a
big impulse to the downside that is what
we want to see a big impulse to the
downside then we have price actually
form support here this is going to be
our low around this range here so if
price were to actually come down and
price started to go bearish now again
here's the thing pros and cons of every
system and every single setup that we
see notice how price actually tempted
multiple times to close and break under
right if you wouldn't have waited for
the Candlestick to actually close then
essentially there would have been a
trade where you may have lost money here
may have lost money here then you
possibly you know if you would have
continued a trade you may have made it
back here but again it comes down to
waiting for that Candlestick to actually
close to try and avoid all of this uh
chop that you could see but then there's
going to be times where the Candlestick
is too large and you're not going to be
able to take the actual position so in
situation like this I just simply
recommend to wait for a retest where you
could have been taken a trade later on
throughout here but now since you have
price break the low right here such as
this one then again all you're simply
doing is taking a trade right once price
closes under the low your stop loss goes
above the wick or the previous W before
that you look for a 2 to1 risk reward
ratio just to Simply get in and out of
the market as quickly as you possibly
can which this is going to be a setup
that we have right here so this is no
trade this is an example where you would
take a position there
now let's look for another example of a
break of the low you see like the thing
is this situation would have been a
little bit different so here we have the
lows over here here you have price close
under the low itself now your entry
obviously would have been over here stop
loss would have gone above this high or
typically I would like to place it above
the previous High just give price a
little bit more room to breathe 2 to one
risk reward ratio and then there you go
you have your 2 to1 risk reward ratio
quite nicely before pullback and then
then you could have potentially even got
in on another break of the low over here
price did close under there but it's
really not the strongest close under um
so there's a few things to take into
consideration here you know so if you
look at the overall median it could have
worked out in your favor but I like to
kind of look at the overall lows and the
highs of the market essentially when it
breaks a low then great we'll continue
to look for price to continue to make
new lows because again when price makes
a low it has a high probability of
continue to go down to make another low
so here's an here's actually a great
example of why stop-loss placement is so
important because we had price actually
close under so your entry signal for a
break of the low setup or a Bo setup is
going to be right here and if you would
have placed your stop loss slightly
above this High here above the
Candlestick you entered on you would
have been stopped out of that position
but if you would have placed your stop
loss above the second Candlestick High
which is over here you would have been
just fine 2 to1 risk reward ratio which
is going to be down here roughly and
then look at that price Consolidated for
a bit but then continue to go down and
actually make new lows and you got your
2 to one risk to reward ratio you can
also go for a 1: one but for me I'm
always going to go for a 2: one no
matter what stop loss I break even at a
1: one RIS reward
ratio and that is going to be it for
this video doesn't really have to be too
complicated nothing too long but I
definitely did want to cover that for
you guys and I will talk to you guys in
the next video
浏览更多相关视频
This One Candle Can Change Your Life
EASIEST ICT Strategy | No Daily Bias (Previous Day High and Low)
This Gold Scalping Strategy Still Makes $100s in Seconds!
The Ultimate Entry Model + Secret Tweak To Never Miss a Trade!
ICT Charter Price Action Model 13 - Charter Lecture On 2022 YouTube Model
My Trading Strategy Part 2: Entries, Exits, & Risk Management
5.0 / 5 (0 votes)