Video Academy: Belajar basic Lighting Auto Kayak FILM bareng Fiqri Fox!!! - (Part 1)
Summary
TLDRThis video script from 'Downate Media' features a tutorial on the fundamentals of three-point lighting in filmmaking with Fikri Fox. The host explains the key components: key light, fill light, and back light, detailing their functions and impact on a shot's mood and depth. The script also includes a step-by-step guide on setting up these lights for optimal results, emphasizing the importance of understanding lighting to enhance storytelling and create dynamic, realistic shots. The tutorial aims to elevate viewers' lighting skills from beginner to intermediate levels.
Takeaways
- 🎥 Three-point lighting is a fundamental technique in filmmaking that consists of key light, fill light, and back light.
- 🔍 The key light is the brightest and primary source of light that illuminates the subject, setting the overall mood of the shot.
- 🖌️ Fill light is used to soften the shadows created by the key light, adding depth and dimension to the scene.
- 🌟 Back light is placed behind the subject to separate it from the background and add a three-dimensional quality to the shot.
- 👤 The position of the camera and the direction it will shoot are crucial for setting up the lighting effectively.
- 💡 Turning off all room lights is essential to avoid interference with the controlled lighting setup.
- 📍 A stand-in is often used during the lighting setup to save time and not tire out the talent who would otherwise wait.
- 🔧 The intensity and placement of the key light can significantly impact the look of the scene, and adjustments are made based on the needs of the shot.
- 🌈 Back lights such as kicker light, rim light, and hair light each serve a specific purpose in enhancing the shot's aesthetics.
- 🎨 The choice of lighting style can convey different messages and emotions to the audience, making it a critical storytelling tool.
- 📹 A step-by-step approach to setting up three-point lighting ensures a professional and polished final shot.
Q & A
What is the main difference between two shots with the same camera but different lighting?
-The main difference lies in the understanding and application of the three-point lighting technique, which significantly affects the outcome despite using the same camera.
What are the three types of lighting in the three-point lighting setup?
-The three types of lighting are the key light, fill light, and back light.
What is the role of the key light in a three-point lighting setup?
-The key light is the brightest light source in a setup and is responsible for illuminating the subject, providing the primary illumination.
Can you explain the term 'motivated lighting' as mentioned in the script?
-Motivated lighting refers to lights that are placed in a scene to mimic real-world light sources, such as lamps or windows, to make the scene more believable.
What is the purpose of adding a fill light in a three-point lighting setup?
-A fill light is used to soften the shadows created by the key light, adding detail and depth to the scene without overexposing the subject.
How does the position of the back light affect the separation between the subject and the background?
-The back light, when placed at a 45-degree angle behind the subject, helps to separate the subject from the background, adding depth and dimension to the shot.
What is the function of a kicker light in a three-point lighting setup?
-A kicker light is a type of back light that is placed opposite to the key light and is used to create a rim of light along the edges of the subject, enhancing the separation from the background.
Why is it important to turn off all room lights when setting up lighting for a shot?
-Turning off all room lights helps to avoid interference with the controlled lighting setup, ensuring that the scene is lit only by the intended lights for the desired effect.
What is the significance of the 45-degree rule in back lighting?
-The 45-degree rule in back lighting suggests that the light should be placed at a 45-degree angle behind the subject to create a pleasing and natural separation from the background.
How can the intensity of the fill light affect the dynamic range of a shot?
-The intensity of the fill light can increase the dynamic range of a shot by adding detail to the darker areas without blowing out the highlights, making the shot more realistic and visually appealing.
What is the role of the background light in a three-point lighting setup?
-The background light is used to illuminate the background separately from the subject, creating mood and depth in the scene or simulating natural light sources like the sun or moon.
Outlines

此内容仅限付费用户访问。 请升级后访问。
立即升级Mindmap

此内容仅限付费用户访问。 请升级后访问。
立即升级Keywords

此内容仅限付费用户访问。 请升级后访问。
立即升级Highlights

此内容仅限付费用户访问。 请升级后访问。
立即升级Transcripts

此内容仅限付费用户访问。 请升级后访问。
立即升级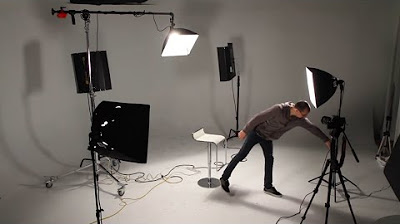


5.0 / 5 (0 votes)
