Fitting Anti Lock Brakes ABS to a non-ABS Motorbike - can it be done ?
Summary
TLDRThis video tutorial guides viewers through the process of installing an aftermarket ABS (Anti-lock Braking System) kit on a motorcycle not originally equipped with it. The host shares their experience with finding a suitable kit online, emphasizing the importance of an electronic control unit and custom sensor discs. They detail the installation steps, including mounting the ECU pump, routing brake hoses, and wiring the system. The video also covers post-installation testing and calibration, highlighting the increased safety benefits of ABS on motorcycles.
Takeaways
- 🔧 The video discusses adding ABS (Anti-lock Braking System) to a bike that doesn't come with it as standard.
- 🌐 The ABS kit is sourced online and is compatible with bikes that have front and rear disc brakes.
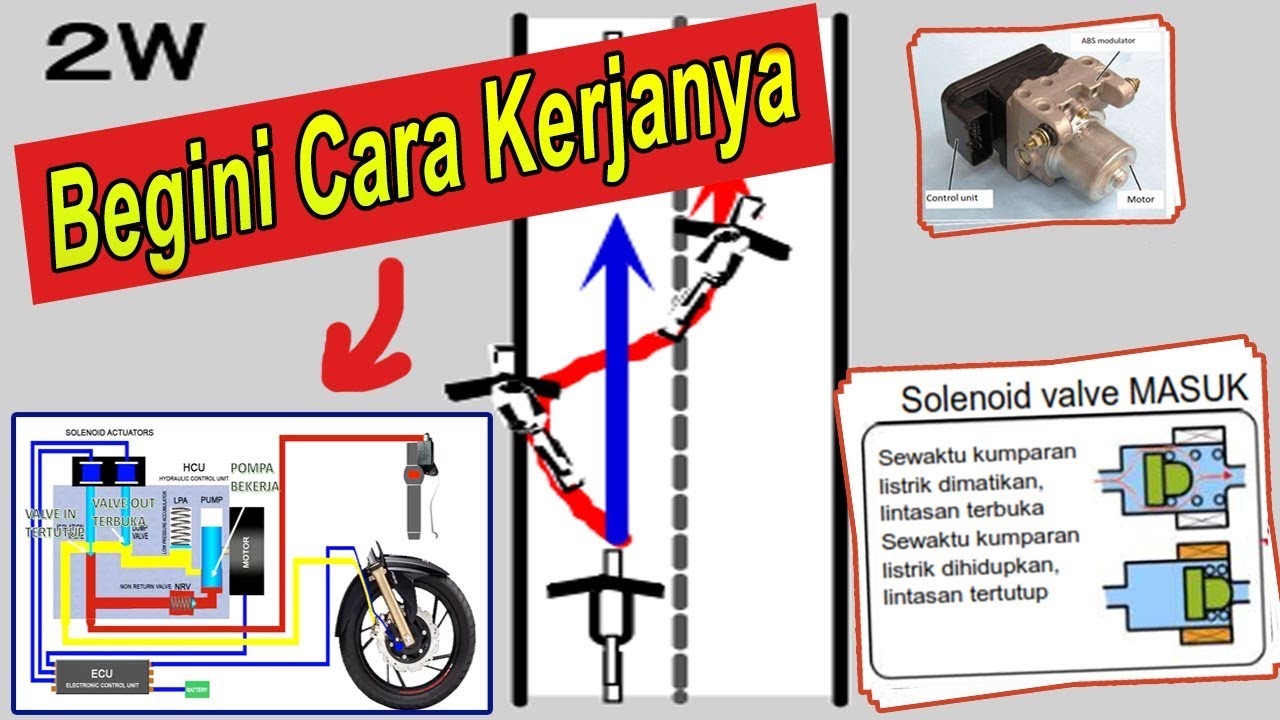
- 🏗️ The kit includes an electronic control unit (ECU), pump, wiring harness, ABS light, wheel sensors, brake hoses, and custom-made sensor discs.
- 💡 The ABS system significantly enhances safety, especially in challenging traffic conditions.
- 💸 The cost of the ABS kit is significantly lower than the premium for ABS on new bikes, making it a cost-effective upgrade.
- 🛠️ The installation process requires some mechanical skills and the right tools, such as spanners, screwdrivers, and a brake bleed kit.
- 📏 Accurate measurements for the sensor discs are crucial for a successful installation.
- 🔌 Wiring the ABS system into the bike's electrical system requires care and possibly a wiring diagram for the specific bike model.
- 🚫 Not all ABS kits are created equal; some are just valves attached to brake calipers and do not offer true ABS functionality.
- 📝 The video emphasizes the importance of researching and selecting a reputable seller with good customer support for the ABS kit.
- 🛑 After installation, it's essential to bleed the brakes properly and calibrate the ABS system if necessary.
Q & A
What is the primary reason the speaker wanted to add ABS to their bike?
-The speaker wanted to add ABS to their bike to make it safer, especially due to the crazy local traffic in the area where they live.
What type of bikes are the ABS kits mentioned in the script designed for?
-The ABS kits discussed are designed for bikes with front and rear disc brakes. There might be some kits that handle drum brakes, but the speaker did not find any.
What is the local name of the bike the speaker installed the ABS kit on?
-The local name of the bike the speaker installed the ABS kit on is 'Rusi Classic 250'.
What are some other names or models that the bike is known by in different regions?
-In different regions, the bike is known as the 'Peda Cafe Racer' in Europe, and the 'GPX Legend' in Thailand and Malaysia.
What is the importance of the Electronic Control Unit (ECU) and pump in an ABS system?
-The ECU and pump are crucial components of an ABS system as they act as the 'brains and engine' of the system, controlling the anti-lock braking mechanism.
What is the first thing the speaker advises to look for when searching for an ABS kit online?
-The speaker advises to look for an electronic control unit (ECU) and a pump, as these are essential for a real ABS system.
What is the significance of sensor discs in the ABS kit according to the speaker?
-Sensor discs are significant in the ABS kit because an ABS system won't work without them. They are custom made for the buyer's bike by the seller or their agents.
What is the approximate cost of the ABS kit that the speaker purchased, excluding delivery?
-The speaker purchased the ABS kit for approximately 230 US dollars, excluding delivery.
What is the speaker's reasoning for considering the cost of the ABS kit a worthwhile investment?
-The speaker considers the cost of the ABS kit a worthwhile investment because it can reduce the risk of hospital bills in case of an accident, which can be much more expensive than the cost of the kit.
What is the first step the speaker took after receiving the ABS kit?
-The first step the speaker took after receiving the ABS kit was to read the manual carefully and contact the seller for an English version when they found it was only in Chinese.
How did the speaker address the issue of the incorrect sensor mounts included in the kit?
-The speaker contacted the seller to request a spare pair of mounting brackets with the correct angles. In the meantime, they 3D printed a temporary bracket to continue with the installation.
Outlines
🔧 Introduction to ABS Installation on a Bike
The speaker introduces the idea of adding anti-lock brake systems (ABS) to a bike that did not originally come with this feature. They discuss their motivation for wanting to increase safety in their local traffic conditions and share their successful experience with installing an ABS kit on their bike, specifically a 'Rusi Classic 250'. They clarify that the tutorial is not one-size-fits-all and that the kits are suitable for bikes with front and rear disc brakes. The speaker also warns against cheap ABS valves sold online and emphasizes the importance of a genuine ABS system that includes an electronic control unit (ECU) and a pump.
🛠️ Choosing the Right ABS Kit and Seller
The speaker provides guidance on selecting an ABS kit and a reliable seller. They advise looking for a kit that includes an ECU and pump, and to avoid cheap options that may not function properly. The speaker shares their experience of searching on various platforms and eventually finding a suitable kit on AliExpress. They stress the importance of the seller's responsiveness and the completeness of the kit, particularly the inclusion of sensor discs. The chosen kit cost approximately $230, which the speaker considers a worthwhile investment for safety.
📦 Unboxing and Preparing for Installation
Upon receiving the ABS kit, the speaker outlines its contents, including the ECU-pump combo module, wiring harness, ABS light, wheel sensors, brake hoses, and custom-made sensor discs. They note the importance of accurate measurements for the sensor discs and the need for clear communication with the seller. The speaker also discusses the support received from the seller, including an English manual and assistance with additional parts needed for the installation.
🏁 Completing the ABS Installation and Testing
The speaker details the steps for installing the ABS system, including mounting the sensor discs, routing brake hoses, and securing the ECU pump. They emphasize the importance of careful wiring, following the manual, and testing the system for proper functionality. The speaker also describes the process of bleeding the brakes, calibrating the ABS system, and conducting safety tests. They conclude by summarizing the experience, highlighting the satisfaction with the working ABS system and the value of the investment for increased riding safety.
Mindmap
Keywords
💡ABS (Anti-lock Braking System)
💡Bike Safety
💡Aftermarket ABS Kit
💡ECU (Electronic Control Unit)
💡Wheel Speed Sensors
💡Brake Hoses
💡Installation Manual
💡Calibration
💡Bleeding Brakes
💡Error Codes
Highlights
Introduction to the concept of adding ABS (Anti-Lock Braking System) to a bike that doesn't come with it as standard.
The motivation behind the project: enhancing bike safety in dense local traffic.
Success in finding suitable ABS kits online after extensive research.
Limitation of the tutorial to bikes with front and rear disc brakes.
The importance of an electronic control unit (ECU) and pump in a real ABS system.
Caution against cheap ABS valves sold on online marketplaces that may not function as expected.
The process of searching for an aftermarket ABS kit on various e-commerce platforms.
Advice on scrutinizing search results to avoid cheap, low-quality ABS kits.
The necessity of ensuring the ABS kit includes custom-made sensor discs for the bike model.
The author's experience with a responsive seller who provided necessary support during the installation process.
Description of the contents of the purchased ABS kit, including the ECU, pump, wiring harness, and sensor discs.
Instructions on providing accurate measurements for custom sensor discs to the seller.
The importance of following the seller's instructions carefully for a smooth installation.
Challenges faced during the installation process and how the seller's support was instrumental in resolving them.
The process of mounting the sensor speed discs onto the brake discs and the adjustments needed.
Strategies for routing the brake hoses and mounting the ECU pump module on the bike.
The wiring process of the ABS system, including connecting the ABS light and interpreting wiring instructions.
Mounting the wheel speed sensors and ensuring they are positioned correctly above the sensor discs.
Bleeding the brakes and initializing the ABS ECU pump as part of the installation.
Testing the ABS system for proper functioning, including a description of the expected pulsating feel during hard braking.
The author's satisfaction with the ABS kit's performance and its impact on bike safety.
Recommendations for future tests, including real-world video comparisons with non-ABS bikes.
Transcripts
[Music]
do
[Music]
hey folks so let's talk about adding abs
brakes or anti-lock brakes to a bike
that never came with abs as standard
i really wanted my bike to be a lot
safer in the crazy local traffic we have
here where i live now
and after a lot of searching i found
some really great kits online and i've
just finished successfully installing
one
for sure i'm just showing you it can be
done this isn't a like a guaranteed
exact tutorial for every bike out there
on the market
i mean for a start these kits are for
bikes with front and rear disc brakes
there might be some out there that'll
handle drum brakes but i didn't see any
okay so install the abs brake kit onto
my bike you know it's known locally here
as a rusi classic 250
the same bike which is a yin gang 90
model is sold in a few different regions
around the world like it's the peda cafe
racer in europe and i think the uh gpx
legend in thailand and malaysia
now the kit wasn't listed for being for
my model so you know really this was
just a bit of a test by me to see if i
could get one that works
so first off i'm not going to be
covering off the complete history and
the benefits of an abs system on a
motorbike there's plenty of great
youtube videos out there will fill in
those details really really well
in fact i found a pretty good concise
one here and and i'll post that link
in the description below for you
okay so let's take a look through the
abs kits online uh you'll find different
options when you start to go searching
let's see what kits to look for and what
abs options not to consider
and then finally what kit did i get
you really need to make sure that what
you are looking at really is an abs kit
any real abs system will have an
electronic control unit or the ecu
and a pump and it's usually going to be
combined in one piece now like in this
picture and if you do want real abs
features you're going to have to pay for
it
i'll be careful what i say here because
they are selling these valves that they
attach to your brake calipers on amazon
and aliexpress etc and they also call
them abs well you get what you pay for
with them go watch some youtube reviews
of them
and you can decide for yourself if it
looks like they work or not anyway so i
spent quite a while uh looking for an
aftermarket abs kit on ebay and amazon
lazada and shoppi and all i came up with
was those cheap caliper valves
and
until i put in the right wording and
then finally i found some that looked
interesting on aliexpress you know
amongst the hundreds of wrong results
that you tend to get on there and when
you do start going through the search
results look really carefully
first eliminate anything cheap and nasty
and even then some of the correct kits
aren't complete which is why you'll see
such a big variation in these prices the
one on the right here is either not a
complete set or it has some options that
you need to select when you're checking
out so you've got to be careful
okay so
before you rush off and buy the first
kit that you see you're going to need to
do a little homework before you can
choose the kit and the seller you're
going to buy it from i mean this isn't
just a sale where you buy a single item
it is a kit
and one part of it the the sensor disks
will very likely be custom made for you
by the seller or his agents
you want to find out how quickly the
seller asks and answers questions so you
got an idea how long all of this would
take so it's not just price you're
interested in
you're going to need to tell them the
model of your bike so they can see if
they think that their kit is going to
work on it
and you really need to make sure that
that kit is complete and the one that
you're going to order does include those
sensor disks the ones that make up for
you because an abs system won't work
without the sensor discs and you need to
ask them to make sure it includes it
anyway the kit i bought was the one that
had the best price including delivery
and the seller was really responsive
with questions and answers and that made
me feel really confident they were going
to help me out if there are any problems
with the installation
which you know turns out to be i think
the first i know of
for my model
now you can see here they sold the kit
in two forms one without the sensor
discs and one with the discs that one's
called option b naturally of course i
went ahead and bought option b with the
discs that kit worked out to be about
230 us dollars thereabouts at that time
uh not including delivery
yeah i know to some people 230 us
dollars plus delivery is going to sound
like a lot of money and you know for
some people it is but i look at it this
way the abs option on most new bikes
usually costs between
say 500 to 1000
and i know that even a one day stay in
hospital will cost a lot more than 230
dollars so
i'd rather use the abs to reduce the
risk of those hospital bills if i
possibly can
okay finally let's look at what the kit
that i bought included
firstly it has the all-important ecu
pump combo module
that's the brains and the engine of the
whole system
then we have the wiring harness to
connect that and integrate it into the
bike's electrical system
we also have the abs light
that flashes for the abs status and it
shows in the error codes
we also have the wheel sensors some
brake hoses which they seem to have
forgotten to show in this picture by the
look of it and finally those custom-made
sensor or speed discs that we need you
know for some bikes
those might be off-the-shelf items but
they weren't for my model bikes so they
had to custom make them
and this shows the parts list of what
they deliver
i've also just noticed that it even
looks like this one's wrong because it
doesn't list the four brake hoses so
maybe this is a list for that option a
but it's once again it's best that you
ask the seller to check that out
now you notice that it lists some yamaha
honda and benelli models that the the
kits will work with as well as other
12-volt bikes with brake signal well
that
other covers my bike and i guess most
road bikes that are 12 volt and have a
rear brake light and of course
front and rear disc brakes as i've
mentioned before so look for that other
when you're comparing the aliexpress
kits to see which ones might work with
your model okay after you order the kit
you will most likely be contacted by the
seller to provide them with some
measurements of your front and rear disk
mounting holes the holes in your disks
if your bike is on that list of honda
yamaha and benelli models maybe that you
won't but i'm guessing they will always
ask you just to be safe
my seller told me what measurements they
needed to be able to custom make those
sensor speed discs
and they actually got me to supply them
some photos just to make it easier now
please please follow their instructions
carefully and be as exact as you can
this is very important if you really
want a smooth installation
so off they go and custom make those
sensor discs and a few weeks later after
ordering three i think it was my parcel
arrived by courier
after i opened it i then noticed that
the kit came with only a chinese
installation manual and this is when you
already get to find out how good the
support is that you get from your seller
mine emailed me an english pdf version
of that manual within a few hours so it
all was good
so obviously now you should check over
what they delivered to make sure that
you got the complete kit
i then realized that this kit came with
two sensor mounts one was flat and one
was a angled or bent mount
that might suit some bikes but it didn't
suit mine when i looked into it so it
was time to contact the seller again
i needed to get a spare pair of mounting
brackets another angle and another flat
and they're sending those over to me now
while i wait for those new mounts to
arrive i didn't want to wait a few weeks
to do the install so i measured the
angle bracket and i drew that up and 3d
printed
a temporary angle bracket that i could
use right now
i mean it's not load bearing so this abs
plastic mount that i printed does the
job fine until those new ones arrive
now my russia friends
you should ask your seller to include a
spare pair of those mounts when you
order the kit just to save time later
and finally it's time to start that
install
so step one of course is read the
flaming manual carefully
yes the english translation may not be
great in some places but
anything you aren't sure about email
your seller and ask them about it get
them to explain it i sent mine a few
emails and i got pretty good responses
pretty quickly actually i was really
happy with their support
the next thing i did was to get those
sensor speed discs mounted onto my front
and rear brake discs
okay so the wheels need to come off to
do that so it's a lot easier with two
guys so i ended up taking my bike back
to my bike store and i got them to do
this part for me because it's a lot
easier for them
and this is also where you're going to
find out how accurate your measurements
were that you sent to the seller and my
measurements for the front disc were out
they were about one millimeter too small
so my tyre guy marked out with a pen
what adjustment needed to be made and he
grabbed out his dremel grinder and he
fixed that in about 10 minutes you know
it's an easy fix if you need it but you
know exact measuring is just a lot
better
so now with those sensor discs mounted
it's back home and it's time to strip
the bike down you're going to need to
spend a bit of time deciding where to
mount that ecu pump module and seeing
where you will need to route your brake
hoses so off comes the fuel tank the
seat and the side covers so we've got
good access
instead of the usual two broke hoses
that you have on a motorbike you now
have four hoses as we're plumbing in the
abs module in between the master
cylinders and the brake calipers
so you may spend quite some time
deciding where to fit this ecu pump and
making sure that those hoses give enough
slack
for your steering and your suspension to
work properly still so i bolted the
brake hoses onto the pump and on my
russia i ended up trying two different
locations the first was up high where
the air box is but that was too far back
on the bike and the front hoses were too
tight for the steering to work properly
so
instead i found that the ecu pump fitted
nicely between the air box and the
starter motor and all the hoses reached
fine from there
you really want to mount the ecu pump
securely so it doesn't move around or
rattle at all you don't want the wiring
harness or the hoses working loose
my kit came with a great universal
mounting bracket that i bent to the
shape that i needed so i could mount it
nice and securely with that abs pump now
mounted we can remove the original brake
hoses and run those new hoses through
and connect them to the master cylinders
and to the brake calipers
if you do this carefully and quickly you
won't end up with a huge mess of spilled
brake fluid but just to be safe for your
paintwork make sure you cover it all up
while you're trying
now we can start on wiring in the new
abs system the first step is the abs
light
this indicator light shows the status of
the abs system and it flashes an error
code if there's any system faults
you want to mount that near your gauges
where you can easily see it
of course to do the wiring is going to
be a big help if you can get a hold of
the wiring diagram for your bike that
way you're not going to need to identify
the bike wires with some test equipment
like i ended up doing
your kit is going to come with some
wiring instructions of course and these
are the instructions for my kit the
translation was a little bit ambiguous
so i sent a few emails to my supplier to
work it all out they also sent me a bit
of diagram that helped quite a lot
for my rusi classic 250 friends after
some trial and error and some new
translations that all came down to these
connections shown here being made you
might want to pause this one to have a
look at it
and same again for my russy friends
tapping into the front brakes i did that
under the fuel tank
using a vampire tap into the original
black wire that takes power to the front
brake switch and then for the rear
brakes just follow the wires up from the
rear brake switch
to that connector under the seat and tap
into the green and yellow wire that goes
to the rear brake light
with all the electricals all now wired
in we want to mount those probes or
those sensors on their brackets and
attach those brackets to the bike so the
probes sit
very close to those sensor discs you
know those discs that i got mounted at
the bike tire store
now for my kit they need to be mounted
so they sit around about 0.75
millimeters very very close to and above
the surface of those discs now this
might take some time for you to adjust
of course
for the rear probe on my russia i had to
drill a small hole in my swing arm and
then i used loctite on the mounting bolt
same again the front probe and bracket
need to be positioned and mounted that
same
0.75 millimeters above the surface of
the sensor disk on the front brakes this
time on my russia the front was pretty
easy there was no drilling i just needed
to use the mud guard bolts to connect it
all
oh and one important note on those
probes and check your manual for your
kit for this they can only be mounted in
certain directions or they just won't
work my manual showed the correct
directions that could be mounted and
they're shown here on the left on this
slide and then the sensor directions or
alignments that won't work remember rtfm
read the flame and manual
so finally we're nearly done with
installation we need to bleed those
brakes properly now
you will need to go and buy some new
brake fluid and probably twice as much
as you would normally get you've got to
remember that we just added four new
longer and empty brake hoses and a new
and empty abs pump
so we're adding more brake fluid than
usual
the manual also suggests turning
ignition on and off a few times which
will initialize the abs ecu pump a few
times and suck some of that fluid
through to make life a bit easier
and there you go the kit's installed
it's mounted routed it's wide and the
brakes have led now you need to test it
and
you've got to calibrate it if your kit
has a calibration procedure
but before anything you've got to just
test these brakes to see if you've bled
them properly even push and roll the
bike a little somewhere safe make sure
that the basic braking is okay and that
you did bleed them properly
if they do stop okay now you need to
find a safe area maybe like a big car
park or a quiet long safe street to
calibrate the abs system again go and
read your manual for the calibration
procedure if there is one i don't know
that all systems will have one
this slide shows the quick and easy
calibration for my abs system and it
only took about two minutes or so to
complete
once you've calibrated the abs system
and that is if yours has that option you
want to safely test this kit properly
again
find somewhere safe and quiet to do this
you're going to be hitting the brakes
hard to try to get the bike to lock up
its brakes on a skid you need to see
that the abs stops this locking up and
you don't want someone driving behind
you to run into you from behind so be
careful
now the good thing is even if the abs
function fails to work or you didn't
correctly wire it up or anything your
original standard basic disc brakes
should still work as long as you bled
them properly
my kit makes a quick buzzing sound when
you turn on the bike that's as the ecu
pump initializes listen for that to see
if your kit does that too
check for leaks to make sure you don't
have any
hoses that aren't tightened up properly
and look for any error codes on your abs
light if you have one and if all of that
is okay now you want to go on your first
test ride
you want to ride straight ahead and ride
slowly let's say 20 kilometers an hour
if that's safe and apply the rear brakes
first hard and fast if the abs system is
working you should get no lock up you
shouldn't get any skidding you should
feel the abs system modulating under the
under your foot on the brake pedal it's
like a pulsing feeling if it's working
if that worked go a little faster try
those rear brakes again
only once you're happy that the rear
brakes are working and therefore the abs
system is working you want to try the
fronts
do the same sequence on your front
brakes now but even more carefully only
do it straight ahead and do it slow to
start with you can have many more
accidents with your brakes on the front
than you can with the back
so if your kit is working properly you
should hear a buzz of the pump when you
turn on the bike provided yours does
that you should feel the pulsating foot
pedal and brake lever when you brake
really hard and fast
you should see no error messages or abs
indicator lights flashing that there's
any errors with the system
and of course you should get no skids or
no lock ups on a dry and clean road
if yours did work fine in your tests
well you could try testing on a gravel
road too but be extra extra careful a
lot of these kits are standard like mine
they have no modes or settings for
off-road or gravel roads they'll still
work but less successfully you will feel
probably a series of small fast little
skids one after the other
just because there's gravel under the
tires so be careful until you get used
to that and test on slower speeds and
with extra care but it is worth testing
if you have the chance just so you got
some experience with it
okay finally just a quick summary i'm
happy to say that there are real abs
kits available that you can fit to some
non-abs bikes i really wasn't sure until
i did my research and then bought this
and experimented
my kit works really well i've got no
lock ups no matter how hard i try
unsealed roads i'm really happy with it
these kits really only support bikes
with front and rear disc brakes that's
unless you can find a kit that
specifically says otherwise that it
supports a rear drum brake
don't always go with the cheapest seller
find the one that has the best and
fastest support as well it's just as
important as the price
really make sure you're accurate with
those measurements for those probe
wheels save yourself some grief
i really didn't need any special tools
to fit this just some spanners some
screwdrivers a brake bleed kit and some
wire strippers
and it really isn't that expensive and i
think the money is really well spent if
it means that you avoid crashing
and any sort of stay in hospital i think
it pays for itself
okay so where to from here i mean i'd
really next i'd like to be able to show
a real world video test of this abs kit
option you know showing my abs equipped
to roosie versus a standard non-abs
russy side by side you know so i'll ask
for some volunteers here in my local
area if they want to help help me out
with that one
this is a technical but important option
for our basic bikes i think so hopefully
this hasn't been too long and boring if
you've gotten this far to the end
i hope this information is of interest
to some of you guys and it helps a few
of you to make your bikes safer anyway
ciao for now guys
you
浏览更多相关视频
Anti Lock Braking System (ABS)(हिन्दी )
Como instalar o Netbeans - 2023
Remeha Elga Ace - plaatsing & installatie (volledige instructievideo)
CARA INSTALL UBUNTU 20.04.1 DI VIRTUALBOX || IT TUTORIAL
AKHIRNYAA VARIO VATRICK PASANG MOUNTING 5CM INI DIA YANG DI NANTI NANTI !!
#2 Java Development Kit (JDK) Setup
5.0 / 5 (0 votes)