Sistem Komputer Instalasi IDE Arduino

Vivi Melina
18 Jul 202403:52

Summary

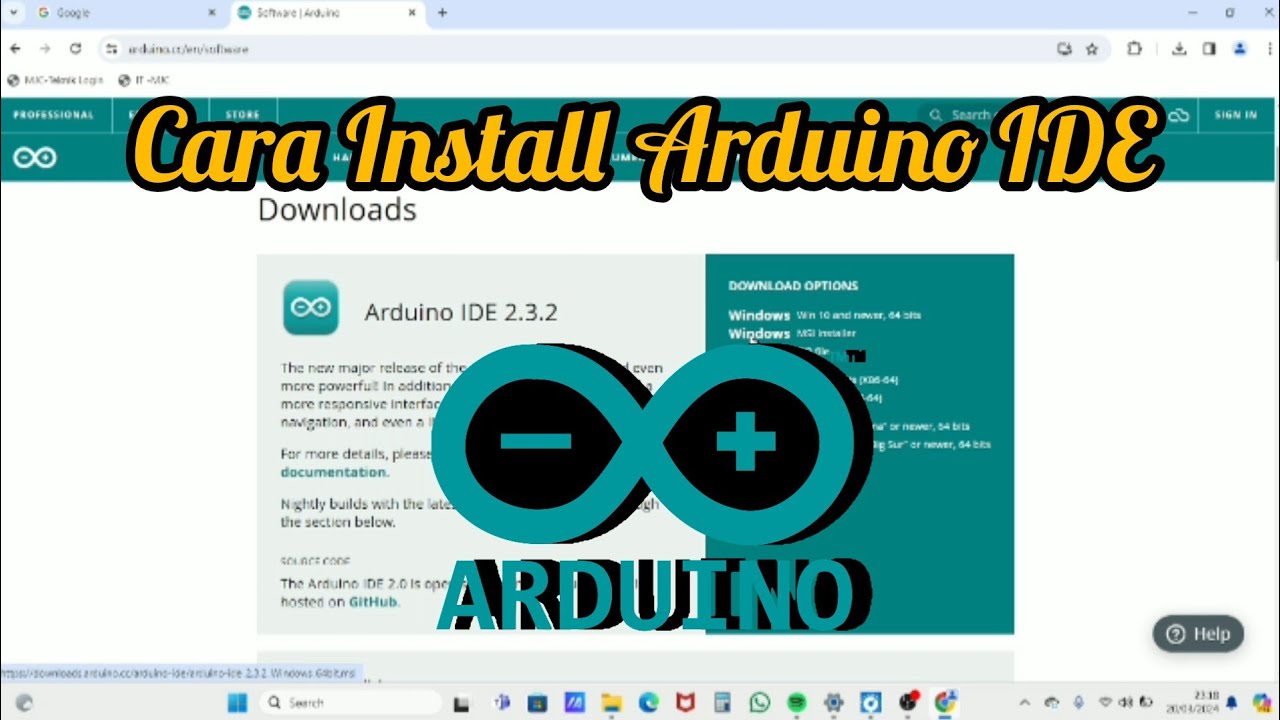
TLDRThis tutorial video script guides viewers through the installation process of the Arduino Integrated Development Environment (IDE) on a Windows 10 64-bit system. Starting from accessing the official Arduino website, selecting the appropriate software, and downloading it, the script continues with instructions on running the installer as an administrator, agreeing to terms, and choosing the installation type. It concludes with the successful setup of the IDE, version 2.3.2, and a brief mention of the next steps involving library downloads and project creation, encouraging learners to stay tuned for more.

Takeaways

  • 🌐 The video is a tutorial on installing the Arduino Integrated Development Environment (IDE).
  • πŸ’» The IDE is a Java-based software used to write programs for uploading to an Arduino board.
  • πŸ“₯ The software is available for free and can be downloaded from the official Arduino website.
  • πŸ” The tutorial specifically guides users to download the IDE for Windows 10 64-bit systems.
  • πŸ“§ During the download process, users are asked to provide their email but can opt to skip this step.
  • πŸ–±οΈ After downloading, the installation is initiated by right-clicking and selecting 'Run as administrator'.
  • πŸ“ The user must agree to the terms and conditions and choose the installation type ('only for this computer' in the example).
  • πŸ”„ The installation process requires waiting until it is completed, after which the user should click 'Finish'.
  • πŸ”„ Upon opening the IDE for the first time, the user is prompted to allow access and may be asked to download additional libraries.
  • πŸ› οΈ The tutorial mentions that the version of the IDE used in the video is 2.3.2.
  • πŸ” The user is instructed to select the appropriate Arduino board from the list within the IDE for programming.

Q & A

  • What is the topic of the video?

    -The topic of the video is about installing the Arduino Integrated Development Environment (IDE) for computer systems.

  • What is the Arduino IDE?

    -The Arduino IDE is a software application that is based on Java, used for writing programs that can be uploaded from a computer to an Arduino board.

  • Where can the Arduino IDE be downloaded from?

    -The Arduino IDE can be downloaded from the official Arduino website, www.arduino.cc/software.

  • What are the steps to download the Arduino IDE from the website?

    -The steps include opening Google Chrome, navigating to www.arduino.cc/software, selecting the software, scrolling down to the download section, choosing the appropriate version for the operating system, and clicking 'Just Download'.

  • Is there a need to provide an email address during the download process?

    -Yes, there is an option to provide an email address, but it is not mandatory as the user can choose 'Just Download' to proceed without entering an email.

  • What should be done after the download is complete?

    -After the download is complete, the user should open the downloaded folder, right-click the installer, select 'Run as administrator', and then click 'Run'.

  • What is the agreement type the user should choose during the installation process?

    -The user should choose 'I Agree' and then select 'Only for this computer' during the installation process.

  • What version of the Arduino IDE is mentioned in the video?

    -The version of the Arduino IDE mentioned in the video is 2.3.2.

  • What is the initial step after opening the installed Arduino IDE?

    -The initial step is to click 'Allow' to grant access and then choose whether to download libraries now or install them manually later.

  • How many types of Arduino boards are mentioned in the script?

    -The script does not specify the exact number of Arduino board types, but it implies that there are multiple types available for selection.

  • What will be covered in the subsequent videos after this one?

    -The subsequent videos will cover the use of the installed Arduino IDE and the creation of various projects.

Outlines

00:00

πŸ’» Installing Arduino IDE

This paragraph provides a step-by-step guide on how to install the Arduino Integrated Development Environment (IDE) on a Windows 10 64-bit system. The process begins with opening Google Chrome and navigating to the official Arduino website to download the software. The user is instructed to select the appropriate version for their operating system and proceed with the download. After downloading, the user should run the installer as an administrator, agree to the terms, and choose the installation type. The installation is monitored until completion, and the user is then prompted to allow access to the Arduino IDE. The IDE itself is introduced, showing its interface for writing code and mentioning the need to select the correct Arduino board. The video script ends with an invitation to learn more about using the Arduino IDE in future videos.

Mindmap

Keywords

πŸ’‘Sistem Komputer

The term 'Sistem Komputer' refers to a computer system, which is a collection of hardware and software components that work together to perform computational tasks. In the context of the video, the computer system is essential for running the Arduino Integrated Development Environment (IDE) and creating programs for the Arduino board.

πŸ’‘Arduino

Arduino is an open-source electronics platform based on easy-to-use hardware and software. It is used for building various projects that require interactive electronic devices. In the video, the Arduino board is the target device for uploading programs created in the Arduino IDE.

πŸ’‘Integrated Development Environment (IDE)

An Integrated Development Environment, or IDE, is a software application that provides comprehensive facilities to computer programmers for software development. The Arduino IDE mentioned in the script is a specific IDE for writing and uploading code to Arduino boards, emphasizing its role in the video's theme of programming and hardware interaction.

πŸ’‘Java

Java is a high-level, class-based, object-oriented programming language that is widely used in various computing platforms. The Arduino IDE is based on Java, which is relevant in the script as it indicates the programming language environment in which the IDE operates.

πŸ’‘Download

In the context of the video, 'download' refers to the process of obtaining the Arduino IDE software from the official Arduino website. The script describes the steps to download the IDE, which is a crucial part of setting up the development environment for Arduino projects.

πŸ’‘Google Chrome

Google Chrome is a web browser that is mentioned in the script as the medium through which the user accesses the Arduino website to download the IDE. It exemplifies the type of software used to navigate the internet and perform the download task.

πŸ’‘Install

The term 'install' in the script refers to the process of setting up the downloaded Arduino IDE on the computer. It is a key step in preparing the environment for programming the Arduino board, as described in the video's instructions.

πŸ’‘Administrator

In the script, 'Run as administrator' is a permission level that allows the user to install software with the necessary system access. It is an important step when installing the Arduino IDE to ensure that the software has the required permissions to modify the system.

πŸ’‘Agreement

The script mentions 'agree' in the context of accepting the terms and conditions or license agreement during the installation process of the Arduino IDE. This is a standard procedure for software installations, indicating the user's consent to use the software as per the provided terms.

πŸ’‘Library

In the context of programming, a 'library' refers to a collection of pre-written code that can be used in a program. The Arduino IDE prompts the user to download additional libraries, which are essential for expanding the functionality of the code written for the Arduino board.

πŸ’‘Version

The 'version' mentioned in the script refers to the specific release of the Arduino IDE software. The video specifies version 2.3.2, which is the version being demonstrated for the installation process, indicating the progression and updates of the software over time.

Highlights

Introduction to the third part of the computer system series focusing on the installation of the Arduino Integrated Development Environment (IDE).

Arduino IDE is a Java-based software that can be used to create programs for uploading to the Arduino board.

The IDE is freely available for download from the official Arduino website.

Instructions on how to download the IDE for Windows 10 64-bit are provided.

The download process requires agreeing to terms and selecting the appropriate version for the user's operating system.

The installation process includes running the downloaded file as an administrator.

Users are guided to agree to the terms and conditions during the installation.

Choosing the 'only for this computer' option for a personalized installation.

The installation process involves waiting for the software to be fully installed.

Completing the installation with a 'finish' option.

Opening the newly installed Arduino IDE and noting the version number.

The IDE prompts for access permissions which should be allowed.

The option to download additional libraries is presented, with the choice to install them immediately or later.

The presenter chooses to install all libraries immediately for convenience.

Overview of the IDE interface for writing code programs for the Arduino.

Selecting the appropriate Arduino board from the available options within the IDE.

Promise of future videos covering the use of the Arduino IDE and project creation.

Closing with thanks and encouragement for continued learning.

Transcripts

play00:00

Assalamualaikum warahmatullahi

play00:01

wabarakatuh kali ini kita masih belajar

play00:05

mengenai sistem komputer part 3 yaitu

play00:09

mengenai instalasi ide ardueno Arduino

play00:13

integrated development enironment atau

play00:16

ide adalah perangkat lunak berbasis Java

play00:20

yang dapat kita gunakan untuk membuat

play00:23

program yang dapat diunggah dari

play00:25

komputer kita ke dalam papan

play00:28

Arduino perangkat Luna ini tersedia

play00:32

secara gratis dan dapat kita download di

play00:37

situs

play00:37

Arduino untuk caranya kita simak

play00:41

bersama-sama yuk pertama kita buka dulu

play00:44

Google Chrome kemudian kita buka

play00:47

situsnya yaitu di

play00:53

www.arduino.cc/software kita pilih

play00:56

software kemudian kita Scroll ke bawah

play01:00

di sini ada download

play01:03

opsional saya pilih untuk Windows untuk

play01:07

Windows 10 64 bit kemudian kita klik

play01:12

just

play01:13

download Scroll aja ke bawah enggak

play01:16

Perlu diisi email-nya kita pilih just

play01:18

download

play01:21

Oke kita tunggu proses download-nya

play01:24

selesai

play01:39

ketika sudah selesai kita Buka folder

play01:42

yang udah di-download tadi kita Klik

play01:46

Kanan kemudian pilih Run as

play01:50

administrator kita klik

play01:55

Run lalu kita pilih agree

play02:01

pilih only for ini karena komputer saya

play02:05

jadi untuk WiFi kita pilih

play02:08

next instal nah ditunggu proses

play02:12

instalnya sampai

play02:18

selesai setelah itu

play02:25

finish Nah kita buka untuk

play02:31

ardino

play02:36

ide-nya pada saat video ini

play02:40

dibuat versinya adalah

play02:44

2.3.2 ya Nah di sini kita klik aja allow

play02:55

access kemudian diminta untuk download

play02:58

library

play03:00

boleh pilih nanti atau instal manual

play03:03

atau diinstal sekarang Nah di sini saya

play03:06

pilih yang install

play03:10

all nah seperti ini ini adalah tampilan

play03:14

kerangka untuk menuliskan kode program

play03:18

pada

play03:20

ardino

play03:21

ide board-nya kita pilih cari Arduino

play03:26

karena di sini terdiri dari beberapa

play03:32

Nah kita

play03:34

oke nah Seperti ini cara menginstal las

play03:38

arduno

play03:39

ide untuk

play03:41

penggunaannya dan untuk membuat

play03:43

projek-projek lainnya akan saya

play03:46

sampaikan di video selanjutnya terima

play03:49

kasih dan selamat belajar

Rate This
β˜…
β˜…
β˜…
β˜…
β˜…

5.0 / 5 (0 votes)

Related Tags
Arduino IDEProgrammingSoftware DownloadIntegrated DevelopmentJava-basedEducationalProject CreationComputer ScienceDIY ElectronicsCoding Tutorial