BACT/ALERT®: Blood Culture Collection: Winged Set Method
Summary
TLDRThe script outlines the critical steps for collecting blood cultures to diagnose sepsis, emphasizing the importance of proper disinfection, sufficient blood volume, and prompt transfer to the lab. It details the process from preparation, including confirming patient identity and using non-sterile gloves, to the actual collection, prioritizing aerobic bottles first. The summary also highlights the need for accurate labeling and mixing of the samples to ensure reliable test results.
Takeaways
- 🔍 Properly collected blood cultures are essential for accurate sepsis diagnosis and improving patient outcomes.
- 💉 Two sets of blood cultures should be obtained before administering antimicrobial agents.
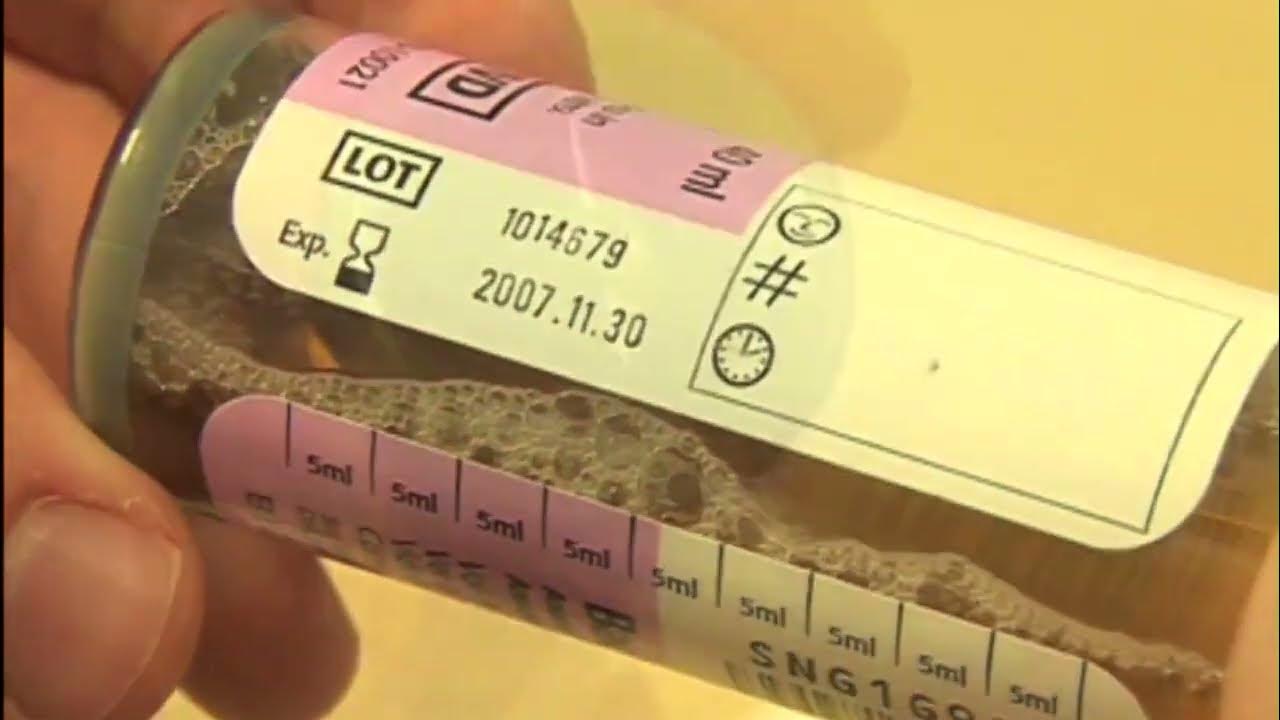
- 📦 Ensure all materials, including culture bottles with lot numbers and expiration dates, are gathered and checked for quality.
- 🧼 Hand hygiene and the use of non-sterile examination gloves are crucial before starting the collection procedure.
- 🆔 Confirm the patient's identity and match the requested laboratory test and patient information to prevent errors.
- 🛡️ Prepare the collection materials in a clean area to minimize contamination.
- 🔄 Disinfect the blood culture bottles using an approved disinfectant and allow them to dry completely.
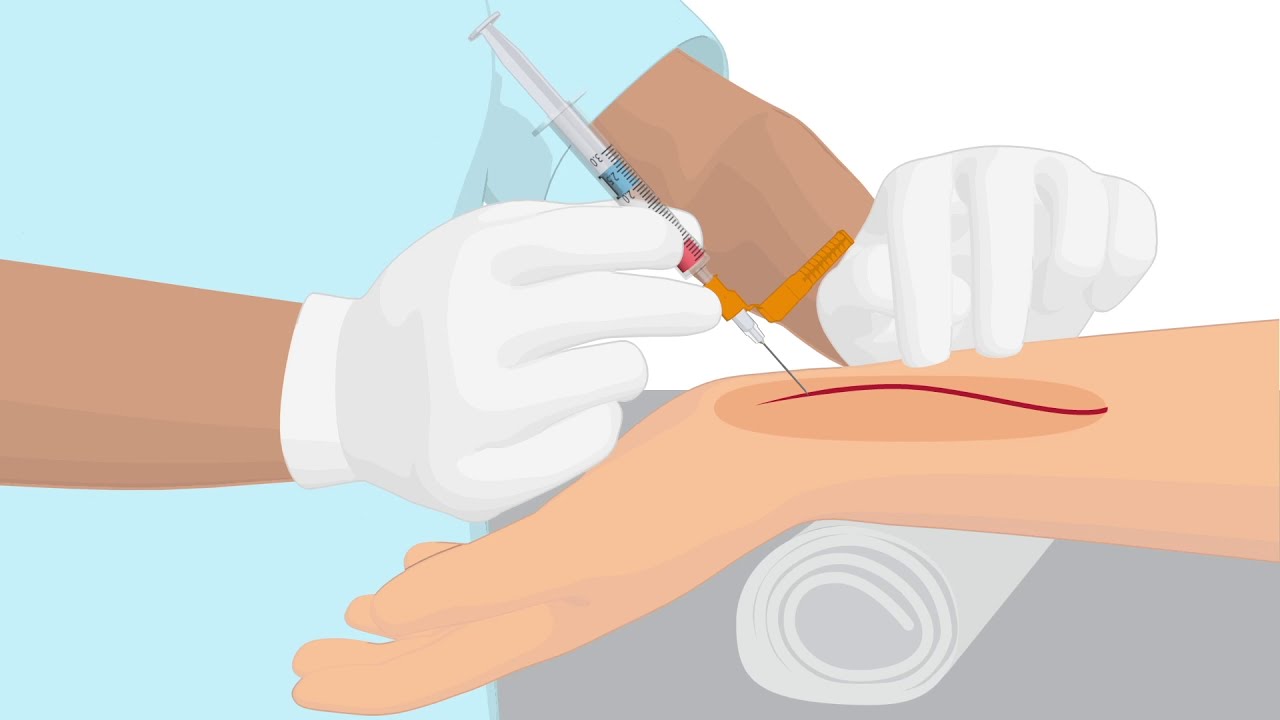
- 🩸 The arm is the recommended site for drawing blood cultures, and proper vein preparation is necessary.
- 🌐 Start with aerobic bottles first to avoid altering the anaerobe bottle's atmosphere with air from the tubing.
- 👶 For pediatric patients, a special pediatric aerobic bottle may be used with a specific inoculation volume.
- 💧 Use the fill-to mark to gauge the sample volume accurately, avoiding overfilling the bottles.
- 🔄 Mix blood culture bottles and tubes by inverting to ensure proper mixing.
- 🏷️ Properly label the bottles with all necessary information and ensure barcodes and level check windows are visible.
- 🚫 Dispose of all used materials correctly and promptly transfer inoculated culture bottles to the laboratory.
Q & A
Why is a properly collected blood culture important for sepsis patients?
-A properly collected blood culture is crucial for sepsis patients because it helps ensure accurate results that can improve patient outcomes by identifying the causative organisms and guiding appropriate antimicrobial therapy.
How many blood culture sets should be obtained for patients with suspected sepsis?
-Two blood culture sets should be obtained as soon as possible and before antimicrobial agents are administered to increase the chances of detecting the causative pathogen.
What should be checked before using the blood culture bottles?
-Before using the blood culture bottles, one should check the expiration date, ensure the media is not turbid or showing any visible defects, and confirm that the bottles are not damaged, deteriorated, or leaking.
Why is it necessary to wash hands or use an alcohol rub before starting the blood collection procedure?
-Washing hands or using an alcohol rub is necessary to minimize the risk of introducing contaminants into the blood culture, which could lead to false-positive results or culture contamination.
How should the patient's identity be confirmed during the blood culture collection process?
-The patient's identity should be confirmed by matching the requested laboratory test and patient information with the patient's identity, either using a printed label form or a mobile device.
What is the recommended site for drawing a blood culture?
-The arm is the recommended site for drawing a blood culture, as it is typically more accessible and less likely to be contaminated.
Why is it important to disinfect the chosen puncture site before inserting the needle?
-Disinfecting the puncture site is important to reduce the risk of introducing skin flora or other contaminants into the bloodstream, which could compromise the accuracy of the blood culture.
What should be done if the anaerobic bottle is collected first instead of the aerobic bottle?
-If the anaerobic bottle is collected first, the air in the tubing could alter the anaerobic environment, potentially affecting the culture's accuracy. Therefore, the aerobic bottle should always be collected first.
How much blood should be inoculated into the aerobic bottle for an adult patient?
-For an adult patient, 10 mL of blood should be inoculated into the aerobic bottle, as indicated by the fill-to mark on the bottle.
What should be done after collecting the blood samples to ensure proper mixing?
-After collecting the blood samples, the culture bottles and tubes should be gently mixed by inverting them 3 to 5 times to ensure proper mixing of the blood with the culture media.
How should the blood culture bottles be labeled after collection?
-The blood culture bottles should be labeled using the dedicated area on the bottle. If using a test label, it should be placed vertically with the same orientation as the bottle barcode, ensuring no coverage of the barcode, fill-to mark, or the window to check the blood level.
Outlines
💉 Proper Blood Culture Collection for Accurate Sepsis Diagnosis
This paragraph outlines the critical steps for collecting blood cultures to ensure accurate results in diagnosing sepsis. It emphasizes the importance of obtaining two sets of blood cultures before administering antimicrobial agents. The process includes checking the expiration and condition of the culture bottles, proper hand hygiene, patient identification, and preparation of materials. The script details the steps for disinfecting the puncture site, drawing blood without repalpation, and prioritizing the order of filling aerobic and anaerobic bottles. It also mentions the use of a pediatric bottle for children and the correct technique for attaching the collection adapter cap. The paragraph concludes with instructions on mixing the blood culture bottles and transferring them promptly to the lab.
🛑 Key Points in Blood Culture Collection to Prevent Contamination
The second paragraph highlights three essential points for successful blood culture collection: proper disinfection, sufficient blood volume, and prompt transfer to the lab. It reiterates the importance of avoiding contamination by using the correct disinfection method and not repalpating the vein after initial disinfection. The summary explains the correct order of inoculating bottles and the specific volumes required for adult and pediatric patients. It also covers the procedure for collecting additional blood tests, the safety measures for needle removal, and the correct disposal of sharps and materials. The paragraph ends with instructions on labeling and packaging the culture bottles for laboratory testing, stressing the need for accurate labeling and avoiding obstruction of barcodes or fill marks.
Mindmap
Keywords
💡Blood Culture
💡Sepsis
💡Contamination
💡Antimicrobial Agents
💡Expiration Date
💡Turbidity
💡Disinfection
💡Vena Puncture
💡Aerobic and Anaerobic Bottles
💡Fill to Mark
💡Labeling
💡Biohazardous
Highlights
A properly collected blood culture sample is crucial for accurate results and improving patient outcomes in sepsis cases.
Two blood culture sets should be obtained before administering antimicrobial agents.
Ensure all materials are gathered, including bottle details and patient information for accurate blood culture.
Check the expiration date and condition of culture bottles to avoid contamination.
Wash hands or use alcohol rub, and wear gloves for the blood collection procedure.
Confirm patient identity and match laboratory test requests to ensure correct blood collection.
Prepare materials in a clean area and disinfect blood culture bottles using an approved disinfectant.
The arm is the recommended site for drawing blood culture with a disposable underpad and tourniquet.
Disinfect the puncture site with 70% isopropyl alcohol and allow it to dry before applying the second disinfectant.
Do not repalpate the vein after disinfection to maintain sterility.
Start with aerobic bottles first to prevent air in the tubing from affecting the culture atmosphere.
For pediatric patients, use a special pediatric aerobic bottle and inoculate with up to 4 mL of blood.
Grasp the adapter cap by the outer edge and avoid touching the center to prevent contamination.
Use the fill-to mark to gauge the sample volume accurately, 10 mL per adult bottle.
If other blood tests are required, collect blood cultures first to avoid contamination.
After collecting, gently mix blood culture bottles and tubes by inverting to ensure proper mixing.
Label the bottles properly with barcode labels and additional information as required.
Place inoculated culture bottles in a biohazardous plastic bag and transfer promptly to the laboratory.
Three key points for blood culture collection: proper disinfection, sufficient blood volume, and prompt transfer to the lab.
Transcripts
[Music]
a properly collected blood culture
sample free of contaminants can help to
ensure accurate results that can improve
patient outcomes for patients with signs
and symptoms of sepsis two blood culture
sets should be obtained as soon as
possible and before antimicrobial agents
are
administered gather all necessary
materials bottle Lot number expiration
date fill to Mark barcode Black Box
window for checking the level of
blood area to add patient information
and test
label check that the culture bottles are
within the expiration date do not use a
bottle containing media displaying
turbidity a yellow sensor or any other
visible
defs do not use bottles that show signs
of damage deterioration or leaking
AG wash your hands with soap and water
and then dry them or apply an alcohol
hand
rub then apply well-fitting non-sterile
examination
gloves before starting the collection
procedure confirm the patient's identity
check that the requested Laboratory test
and patient information matches the
patient's identity this could be either
using a printed label form or mobile
device
prepare the collection materials in a
clean protected area to help minimize
contamination remove the flip caps from
the blood culture
bottles disinfect using an approved
disinfectant use a fresh swab or
applicator for each
bottle remove the swab or applicator and
allow bottle tops to dry completely
attach the set to the collection adapter
cap if it is not already
connected note the adapter cap may have
an insert that needs to be removed when
collecting blood cultures the insert
will be used if additional blood test
tubes are needed the arm is the
recommended site for drawing a blood
culture place a disposable underpad
under the patient's arm locate the vein
and apply a disposable
tourniquet palpate to locate the vein
disinfect The Chosen vea puncture site
according to your facility's approved
procedure recommendations are to cleanse
the site with friction for 30 seconds
using 70% isopropyl alcohol allow to dry
then apply the second disinfectant
following the manufacturer's
recommendation the vena puncture site is
not considered a septic until the
disinfectant has fully evaporated
[Music]
do not rep palpate the prepared vein
before inserting the needle enter the
vein swiftly blood appearing in the
blood collection tubing confirms a
successful vein app puncture release the
tourniquet as soon as the Blood starts
to flow and always if it has been in
place for 2 minutes or
more always start with the aerobic
bottles first as the air contained in
the tubing will not affect the
atmosphere of the aerobic bottle if the
Anor robic bottle is collected first the
air contained in the tubing will alter
the atmosphere of the Anor robic bottle
for Pediatric patients a special
pediatric aerobic bottle may be used and
inoculated with up to 4 mL of
blood grasp the adapter cap Always by
the outer edge and don't put your finger
into the center place the adapter cap
over the aerobic bottle and press
straight down to pierce the septum
continue to hold the adapter cap down
during the collection keep the bottle in
an upright position below the patient's
arm during the collection to avoid back
flow of the media into the
tube use the fill two Mark to accurately
gauge the sample volume 10 ml per adult
bottle
the vacuum inside the bottle will not
stop at 10 mL so be sure to not overfill
for Pediatric patients a special
pediatric aerobic bottle may be used and
inoculated with up to 4 mL of
blood once the aerobic bottle has been
inoculated remove the bottle from the
adapter cap insert the Anor robic bottle
and repeat the collection
procedure use the fill two Mark to
accurately gauge the sample volume 10 m
per adult bottle if other blood tests
are required always collect blood
cultures first insert the adapter if
required for blood tubes to collect
blood taking caution not to put your
finger into the center to avoid a needle
stick remove the needle from the vein
gently and engage the safety device if
utilized by your facility cover the
patient's puncture site with a suitable
dressing and apply
pressure discard the the entire
collection device into a Sharps
container and dispose of other
materials when complete gently mix blood
culture bottles and tubes by inverting 3
to five
times to properly label the bottle use
the dedicated area on the bottle if
using a test label place the barcode
label vertically so the orientation is
the same as the Bottle Bar Code do not
cover any of the bottle bar codes or the
fill to Mark or window to check the
blood level add any additional
information if required such as date
time and collected by ensure that any
additional labels do not cover the
bottle
barcode Place bottles and blood
collection tubes in a biohazardous
plastic bag if available place the label
or request form in the outer compartment
of the
bag transfer the inoculated culture
bottles promptly to the test
laboratory three important points to
remember regarding blood culture
collection first proper disinfection is
crucial to the ensuring of a
contamination-free
culture second sufficient blood volume
will help ensure optimal organism
detection and third transfer the
inoculated bottles promptly to the
laboratory
[Music]
Browse More Related Video
5.0 / 5 (0 votes)