First Time Breeder Bin Cycle Results Plus Using a Fan for the First Time

RockinWorms
12 Sept 202313:40

Summary

TLDRJayne from Rock and Worms welcomes viewers to her channel, showcasing a new breeder bin's first cycle with red wigglers. She demonstrates using a fan to dry castings quickly, then sifts through to reveal smaller cocoons due to the worms being new to breeding. Jayne explains the importance of feeding high-calorie foods to breeders for larger, more manageable cocoons, and shares her method of efficiently managing space and resources in her worm composting journey.

Takeaways

  • 🌱 The video is a tutorial on vermicomposting, specifically focusing on the management of a 'breeder bin' for red wigglers.
  • 👋 Jayne, the host, warmly welcomes new and returning subscribers to the channel dedicated to red wigglers.
  • 📦 The video showcases a 'warm bin' which is undergoing its first breeder cycle, indicating a new phase in the vermicomposting process.
  • 🌬 Jayne uses a mini fan to dry down the castings, a method recommended by commenters and found to be effective by the host.
  • ⏱ The fan dries the castings quickly within an hour to an hour and a half, allowing for easier sifting and redistribution of moisture.
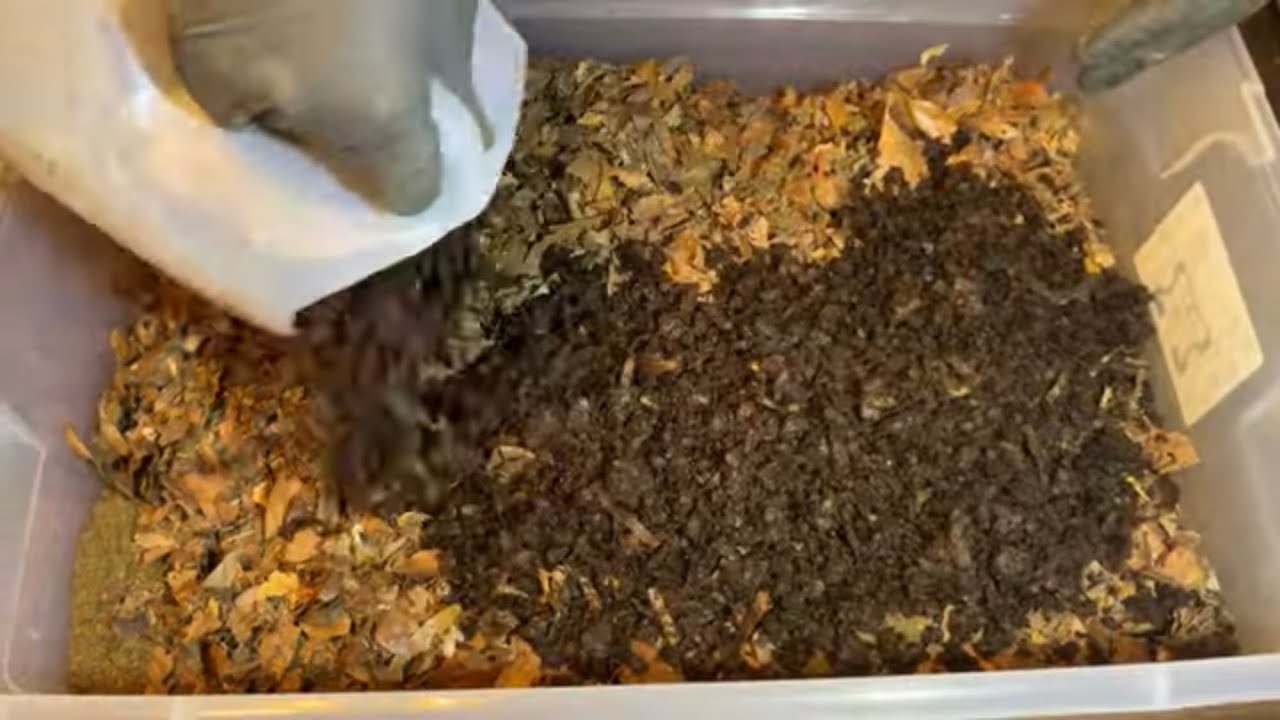
  • 🔄 Jayne demonstrates the process of sifting the bin's contents to separate the dry castings and redistribute moisture uniformly.
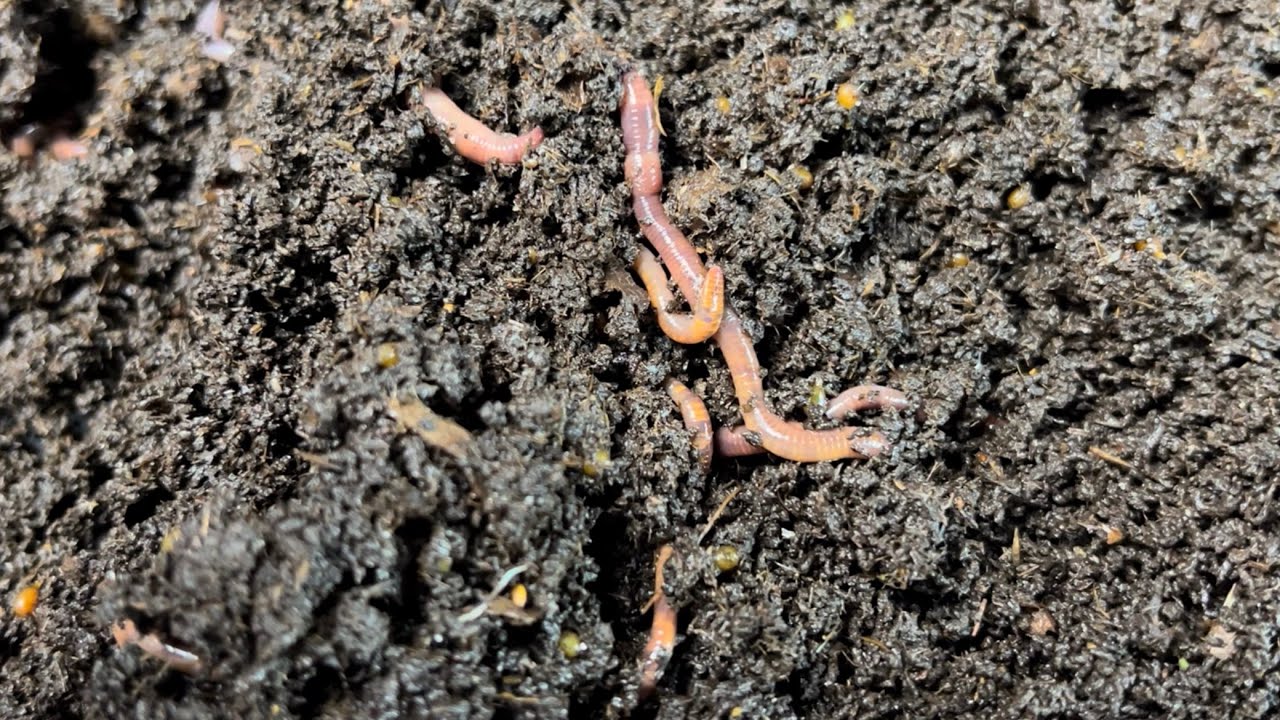
  • 🐛 The video provides a detailed look at the worm cocoons in a new breeder bin, noting that they are smaller compared to those in established bins.
  • 🥗 The size of the cocoons is attributed to the worms being newer to the breeding process and having had less time to grow and produce larger cocoons.
  • 🍽 The diet of the worms is highlighted as a factor influencing cocoon size, with breeders being fed a higher calorie diet to encourage growth.
  • 🔬 Jayne discusses an ongoing experiment involving the breeders, which requires them to be temporarily housed in a holding bin.
  • 🌱 The importance of managing space and resources is emphasized, especially when maintaining multiple breeding bins and grow-out bins.
  • 🌳 The castings are intended for use in the garden, highlighting the beneficial use of vermicompost as a natural fertilizer.

Q & A

  • What is the main topic of the video script?

    -The main topic of the video script is the process of managing a worm breeding bin, particularly focusing on the first breeding cycle and the use of a fan to dry down the castings.

  • What is a 'breeder bin' in the context of the script?

    -A 'breeder bin' is a container where red wigglers, a type of worm, are kept for the purpose of breeding. It is part of vermicomposting, where worms are used to convert organic waste into nutrient-rich castings.

  • Why does Jayne use a fan in the worm bin?

    -Jayne uses a fan to dry down the castings in the worm bin. This helps to speed up the process and allows her to mix the material more evenly to redistribute moisture.

  • What is the advantage of using a fan to dry down the castings?

    -The advantage of using a fan is that it dries down the castings very quickly, which helps in the process of sifting and redistributing the moisture in the bin.

  • What is the downside mentioned about using a fan to dry down the castings?

    -The downside is that the fan dries the castings very quickly, which means one must be prepared to stop the drying process at the desired point or be ready to sift out the material immediately.

  • What are 'clitolums' mentioned in the script?

    -Clitolums are the reproductive segments of red wigglers, which are often visible and can be identified by their yellow tails. They are part of the breeding process in vermicomposting.

  • Why are the breeders in the new bin smaller than those in established bins?

    -The breeders in the new bin are smaller because they have not been through multiple breeding cycles yet. They have not had the chance to grow and become 'chunkier' due to less competition and higher calorie food in the breeding process.

  • What is the significance of the size of the cocoons in the breeding bin?

    -The size of the cocoons is significant because larger cocoons are easier to see and collect. Smaller cocoons can sift through the larger holes of the sieve and require more work to be picked out individually.

  • What is the purpose of sifting the worm bin?

    -Sifting the worm bin helps to separate the castings from the cocoons and the breeders. It allows for better management of the vermicomposting process and ensures that the worms are kept in suitable conditions for growth and reproduction.

  • What does Jayne plan to do with the castings after sifting?

    -After sifting, Jayne plans to put the castings into a castings bucket, which will then be used in the garden as a nutrient-rich soil amendment.

  • How does Jayne manage the space limitation for cocoon bins?

    -Jayne manages space limitations by consolidating the cocoons into a smaller number of bins and actively managing the volume of castings removed from the breeder bins.

  • What is the role of 'overs' in the context of the script?

    -The 'overs' refer to the cocoons that are sifted out from the main bin and are collected for further processing or direct use in the garden.

  • What is the蚯蚓种群箱中新种群箱与旧种群箱的茧大小有何不同,以及这对蚯蚓养殖过程有何影响?

    -新种群箱中的茧比旧种群箱中的茧小,这意味着需要更多的工作来挑选出茧,因为更多的茧会通过筛子的较大孔隙掉入中间空间。这影响了养殖过程的下一步,可能需要更多的时间来挑选和处理茧。

  • Jayne提到了一个实验,这个实验的目的是什么?

    -Jayne没有详细说明实验的具体目的,但提到了这个实验涉及到将种群放入一个保持箱中,直到实验的下一步设置完成。这表明实验可能与种群的管理和繁殖有关。

  • 为什么Jayne暂时没有将种群放入新的种群箱?

    -Jayne提到了两个原因:一是这些种群将参与一个新的实验,需要在保持箱中待一两天;二是她暂时缺少基本床垫混合料的一个主要成分——筛过的牛粪,因为下雨她没能补充牛粪。

Outlines

00:00

🌱 Introduction to Red Wiggler Breeding Bin

In this introductory paragraph, Jayne welcomes new and returning subscribers to her video series on red wigglers, a type of composting worm. She is in one of her worm bins that has just completed its first breeding cycle. Jayne introduces a mini fan she's using to dry down the worm castings, a technique suggested by her commenters. The fan works effectively but requires careful management to avoid over-drying. She proceeds to mix the material in the bin to redistribute moisture and prepare for sifting out the worms and cocoons.

05:05

🐛 Managing Breeder Worms and Cocoons

Jayne discusses the process of managing her breeding worms, noting that the worms in this first-time breeder bin are smaller and produce smaller cocoons compared to more established bins. She explains that the smaller size of the cocoons means more will sift through to the intermediate space of her sifting setup. This increases the work required to separate the cocoons for placement into a cocoon bin. She also mentions a temporary shortage of sifted cow manure due to rain, which is a key component of her bedding mix, and plans to set up a new breeder bin once the cow manure dries.

10:12

🔍 Observing Cocoon Development in New Breeder Bins

In this paragraph, Jayne shares her observations on the development of cocoons in a new breeder bin. She notes that the cocoons are smaller and less visible against the bedding material compared to those from more mature bins. She advises giving new breeder worms a chance to grow and fatten up by feeding them high-calorie foods, which will result in larger cocoons in subsequent cycles. This will simplify the sifting process and reduce the number of cocoons that need to be manually picked out. Jayne emphasizes the importance of managing space and resources effectively, especially when maintaining multiple breeding bins.

Mindmap

Keywords

💡Red wigglers

Red wigglers are a type of earthworm commonly used in vermicomposting due to their ability to break down organic matter efficiently. In the script, they are the main subject of the video, highlighting the journey of managing and breeding these worms for composting purposes.

💡Warm bins

Warm bins are containers used to house red wigglers, providing a warm and controlled environment that is conducive to their growth and reproduction. The script mentions being 'here in one of my warm bins,' indicating the setting where the bin's first breeder cycle is being discussed.

💡Breeder cycle

A breeder cycle refers to the process of breeding worms to increase their population for vermicomposting. The video script introduces the concept by stating it's the first time the bin has gone through its breeder cycle, emphasizing the importance of this stage in worm management.

💡Casting

Casting is the waste material excreted by worms, rich in nutrients and beneficial for soil health. In the script, the speaker discusses drying down the castings with a fan, which is a method to manage the moisture content and prepare the material for use in the garden.

💡Fan

In the context of the video, a fan is used to aerate and dry the worm castings. The script describes using a mini fan to expedite the drying process, which is a technique suggested by commenters and appreciated by the speaker for its efficiency.

💡Sifting

Sifting is the process of separating different components of the worm bin, such as separating castings from cocoons. The script describes sifting as a necessary step to manage the worm bin effectively, particularly when dealing with a new breeder bin.

💡Cocoons

Cocoons are the protective casings that enclose the pupae of worms, which will eventually emerge as adult worms. The script discusses the size and visibility of cocoons in a new breeder bin compared to more established ones, indicating the growth and development stages of the worms.

💡Clitolum

A clitolum is the reproductive segment of a worm, often visible in mature worms ready to breed. The script mentions 'clitolums' with 'nice Yellow Tails,' referring to the mature worms in the bin that are capable of reproduction.

💡Grow out bins

Grow out bins are used to house worms that have grown beyond the breeding stage, focusing on their role in composting rather than reproduction. The script contrasts the condition of worms from grow out bins with those in a new breeder bin, highlighting the differences in their diet and living conditions.

💡Worm chow

Worm chow refers to a high-calorie food mix designed to feed breeding worms, promoting their health and reproduction. The script mentions worm chow as part of the diet for breeders, in contrast to the lower-calorie vegetables fed to worms in grow out bins.

💡Experiment

In the script, an experiment refers to a new method or process being tested with the worms. The speaker mentions that the breeders are part of a new experiment and need to be placed in a holding bin temporarily, indicating a scientific approach to worm management.

💡Holding bin

A holding bin is a temporary container used to house worms during transitions, such as between experiments or stages of the breeding cycle. The script describes using a holding bin for breeders before they are moved to a new breeder bin as part of an ongoing experiment.

💡Sifted cow manure

Sifted cow manure is a component of the bedding mix used in worm bins, providing a source of nutrients and a habitat for the worms. The script mentions a shortage of this material due to rain, which affects the setup of a new breeder bin.

💡Bacteria

Bacteria are microorganisms that play a crucial role in the decomposition process within a worm bin. The script refers to 'little white specks' of bacteria in the bin, indicating the presence of a healthy microbial community essential for composting.

Highlights

Introduction to the video with a special welcome to new subscribers and a recap for returning viewers.

Demonstration of using a mini fan to dry down the castings in a worm bin, a technique suggested by commenters.

The fan effectively dries the top layer of the bin castings within an hour and a half, facilitating easier handling.

The downside of the fan is the need for constant monitoring to prevent over-drying of the castings.

The process of sifting and redistributing moisture in the bin to ensure even moisture distribution.

Introduction of a breeder bin that has completed its first breeding cycle.

Observation of the smaller size of the breeders and their yellow tails, indicating their newness to the breeding cycle.

Comparison between the size of breeders in a new bin versus those in an established bin.

Discussion on the diet differences between breeder and grow-out bins, with breeders receiving higher calorie food.

Explanation of the temporary shortage of sifted cow manure due to rain and its impact on bedding mix preparation.

The plan to set up a new breeder bin once the cow manure is dried and sifted.

Description of the holding container where breeders will stay temporarily during an experiment.

The importance of sifting to separate castings from cocoons for efficient worm bin management.

The impact of smaller cocoons on the sifting process and the additional work required to collect them.

The strategy for consolidating cocoons into fewer bins to manage space limitations effectively.

Advice on allowing new breeders to go through several cycles with high-calorie food to produce larger cocoons.

Conclusion summarizing the importance of managing new breeder bins and the benefits of larger cocoons for ease of handling.

A call to action for viewers to like, subscribe, and share the video to support the channel's growth.

Transcripts

play00:03

hi I'm Jayne at Rock and worms I want to give a special welcome to all our new

play00:09

subscribers a warm welcome back to everybody who's been you know with me on

play00:14

this incredible journey that we're taking regarding red wigglers and if

play00:19

you're just you know stopping in to check us out welcome to you too and I

play00:24

hope you'll decide to you know stick around all right we are here in one of

play00:30

my warm bins and this is the first

play00:37

time that this bin has gone through its breeder cycle but before we get into the

play00:46

bin I want to uh back up just a second and show you this setup this is a little

play00:51

mini fan that I found in my cameraman's office

play00:55

so I pinched it for a couple hours today and what I've been doing is blowing the

play01:02

fan it oscillates over the top of the bin to dry down the castings a bit

play01:09

several of my um commenters had said that they use a

play01:15

fan to dry down their castings and why wasn't I using one well I finally

play01:21

gave it a go and I want to say that I like it all right it dried down the top

play01:28

of the of the bin the castings fairly quickly within an hour hour and a

play01:33

half to the point where I you know move the dry castings over to the side let it

play01:40

dry down a little bit more and then after in about another half an hour or

play01:44

so I ended up mixing all the material in together to redistribute the moisture

play01:51

that was you know in the in the bin okay so

play01:55

everything will um sift uniformly if you will okay so

play02:01

the the plus about the using the fan is it did dry down the castings very

play02:07

quickly okay the downside of it is it dries down the castings very quickly so

play02:14

you need to be prepared to either you know stop the dry down at whatever point

play02:19

it is that you want or you need to um you know be ready to sift out okay so

play02:27

that's what we're gonna do now this is a breeder bin that is coming off its first

play02:34

ever breeding cycle and I started to sift this out earlier today and then I

play02:42

started looking at the cocoons and that's when I decided hey maybe you guys

play02:46

would be interested in seeing what a first time breeder been

play02:51

looks like and what the cocoons look like

play02:54

so I actually do not know how many breeders are in here because I had

play03:00

picked them out of my grow out bins and just tossed them in to a new uh breeder

play03:07

bin setup but you can see you know the clitolums

play03:12

they're a little dirty here's one with a nice Yellow Tail and one of the things

play03:18

is they're a little bit on the smaller side if you've you know watched some of

play03:22

my other breeder Bin videos and managing to success videos you'll notice that

play03:28

those breeders are a little bit more chunky a little bit fatter and that's

play03:33

because they've been in the breeding bin cycle for months you know for several

play03:39

several go-arounds so they've been able to take advantage of less competition

play03:46

from their compatriots in a you know grow out bin

play03:52

as well as the higher calorie food of worm Chow because worm Chow along with

play04:00

vegetable powder and some amendments are what I feed my my breeders okay where my

play04:06

grow up bins get primarily not exclusively but primarily the lower

play04:11

calorie vegetables okay so I'm going to start sifting this

play04:16

because that's really what I want to show you now again normally

play04:22

I would be picking these breeders out and putting them directly into their new

play04:29

breeder bin however two things one these breeders have volunteered

play04:37

to be part of a new experiment I'm running and they need to go into a

play04:43

holding bin for a day or two until I can get to the next step of my experiment

play04:50

set up so I don't want to put them directly into

play04:56

a new breeder then and two I happen to be temporarily short

play05:04

of one of the main components of my basic bedding mix which is the

play05:10

sifted cow manure it's been raining and I haven't been able to restock my

play05:17

cow manure so uh we just collected some today it's drying out in the barn and uh

play05:26

the plan is that I'll be able to sift some out tomorrow and and set up a new

play05:31

breeder bin for them after I take them through the next step

play05:35

of the experiment but so in the meantime they're going to live

play05:41

you know moderately happily in this holding container with the leftovers of

play05:49

the sifting and you can see there's a lot of cardboard in here if uh you know

play05:54

you can see that there's lots of little white specks which are pieces of uh

play05:59

bacteria and they have plenty of food okay so they're going to be fine to hang

play06:05

out in this smaller container for

play06:09

you know another 24 hours okay okay so I'm not gonna sip

play06:16

the whole bin because that's not really the point

play06:20

of this video it is this so

play06:27

this is the castings and you can see how how nicely they're sifting out being a

play06:32

you know appropriately dried down with the fan so again I really do like that

play06:37

but I want to show you the cocoons okay so here are cocoons right here

play06:44

and some down here and generally speaking

play06:49

the cocoons are a little bit on the smaller side

play06:54

let me uh here here's another one a little bit on the smaller side than what

play07:01

I normally get out of my more established breeder bins and again that

play07:06

Cycles back to what I said in the beginning these are new breeder bin

play07:11

breeders okay so they are on the smaller side and that means that they throw out

play07:19

throw off smaller cocoons okay that also means that more cocoons

play07:26

will sift through the larger 1 8 hole into the you know the interim space

play07:35

between the 1 8 and the 1 16. so that then subsequently means that if I want

play07:43

to

play07:46

pick out rescue collect these cocoons that's more work for me because I have

play07:54

to go in and literally pick these out one by one in order to put them into a

play07:59

cocoon bin so I can keep these castings separate and these castings go into my

play08:07

castings bucket which we'll head right out into the garden now if you are

play08:14

in a place where you can let me do another step

play08:19

since I'm just talking to you here if you're in a place where you know you

play08:25

don't need to sift out your castings from your cocoons or pick out your

play08:31

castings or pick out your cocoons from your castings then you know you don't

play08:36

need to to do this okay but for me since I have you know several brooder bins and

play08:46

I am adding a breeder bin every week to 10 days

play08:51

I cannot afford space wise to have a new cocoon bin for every

play09:00

breeder bin every cycle it's like you know the old uh saying about the you

play09:07

know Penny on a on a chessboard and after you know 16 or 20 spaces you're

play09:14

already a multi-millionaire because that exponential happens and this isn't quite

play09:19

that bad but given my space limitations being here in my house it is something I

play09:25

have to very actively manage so if I can uh you know take a lot of this volume

play09:33

out take these beautiful castings out right away that means that I can

play09:39

consolidate the cocoons into a smaller number of bins okay in

play09:47

fact the cocoons that I'm going to be picking out of this breeder bin are

play09:52

going to be added to

play09:57

um let's see which one these two cocoon bins right here because these are cocoon

play10:02

bins that I started from breeder bins last week okay so the number of cocoons

play10:12

that come out of here since I'm just adding cocoons in a small amount of

play10:17

their batting castings can go right into these bins without it being you know too

play10:23

much and too heavy and too awkward for me to manage

play10:27

okay and actually I'm sorry I misspoke um I'm not adding the castings the

play10:33

castings are going into the castings bucket what's going to go into those uh

play10:37

cocoon bins are the overs here after I pick out the Breeders okay

play10:43

because there's cocoons in here but here's another thing I want to show you

play10:47

with the cocoons let me uh bring this over a little bit closer to me so I can

play10:52

see if we start pulling this apart you can see there are cocoons in there you

play10:57

can see that you can see the cocoons okay but if you recall some of the overs

play11:05

I get from my more established breeder bins this would be you know just

play11:12

littered with cocoons that you could see and it's not that the number of cocoons

play11:18

aren't in here it's this it's just that they're much smaller and harder to see

play11:23

against the bedding okay but you know look at lots of cocoons right they're

play11:28

just a little smaller a little harder to see

play11:32

so anyways the point of all this right is that when you start a new breeder

play11:37

then particularly if you're taking your breeders out of your grow out bins and

play11:43

those breeders a little bit on the skinnier side

play11:48

give them a chance okay let let them run through a couple breeder Cycles where

play11:55

you're feeding them the more high calorie foods

play12:00

um again I prefer uh predominantly worm challenge in my breeder bins but you

play12:05

know higher calorie foods so these worms get a chance to pack on some weight and

play12:12

then they're going to reward you by giving you bigger cocoons which then

play12:17

will catch more in your bigger sieve and you won't have

play12:22

to pick them out because most of them all be in one place to begin with and

play12:27

then what comes through into your

play12:32

middle space here between your your two sieves will just be you know a

play12:37

relatively few cocoons that you can easily either pick out or say forget it

play12:44

there's you know maybe only 20 or 30 cocoons in there from a whole bin they

play12:49

can just go out into the garden and live their best lives out there

play12:53

okay so that's what I wanted to show you what

play12:57

a new breeder bin looks like vis-a-vis the size of their cocoons

play13:03

compared to an older bin an older breeder bin and how that impacts the

play13:10

time it takes you to you know move on to the next step whatever that next step is

play13:16

for your worm Journey all right so that's it I hope you have a good one uh

play13:23

please like And subscribe share if you can because that helps me very much to

play13:29

grow continue to grow my channel and get even more new subscribers joining us

play13:34

here on the castings crew I am yours in the dirt Jane

Rate This

5.0 / 5 (0 votes)

Related Tags
Red WigglersBreeder BinCocoon CareWorm CastingsFan DryingVermicompostingGardening TipsEco-friendlySustainable LivingCompost Management