Photogrammetry Just Got Easier: Create awesome 3D models from photos with Substance 3D Sampler
Summary
TLDRこのビデオでは、Adobe 3D Samplerを使って写真から高品質の3Dアセットを作成する方法が紹介されています。ホストであるPablo Muñozは、写真を用いて植物の3Dオブジェクトを作り上げるプロセスをステップバイステップで解説しています。自動マスクや物体認識、そしてポイントクラウドからのメッシュ生成まで、簡単かつ自動化されたプロセスを紹介し、最終的な3Dモデルを3D Stagerでレンダリングする方法も学べます。
Takeaways
- 📷 Adobe 3D Samplerを使用して写真から高品質の3Dアセットを作成する方法を学べます。
- 🌿 ビデオでは、カメラで植物を取り囲って61枚の写真を撮影し、それらを3D Samplerにインポートします。
- 🔍 3D Samplerは自動マスク機能があり、写真からオブジェクトを認識してマスクを作成します。
- 💻 Photoshopと同様のアルゴリズムを使ってオブジェクトを選択し、3D Samplerはそれに類似した技術を利用してマスクを生成します。
- 🔄 高精度モードで処理を実行し、写真の順序は特に指定しなくても自動的に処理されます。
- 🌐 3D Samplerはポイントクラウドを作成し、それからメッシュを生成して3Dモデルを完成させます。
- 🌤️ 撮影時には日差しが強くない曇りの日に撮影すると、3D Samplerの処理を容易にします。
- 🛠️ 3D Samplerで生成されたメッシュにはギャップが生じる可能性があり、ZBrushなどのソフトウェアで修正できます。
- 🎨 Substance 3D Stagerを使用して3Dモデルに素材を適用し、シーンを構築してレンダリングできます。
- 🖼️ 3D Stagerではカメラの奥行きの効果を有効にし、フォーカスポイントを設定してよりリアルなレンダリングを作成できます。
- 🔧 3D Samplerと3D Stagerの組み合わせで、写真から3Dアセットを作成し、シーンに配置して高质感の写真を作成することが可能です。
Q & A
ビデオで紹介されている3Dアセットを作成するために必要な写真の枚数はどれくらいですか?
-ビデオでは、合計で61枚の写真が必要であると述べています。これらの写真は、対象物を取り囲って異なる角度から撮影したものと、細かいテクスチャや詳細を捉えるためのクローズアップです。
Adobe 3D Samplerを使用する際のカメラの種類には特にこだわりがありますか?
-特にDSLRカメラを使用することが推奨されていますが、ビデオでは特にカメラの種類にこだわりは見られません。重要なのは、高解像度の写真をとることと、撮影が均一な照明条件下で行われることです。
Adobe 3D Samplerでの写真をどのように取り込むのですか?
-Adobe 3D Samplerのウィンドウで「新しい3Dオブジェクト」をクリックし、写真をドラッグ&ドロップまたは取り込むことでインポートします。その後、グループ名や写真の解像度、センサーサイズ、焦点の長さを設定し、提出します。
自動マスク機能とは何であり、どのように動作しますか?
-自動マスク機能は、ソフトウェアが写真内のオブジェクトを認識し、それに基づいてマスクを生成する機能です。Photoshopのオブジェクト選択ツールと同様のアルゴリズムを使って、高精度でオブジェクトを識別します。
3D Samplerで生成されたポイントクラウドはどのようなものか説明してください。
-ポイントクラウドは、3D空間内のポイントの集合であり、ビデオではカメラのアイコンがそれらを表しています。これらのアイコンは、対象物を360度回転しながら撮影した結果として、対象物の形状を正確に再現しています。
ビデオで撮影された写真がうまくアライメントされなかった場合、どう対処しますか?
-アライメントがうまくいかなかった写真は、警告として表示されます。通常、これはクローズアップ写真で、大きな問題ではありません。必要に応じて、これらの写真を手動で調整することができます。
3D Samplerでメッシュの解像度をどのように選択しますか?
-メッシュの解像ドは「フル」、「ハイ」、「メディウムドラフト」などから選択できます。ビデオでは「フル」を選択して、高精度のメッシュを作成しています。
3D Samplerで生成された3Dモデルにギャップが存在する場合、どのように対処しますか?
-ギャップが存在する場合は、ZBrushやBlenderなどの他のソフトウェアを使用して、ジオメトリをクリーンアップし、ギャップを修正することができます。
3D Stagerで3Dモデルに適用するマテリアルはどのように設定しますか?
-3D Stagerでは、モデルを選択し、マテリアルパネルからベースカラーとして画像をドロップできます。その後、必要に応じてマテリアルの他のプロパティを調整して、よりリアルな外観を作成できます。
ビデオで紹介されている3D Stagerの機能には何がありますか?
-3D Stagerでは、3Dモデルの配置、マテリアルの適用、カメラの設定、照明の調整などが可能です。また、レイトレーシングを使用して高品質のレンダリングを作成し、深度のフィールドを有効にすることで写真のように自然なブラーを追加できます。
Adobe 3D Samplerと3D Stagerを使用して3Dアセットを作成するプロセス全体について説明してください。
-プロセスは以下の通りです。まずAdobe 3D Samplerで写真をインポートし、自動マスク機能を使用してポイントクラウドを作成します。次に、メッシュの解像度を選択し、ジオメトリを生成します。その後、3D Stagerでモデルにマテリアルを適用し、カメラや照明を調整してレンダリングを作成します。
Outlines

This section is available to paid users only. Please upgrade to access this part.
Upgrade NowMindmap

This section is available to paid users only. Please upgrade to access this part.
Upgrade NowKeywords

This section is available to paid users only. Please upgrade to access this part.
Upgrade NowHighlights

This section is available to paid users only. Please upgrade to access this part.
Upgrade NowTranscripts

This section is available to paid users only. Please upgrade to access this part.
Upgrade Now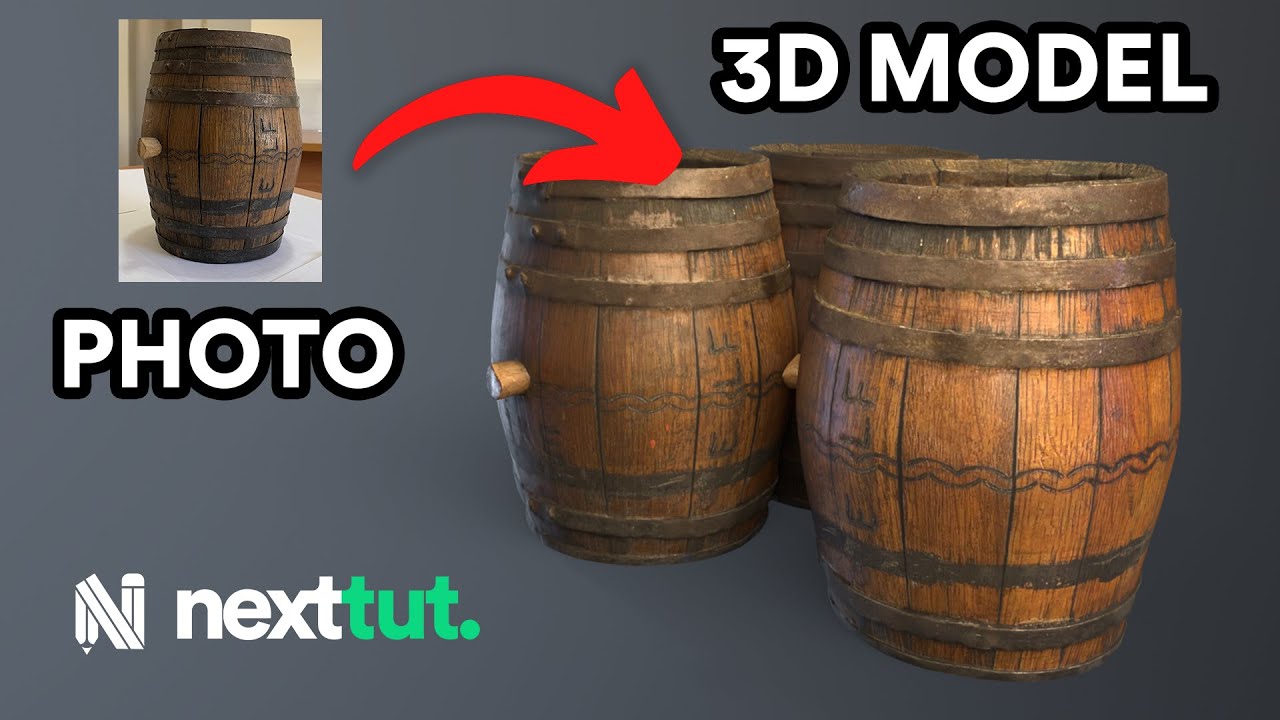


5.0 / 5 (0 votes)
