GET THE PERFECT EXPOSURE every time.
Summary
TLDRIn this video, Simon Dono shares expert tips on achieving the perfect exposure in photography, ensuring photos are neither too dark nor too light. He explains the fundamentals of exposure, the role of shutter speed, aperture, and ISO, and how to use them effectively. Simon also introduces the histogram as a tool for evaluating exposure and discusses techniques like 'expose to the right' for optimal image quality. He provides practical advice for both manual and semi-automatic shooting modes, including how to use exposure compensation and bracketing to handle high dynamic range scenes.
Takeaways
- 📸 Mastering exposure is crucial for achieving the right brightness in photos.
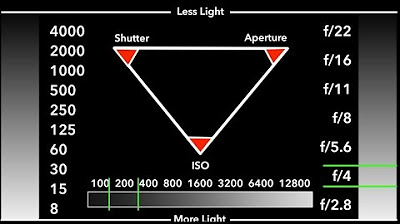
- 🔆 Exposure involves controlling the amount of light that hits your camera sensor through shutter speed, aperture, and ISO.
- 📈 Using a histogram is an effective way to evaluate the exposure of your image, showing the distribution of brightness from dark to light.
- 🚫 Avoiding pure black or white in your image (clipping) is generally recommended for most photography to preserve detail.
- 📈 'Expose to the Right' (ET) technique suggests slightly overexposing your image to capture more data and reduce noise, especially in shadow areas.
- 📷 In manual mode, intentionally set two variables (like shutter speed and aperture) for creative control, and use the third (ISO) to adjust brightness.
- 📁 When shooting in semi-automatic modes, use exposure compensation to fine-tune the camera's automatic exposure settings.
- 🌟 For scenes with high dynamic range, consider exposure bracketing to capture a range of brightness and combine them for a balanced image.
- 📹 The video offers a free guide on shooting in backlit situations for subscribers, enhancing exposure skills in challenging lighting.
- 💡 Experiment with different settings and techniques to find the best exposure for your specific photography needs and creative vision.
Q & A
What is the main focus of the video?
-The main focus of the video is teaching viewers how to achieve the correct brightness in their photos by mastering exposure.
What are the two ways to get more light on the sensor?
-The two ways to get more light on the sensor are by using longer shutter speeds and larger apertures.
What does ISO control in relation to exposure?
-ISO does not change the actual exposure but affects the final image brightness by adjusting the volume or gain of the photo's brightness after it's taken.
What is a histogram and how does it relate to exposure?
-A histogram is a graphical display that shows the brightness of the pixels in an image, with dark tones on the left, light tones on the right, and mid-tones in the center. It helps evaluate the appropriateness of exposure by showing whether the image is too bright or too dark.
What does 'blown out' mean in photography?
-'Blown out' refers to the loss of detail in the brightest parts of an image, where the highlights are so overexposed that they appear as pure white.
What is the 'expose to the right' (ET) technique and why is it useful?
-The 'expose to the right' technique involves exposing the photo so that the histogram leans to the right without clipping the highlights. This is useful because it maximizes the dynamic range, minimizes noise, and retains more data in the image, especially in the shadow areas.
How can you adjust the exposure settings in semi-automatic modes like shutter priority or aperture priority?
-In semi-automatic modes, you control two settings (shutter speed and aperture or ISO), and the camera automatically adjusts the third. Exposure compensation can be used to fine-tune the brightness to get the desired exposure.
What is the significance of 18% gray in exposure?
-18% gray is a reference point in photography that reflects 18% of light, which is often used as a middle ground for proper exposure. Cameras in semi-automatic modes try to adjust the exposure to achieve this mid-tone brightness.
What should you do if your scene has too much dynamic range for your camera to capture?
-If a scene has too much dynamic range, you can expose for the right without clipping the highlights, expose for the left without clipping the shadows, or use exposure bracketing to combine different exposures digitally.
Why is it recommended to shoot in RAW when using the 'expose to the right' technique?
-Shooting in RAW is recommended with the 'expose to the right' technique because it retains more tonal data and dynamic range, allowing for better post-processing without the risk of clipping the whites.
What are the potential issues with shooting too dark or too light, and how can you avoid them?
-Shooting too dark can result in noise and loss of detail, while shooting too light can cause blown-out highlights. To avoid these issues, use proper exposure techniques, adjust settings like shutter speed and ISO, and consider using exposure compensation or the 'expose to the right' technique.
Outlines

This section is available to paid users only. Please upgrade to access this part.
Upgrade NowMindmap

This section is available to paid users only. Please upgrade to access this part.
Upgrade NowKeywords

This section is available to paid users only. Please upgrade to access this part.
Upgrade NowHighlights

This section is available to paid users only. Please upgrade to access this part.
Upgrade NowTranscripts

This section is available to paid users only. Please upgrade to access this part.
Upgrade NowBrowse More Related Video

CARA MUDAH MERAWAT DOC AGAR MINIM KEMATIAN

CARA MENGUKUR LINGKAR LENGAN ATAS ( LILA ) // PENGUNAAN PITA LILA KADER REMAJA LANGON- NOVIEGIZI

LOGICAL DIVISION OF IDEAS PARAGRAPH

Understanding Exposure: The Exposure Triangle with Mark Wallace

Measuring a Mid-Upper Arm Circumference

cara membuat lubang speaker | cara menentukan ukuran lubang speaker
5.0 / 5 (0 votes)