🔴 Lerne Arduino in 12 Minuten, ….…JEDER KANN DAS! | #EdisTechlab
Summary
TLDRThis video introduces viewers to Arduino, a popular open-source platform for building electronic projects. It covers the basics of Arduino hardware and software, showcasing the Arduino Uno board and its components. The video explains how to set up and program the board using the Arduino IDE, starting with simple projects like blinking an LED and building a switch for controlling the LED. The tutorial provides step-by-step guidance on wiring, coding, and uploading projects, making it ideal for beginners to understand the basics of electronics and programming with Arduino.
Takeaways
- 😀 Arduino is a versatile open-source platform made up of both hardware (microcontroller board) and software (IDE for coding in C/C++).
- 😀 Arduino hardware is popular for being affordable and accessible for beginners and professionals alike, with the Arduino Uno being a common choice.
- 😀 You can expand Arduino's functionality by using various shields, such as adding modules for motor control, MP3 playback, or even creating a telephone.
- 😀 Arduino IDE is available for Windows, Mac, and Linux, and can easily be installed and used for programming Arduino boards.
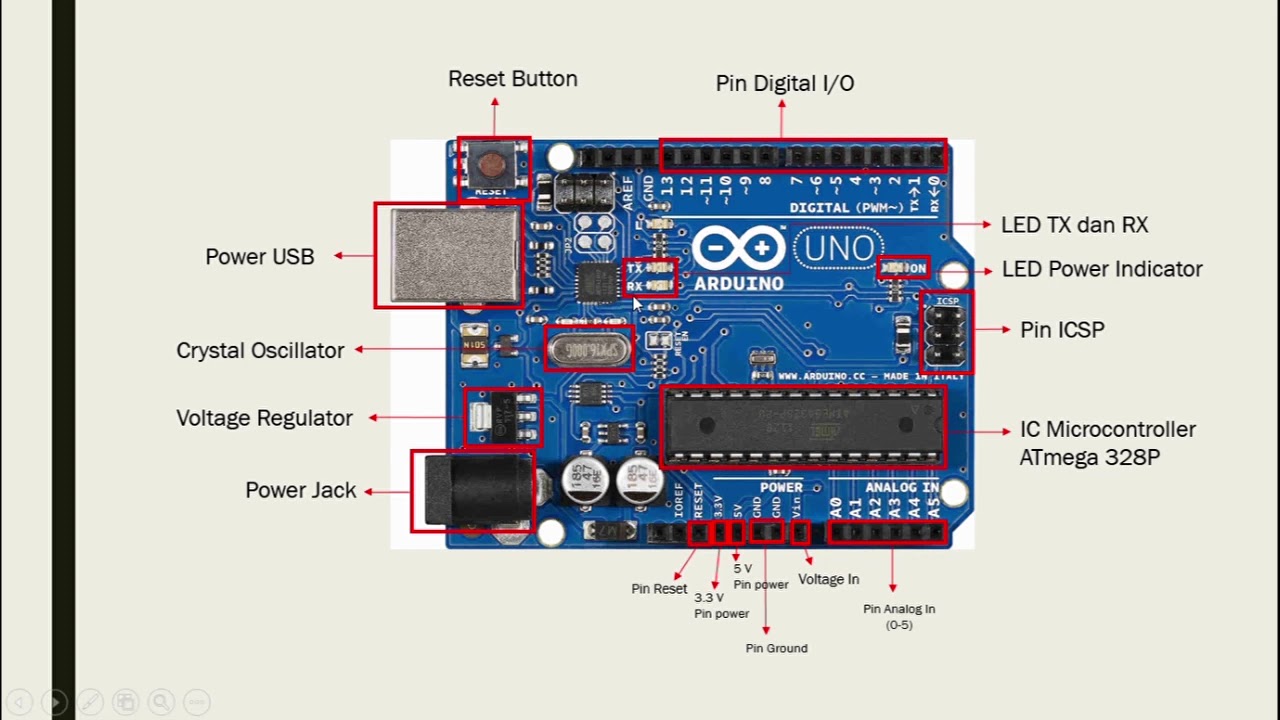
- 😀 The Arduino Uno board uses an ATmega328 microcontroller, with features like 16 MHz clock speed, USB connectivity, and voltage regulation.
- 😀 The Arduino Uno can be powered through USB or an external power supply (7-12V), with onboard voltage regulation converting it to 5V for the microcontroller.
- 😀 Arduino Uno has a variety of input/output pins, including analog inputs, digital inputs/outputs, and serial communication ports (TX/RX).
- 😀 A basic Arduino program consists of two main sections: 'setup' (defining inputs/outputs) and 'loop' (the continuous running code).
- 😀 An example project is controlling an LED by connecting it to the board with a resistor and programming it to blink at a regular interval.
- 😀 The second example project involves using a switch to control the LED's blinking behavior, demonstrating how to handle inputs in Arduino programming.
Q & A
What is an Arduino and how does it work?
-An Arduino is a platform consisting of both hardware and software. The hardware is a microcontroller board that acts as a mini-computer with analog and digital inputs/outputs. The software, known as Arduino IDE, is used to write programs in C or C++ to control the hardware.
Why is Arduino considered an open-source platform?
-Arduino is open-source because both the hardware and software are publicly available. This allows users to modify and share designs, leading to a wide range of microcontrollers with similar but varied features, enhancing the platform's versatility.
What are the key components of an Arduino board?
-The main components of an Arduino board include the microcontroller, USB connection for programming, LEDs for status indicators, and various digital and analog pins for input/output. Some models also include additional components like Wi-Fi modules and sensors.
What is the significance of the Arduino Uno model?
-The Arduino Uno is one of the most popular models due to its affordability and versatility. It is widely used for beginner and intermediate projects, offering a simple yet powerful platform for learning and prototyping with electronics.
What is the role of shields in the Arduino ecosystem?
-Shields are expansion boards that can be added to an Arduino to enhance its functionality. They can add capabilities such as motor control, audio playback, or even turn the Arduino into a telephone, depending on the shield used.
How does one install the Arduino IDE for programming?
-The Arduino IDE can be downloaded from the official website and is available for Windows, Mac, and Linux. Installation is straightforward, and once installed, users can easily upload programs to their Arduino board via a USB connection.
What is the purpose of the reset button on the Arduino board?
-The reset button is used to restart the Arduino board, especially if the program running on it encounters an issue. Pressing the reset button can restart the board and reinitialize the program.
What is the voltage regulation system on the Arduino Uno?
-The Arduino Uno uses a voltage regulator to convert the input voltage (from 7-12V) to a stable 5V, which is required to power the microcontroller and other components on the board.
How are the pins on the Arduino Uno used?
-The pins on the Arduino Uno are used for both input and output operations. Digital pins can handle 5V signals, while analog pins can read varying voltages. These pins can be configured as either input or output, depending on the needs of the project.
What was the first project demonstrated in the video?
-The first project demonstrated in the video involved controlling an LED with the Arduino. The LED was programmed to blink at one-second intervals using digital output from one of the Arduino's pins.
What additional project was shown in the video, and how did it work?
-The second project involved adding a switch to control the blinking of the LED. When the switch is pressed, the LED blinks in the same manner as the first project, and it stops blinking once the switch is released.
Outlines

This section is available to paid users only. Please upgrade to access this part.
Upgrade NowMindmap

This section is available to paid users only. Please upgrade to access this part.
Upgrade NowKeywords

This section is available to paid users only. Please upgrade to access this part.
Upgrade NowHighlights

This section is available to paid users only. Please upgrade to access this part.
Upgrade NowTranscripts

This section is available to paid users only. Please upgrade to access this part.
Upgrade Now


5.0 / 5 (0 votes)