Azure Function Apps Tutorial | Introduction for serverless programming
Summary
TLDRThe script provides an introduction to Azure Function Apps, a service for running event-driven serverless code without managing infrastructure. It outlines key features like flexible development, multiple languages and runtimes, easy integration with Azure services via bindings, and a consumption-based pricing model. A demo walks through creating a blob triggered function that processes files uploaded to blob storage, highlighting simplified functionality with only a few lines of code. The video conveys how Function Apps enable rapid development and deployment of scalable, cost-effective solutions.
Takeaways
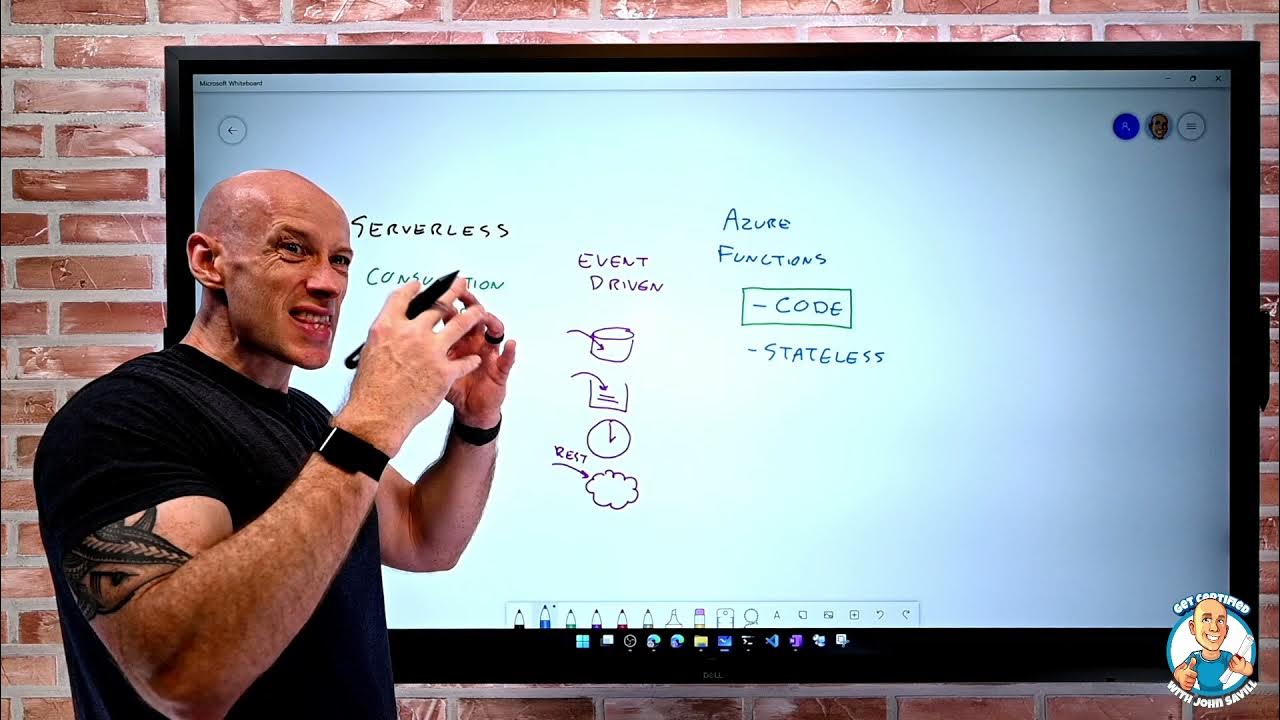
- 😊 Functions are small pieces of reusable code that can be triggered by events
- 👍 Function pricing is cheap - first 400,000 GB-s and 1M executions are free
- 🔥 Bindings make connecting functions to other Azure services simple
- 📝 Many languages are supported including C#, Java, JavaScript, PowerShell & Python
- 🚀 Quickly create functions in the Azure portal for testing before deploying from VS Code
- 🔗 Triggers start function execution and outputs enable writing results to services
- 📦 Bindings support Azure services like Blob Storage, Event Hubs, Cosmos DB etc.
- ⚙️ The host.json file controls low-level settings like routes, concurrency limits etc.
- 🛠 Use App Settings to manage environment configurations and connections strings
- 🎉 Functions scale automatically without managing servers, so no infra overhead!
Q & A
What are Azure Functions and what are they used for?
-Azure Functions are a service for running small pieces of code without having to manage servers or infrastructure. They allow you to focus just on your code while Azure handles scaling and management behind the scenes. Functions are commonly used for data processing, integration, scheduled tasks, and more.
What languages and frameworks can you use to write Azure Functions?
-You can write Azure Functions in C#, Java, JavaScript, PowerShell, Python, and more. On the .NET side, you can use both the .NET Framework and .NET Core.
How are Azure Functions triggered?
-Azure Functions need to be triggered in order to execute. Triggers could include HTTP requests, changes in database data, queue messages, file uploads, scheduled timers, and more. A function can only have one trigger but may also bind to multiple inputs and outputs.
How are Azure Functions priced and scaled?
-By default Azure Functions run on a consumption plan, which means you only pay for the resources used while your functions run. There is a free grant for the first 400,000 GBs processed and 1 million executions per month. Beyond that, pricing is very low cost per million executions and gigabytes processed.
Where can Azure Functions code and configuration be edited?
-In the Azure portal, you can edit Function code and configuration directly. For more robust development, Azure Functions can be developed locally using Visual Studio Code and deployed to Azure. Configuration like bindings can be set both declaratively in code as well as visually in the Azure portal.
How does simplified integration work with Azure Functions?
-Binding to inputs and outputs is very simple with Azure Functions. For example, you can bind to blob storage and automatically trigger when a new file is uploaded or bind to a database and query data within your function. These bindings require just a simple declarative configuration.
What is the purpose of the host.json file?
-The host.json file controls settings for how the Azure Functions runtime should behave, including things like HTTP routes, concurrency limits, timeouts, and more. This allows control over the environment without having to manage VMs or infrastructure.
Can Azure Functions integrate with other Azure services?
-Yes, Azure Functions have out-of-the-box integration with several Azure services via bindings, including Storage, Cosmos DB, Event Grid, and many more. This allows using other Azure services directly in your serverless functions.
What options exist for testing and monitoring Azure Functions?
-The Azure portal provides built-in testing capabilities for Functions. Additional monitoring is available by integrating Application Insights, which will provide telemetry data on function executions. Functions can also be tested locally before deploying to Azure.
How are connections to other resources handled in Azure Functions?
-Connections to linked resources like storage accounts are configured through application settings that are automatically supplied to the functions when running. For local development, these connections can leverage the local emulator.
Outlines
😊 Introducing Azure Function Apps
The paragraph introduces Azure Function Apps, explaining they allow running code without managing servers or infrastructure. It outlines key benefits like scalability, low cost, and ease of use across languages. A comparison to Azure App Service is made, noting functions extend its capabilities. Use cases and triggers are also discussed.
📝 Function Apps Simplified Integrations
The paragraph discusses simplified integration in Function Apps. It explains triggers invoke functions, passing inputs and accepting outputs. Bindings to services like blob storage are easy, allowing combining triggers, multiple inputs and outputs across services in a few lines of code.
🗃️ Function Apps Triggers and Bindings
The paragraph lists the extensive triggers and bindings available in Function Apps v2, including blob storage, databases, authentication providers, and more. It notes some like Event Grid can only be triggers while most can also be inputs/outputs. The flexibility to combine multiple services is emphasized.
✨ Creating a Function App in the Azure Portal
The paragraph steps through creating a function app in Azure Portal. It shows key steps like naming, OS, hosting plan, runtime stack selection and storage configuration. Application Insights is also provisioned for logging. Total deployment takes 2-3 minutes after which the function app user interface is explored.
🖥️ Developing a Function App with Visual Studio Code
The paragraph demonstrates developing a function app locally using Visual Studio Code instead of the portal. It steps through creating a blob trigger function app, configuring bindings, and deploying to Azure. Successful end-to-end functionality is confirmed by uploading a file to blob storage and verifying output file creation.
Mindmap
Keywords
💡Serverless
💡Function Apps
💡Functions
💡Triggers
💡Bindings
💡Blob Storage
💡Host.json
💡HTTP Trigger
💡Azure Storage Account
💡Deployment
Highlights
Functions is a service for running small pieces of code, so you have that script in dotnet or maybe java or any other languages that is supported
You can pay per use so the price is super super cheap because first four hundred thousand gigabytes of memory is free as well as first million executions are also free
Binding to triggers inputs and outputs is very simple. For instance you can bind to a blob storage, so you, can trigger a code whenever there's a new file available on a blob
There's quite a lot of those. I will show you the brief list. So first of all look at this list, and notice that there's first of all two versions of the Function Apps. Version point 1 and version point 2.
In the manage section, you can manage keys. What are the keys for the functions? When you create a function and you had this function code that we are showing at the top you had a get function URL button when you hit it if you would see something like this with the URL to your function
You have a trigger here, you can other inputs, multiple inputs or multiple outputs and for each you can provide a configuration.
I want to create a web hook plus API which is this HTTP trigger so I'm going to hit create..., and in just couple of seconds I'm going to be presented with a standard template for HTTP triggers
Let's be professional so let's go and create function code using Visual Studio Code so how do you do that first of all you go to your Visual Studio Code make sure that you are logged in and you have extensions called Azure account and Azure functions installed
Well the name is not the best but let's change it, ProcessMyBlob... so let's process my blob what is the namespace I'm just gonna leave it as default create local app settings JSON I'm gonna use this storage I need to create a what is the container name I'm gonna call it demo
For all the outputs and inputs besides the trigger we need to specify what is the file access that we're accessing in this case we want to write to the blob therefore we need file access write...
I can run it locally or quickly deploy this to Azure, so let's hit a comment, "dotnet build" after our function function is built we can quickly deploy this to Azure
Looks like we're done if this works we can probably go back to the portal and test it I'm gonna open my storage account into the blob service if you don't know storage accounts I have a great video on storage account introduction that also will be linked down in the comment section
Now back to the blobs go to the output container hit refresh and then just couple of seconds we will gonna get our file here even before I stopped talking we already processed our file
And believe me it's as easy to bind... to any other service that you seen from the list that I presented previously
Transcripts
hey there this is Adam again and today we're going to be talking about serverless
because it's probably one of the best concepts about the cloud. Managing the
code without managing the servers or the infrastructure and everything at scale
well what's not like it.Today we're gonna get introduction into Azure
function apps. Probably one of my favorite services, so stay tuned.
So let's start with functions. Functions is a service for running small pieces of code
so you have that script in dotnet or maybe java or any other languages that
is supported and this is the place to go and they call those small pieces of code
functions. This is a great service and very cheap service, very scalable service
for running serverless, because you don't have to manage infrastructure underneath
what is important is that this service is extension of Azure App Service, so if you
want to know all about features that this service has because this is an
extension of the App Service I highly recommend you to watch the video on the
App Service which will be linked down in the comments. So why would you use
Function Apps well they have a lot of features like multiple languages, they
support C# in both DotNet and DotNet Core frameworks, Java, JavaScript
Typescript which is transpiled to JavaScript
you have PowerShell Core, you have F# and Python, so a lot of languages
that you can use and other that are popular recent days, you can use here, but
additionally you can pay per use so the price is super super cheap because first
four hundred thousand gigabytes of memory is free as well as first million
executions are also free, so you probably will use functions in most cases without
paying a dime. So I would say that's a great price, but if you extend and you go
further beyond that the price is still very small because million executions
cost 169 cents. Additionally you have your own
dependencies that you can bring either using NPM
or NuGet you also have integrated security this is coming from the
App Service. You have this integration with Azure Active Directory or any other external
provider. You have simplified integration because you can combine this with
external tools. You have flexible development, because you can develop in
the portal on maybe Visual Studio code or any other tool in that matter. But
also you have integration of GitHub, Azure DevOps and other external repositories
and this is again one of the key features that came from this being an
extension to the App Service and lastly we have this as an open-source because
entire SDK for functions is open-source so you can find it on a GitHub. So we
were talking about this simplified integration I didn't say much because I
have a lot of slides on the simplified integration and let's talk about this
now. So how function works. Function is a piece of code, we already said that, but
in order to execute that piece of code you need something called trigger.
A trigger is an action that will involve this code and will pass some basic
information to this code in order to run and of course code when it's done it has
some sort of an output because why would you run it if it didn't have an output.
So the simplified integration is this part where binding to triggers inputs
and outputs is very simple. For instance you can bind to a blob storage, so you
can trigger a code whenever there's a new file available on a blob and you can
maybe process that file and put it back on a blob storage. What is great here is
that you are not limited to one trigger and one output... or well trigger can only
be one. There's always one trigger, but you can also have multiple inputs so you
can maybe grab additional data from your cosmos DB while processing this blob
storage or maybe you can grab some additional info from the queue store and
this is not where it ends, because you can also have multiple outputs. So maybe
you process this file and grab some information from the queue now you can
also output this to the blob storage, maybe save some additional logging into
another blob storage and put some events for other applications to know that your
finished processing on the event hub. So all those integrations are very very
easy and I will show you why. So let's grab the most simple example, so we're
processing data from the blob storage and we want to output into the blob
storage. How do we do this? I will use a DotNet Core as an example, but it's as
easy in any other language as it's in DotNet Core. You just grab a documentation and
check what's the difference but the principle stays the same. So this is the
piece of code that grabs the file from the blob as a trigger. So you have a blob
trigger... defined here and you do it in a way that you pass a parameter and you
specify blob trigger. That tells our function that we are triggering every
time there's going to be new file on the blob storage.
Second of all you specify in which container should you check. In this case
it's going to be "sample-workitems". So function will check whenever there are
new files in this container and trigger whenever new file appears or is modified.
Next... You have something called expressions, so in this case use
expression to grab the name of the file that is being processed. What is good
here is that you can use this expression to pass the name of that file into a
variable of the same name. That means in this name variable right now in this
parameter, You will have the name of the file or actual full path to the name in
that variable. Next and lastly for this trigger you need to define a variable
that you will put your contents of the file in. In this case it's a stream so
we're going to put the file and all its contents in
"myBlob" parameter,
and lastly if you want this output you just add additional line
saying "Blob", this is no longer trigger switch, it's just a blob. You specify the
container name, You specify the file access which is in this case writing
because we were processing the file. And you can just type a "blob.copyTo(outputBlob)"
and this is with... one line of code you're making a copy of blob into
additional container into additional storage. This is as easy as you see.
You just type in one binding, because every this line that you see here, "BlobTrigger"
"Blob", those are bindings.
So just give one line
of binding and just type your code and it does all the connectivity, all the
file... uploading, downloading, all those kind of actions for you and it's as easy
as it gets for any other binding, for any other service. So if this is so easy
what kind of triggers and bindings do you have available at hand. There's quite
a lot of those. I will show you the brief list. So first of all look at this list
and notice that there's first of all two versions of the Function Apps. Version
point 1 and version point 2. I would say go for version point 2, because it's that
direction that Microsoft is going and it's probably gonna be long-term living
support here. Much longer than a version first and there's a lot of new features
coming in to point out that are not available in point 1. But also notice
that all those services not always can be also input and output because of
those... how those services work... best example of this is even grid on the left
hand side because it can be a trigger but it cannot be output or input. So you
can trigger your functions based on the events from the event grid, but you
cannot output into the event grid... yet. So you have of course Blob storage, Cosmos DB,
Event Grid, Event Hubs, HTTP and web hooks; those are
standard this is not a service binding this is just a binding for you to create
your HTTP RESTful services. You also have integrations with Graph. Graph is a.. crazy
good API delivered by Microsoft to manage all things about Office and Azure
Active Directory, so you have Excel tables OneDrive files, Outlook email, some events
from the Graph you have tokens, but also you have Mobile App Service, you have
Notification Hubs, Queue Storage, Send Grid, Service Bus, SignalR, Table
Storage, Timer which means you can actually do scheduled processing and
Twilio. So a lot of bindings for you to use and a lot of flexibility coming with
them. So let's go into the portal and start creating the service. In order to
create new service you need to hit create resource and type function...
Hit create. You need to provide the name. I'm gonna call it "a4edemoapp". I need to
select a resource group I already have one existing, so I'm gonna choose that.
I'm gonna leave OS as windows. I'm going to leave consumption plan. Consumption plan
is this serverless plan, which means you don't manage any servers. Azure will give
you servers whenever there's a processing happening, whenever there's
not it will take away those servers. So have between 0 and 200 servers available
at hand and of course either decides whenever you need those 200 servers or
not. If you're going to be processing a lot of data Azure will keep giving you
additional servers and your data will be processed faster. Next we need to pick a
location. I'm gonna pick North Europe, this is my go-to choice because it's the
closest data center of me. I'm gonna choose runtime stack .Net Core I'm
gonna choose storage. Interesting... why do I need a storage? Because everything that
you're doing functions including functions code is stored on
storage, as you can imagine since functions are serverless you don't have a
server therefore, you don't have any place where you can put your code in and
save your state. This is where storage comes in. An entire code base of your
functions and the state of your functions are saved on the storage. So
whenever new servers are initialized they grab the code from this storage, and
lastly you have Application Insights, a great service for logging and telemetry
but this is not a part of the demo today. So let's hit create.
The deployment
happens in about 2-3 minutes because three services needs to be deployed so
I'm gonna speed this up
So the deployment finished, so we can go to our resource group open it find a
function up including that storage that we created and application insights I'm
gonna go to App Service, and this is the default UI that you will be presented in
that... when you create functions. So let's go back to our presentation and I will
talk briefly about the features that you can find here in the portal.
So what are the top features? First of all when you are presented with this you will have a
list of the Function Apps and for each Function App you will have an overview
table and a platform features tab. In an overview tab you have a most basic
information about the Function App like the URL of the Function App, what is the
pricing tier and App Service plan, what is the resource group that is hosted, what
is the current status, which in our case it's running, but you also have... something
important in the platform features, because in the platform features you
have much more options, like all the options coming from the App Service, but
also, one key feature here is the Function App settings, I'm not going to
talk about all those options here. Because they are coming from the
App Service. If you want to learn more about most of them, go to my video on the
App Service, but for today we're just focusing on this one Function App
settings. So in the Function App settings you will get the most basic information
about the... let's say crucial part of the environment setting. Like daily quota is
here, the runtime configuration which is this 1.0, 2.0 version that we're talking
about when we are talking about the bindings. You also have read-only mode
here and if you want to change your application that no one can modify it
you also have your host.json file here, but I will talk about host.json file
later on... additionally when you have a functions already deployed in the
functions tab you can find all those function you can change the state of
each function you can either disable it or enable it you
can create new functions from here of course this is not the professional way
of developing functions but you can in fact develop functions in a portal.
This is great for a quick prototyping but still considering how fast it is to
deploy it from visual studio I would never use portal anyway. So when you hit
new function you'll be presented with the templates for this function you have
HTTP templates, you have timer template service bus, queues, and a lot of more you
just hit one of those provide some basic information and you will get the
function like this... so HTTP trigger function when you deploy it you will see
something like this. This is the out-of-the-box template using CSX which
is like scripting C# file. I would say it's not the best to develop
production applications, but it's good for every now and then... And of course you
have an additional tab called "test", so you can quickly test your functions also
in the browser. So it's like a small integration developed an environment for
you in the browser to do a quick POCs, quick testing and quick functions.
Next in this function inside of it you have three tabs. One called "integrate", this is a
visual way to add those bindings that we're talking about. You have a trigger
here, you can other inputs, multiple inputs or multiple outputs and for each
you can provide a configuration. For instance when hitting on the input you
will get the list of that standard input that you can use like a blob storage,
table storage, authentication tokens from Graph, etc. Next you have a manage section
In the manage section, you can manage keys. What are the keys for the functions?
When you create a function and you had this function code that we are showing
at the top you had a get function URL button when you hit it if you would see
something like this with the URL to your function but what you wouldn't see at
first it does there's a very long code attached to your function this is
authorization code that allows you to call this through the public Internet
and you have also monitor tab... in which you can see all the executions for your
functions this is a very very small very basic feature is just a date
operation ID duration code but if you want to see full telemetry for your data
you just go to application insights since we provision this together and
that's it in terms of portal features but one last thing that I want to talk
about is this host configuration file. Because this host file that we are
talking about in the function app settings is the file that controls how
your entire functions work for instance one of the sections that you can apply
there is HTTP section this is the section that will control how your HTTP
trigger works first of all it defines the route it says that the prefix for
the route is always slash API which is good to always notify your customers and
your clients that this is the URL for the API
you also have max outstanding requests count, this is how many requests can
there be queued before your requests will start getting responses TooBusy
from the service, and also you have max concurrent requests and this is the
count of how many parallel executions for the functions can happen at the time
in this case it's a hundred which means we can have 100 functions running at the
same time so let's go further and talk about this file but remember this file
is available in the function app settings if you're working in the portal
this is place where you change it but if you're working with a code then this is
going to be part of your code base in your project so let's go back to the
portal since we've seen how to work with this, let's create a quick function so
let's go to the function tab let's hit this button to create new function from
the quick start we're gonna choose that we want to develop in the portal I'm
gonna hit continue I want to create a web hook plus API
which is this HTTP trigger so I'm going to hit create...
and in just couple of
seconds I'm going to be presented with a standard template for HTTP triggers
okay I've got it and notice that it is tiny bit different that what we were talking
about because you have here "HTTPRequest" it's not "HTTPTrigger" and a...
this is simply because working with HTTP is tiny bit different than working with
other triggers but don't worry about it this is the most simple version of the
HTTP function that you can write, so you have some logging here that we've been
processing the request this says that grabbed a URL parameter called name if
there is some parsing and if there's no name in the URL return the
message that URL needs to be submitted if it is say hello and name, so let's see
if this works you can test it two ways you can either open this panel on the
right hand side click on the test tub and send a request body or a URL
parameter scroll down this UI is known that the best but there's a run button
here executed and we got hello Azure... so it works but you can also test it just
by grabbing a URL yourself going to another tab pasting the URL hitting
Enter of course please pass the name query string we didn't do that
so let's do that
so my name is Adam and hello Adam
so you see it works and we got logs here we could console everything that we
do we can see here quickly at glance so of course you could stay here and start
the hoping here and notice how easy it is to actually create your HTTP type
functions but let's be professional so let's go and
create function code using Visual Studio Code so how do you do that first of all
you go to your Visual Studio Code make sure that you are logged in and you have
extensions called Azure account and Azure functions installed including all
the CLI tools for the functions when you do you log into your functions and your
portal and in your subscription you should be able to find the function that
you created let's refresh so we have our a4edemo application this is all the
function that i have access to so what we need to do right now is go to
Explorer this is the empty demo folder and then I created and you need to
initialize new project I do that by hitting F1 and typing functions so if you
have an extension installed you see all those options here I will hit create
function option it says that I need to initialize the project which I'm gonna
say ok I want to use C# because today's demo is part of the .net core
I want to trigger let's maybe do a scenario where we're gonna trigger from
the blob, we're gonna process this blob and output it back into the storage so
I'm gonna hit blob trigger well the name is not the best but let's change it
ProcessMyBlob... so let's process my blob what is the namespace I'm just gonna leave it as
default create local app settings JSON I'm gonna use this storage I need to
create a what is the container name I'm gonna call it demo and for local
development you need to select if you're using live storage account from Azure or
if you're using local emulator I'm gonna choose local emulator because it's
much better and what to do with the file that we're going to create opening
current window
it was quite few options to click at start but we're done and let's see what
the template created for us first of all you hit here enter and here and here we
see that have we have three parameters for blob so we have a connection name we
choose the connection we have a demo so let's talk about what do we have here
first of all blob trigger which means this function will run every time
there's a new file this file has to be on the demo container on a storage that
is supplied in this connection setting and the name of the file will be passed
into name parameter so what we need to do here is we probably could just deploy
this right now but what I want to do is I want to actually remove this setting
because I don't want to create new storage account I want to use this
setting use AzureWebJobsStorage so you can quickly change that by changing
this connection name here so that means we're going to connect the blob but how
to connect to this blob we're going to use connection specified by app setting
called AzureWebJobsStorage if you want to talk
about and here about the app settings go again to the video on the App Service
Plan and App Service in general and you will see how this binding is done
because this is also one of the features coming from the app service so we're
gonna grab this connection string which means in the local development we're
gonna use local storage in the portal we're gonna use the storage attached to
our functions so let's hit save here let's do one more thing let's do a demo
where since we're gonna be processing this file and we can already do
something about it like I don't know... grab the length of this file like var len
equals this right so this is gonna grab the length of the file from our stream
and put it in the length variable so if you want to output something into
Blob again we need to go here the easiest is just copy this line and change few
things about it so let's remove trigger because this is no longer trigger it's
gonna be output lets outputs... lets output something in two different container
maybe call that container output let's leave the name as the same as the name
of the file we started processing and let's change the variable to outputBlob
so what do we do right now let's do most simple example where I'm gonna grab my
blob type copyTo and let's copy it to outputBlob
one thing that we're missing here is file access because for all the outputs
and inputs besides the trigger we need to specify what is the file access that
we're accessing in this case we want to write to the blob therefore we need file
access write...
this should be fine and we should be able now to run this function
I can run it locally or quickly deploy this to Azure, so let's hit a comment
"dotnet build" after our function function is built we can quickly deploy this to
Azure I'm pretty confident this will work so let's try it... we go to our Azure
extension we right-click on our application click deploy to function app
it will say if you are sure that you want to override existing functions... well
I am sure... so let's go for that and the first deployment takes about a minute or
two so let's speed this up
looks like we're done if this works we can probably go back to the portal and
test it I'm gonna open my storage account into the blob service if you
don't know storage accounts I have a great video on storage account
introduction that also will be linked down in the comment section so feel free
to check it out for now I'm gonna create two containers as we specified one for
the input which is called demo and one for the outputs called output so if my
function is working fine I can go to demo hit upload a file select one of
that files maybe my file with my code
now back to the blobs go to the output container hit refresh and then just
couple of seconds we will gonna get our file here even before I stopped talking we
already processed our file and I can open this file here and check that we
have entire content of our file copied successfully to another container it was
this easy to bind two blobs process something with them and output back to
the blob storage and believe me it's as easy to bind... to any other service
that you seen from the list that I presented previously as you have seen
serverless is not that hard you just type few lines of code and it's working it's
very cheap very flexible very scalable service that you can use in minutes so
if you know any of the programming languages just go ahead and start doing
it it's very satisfying if you liked this video hit thumbs up leave a comment
and if you really liked it if you want to see more videos hit subscribe and I
guess see you next time
Просмотреть больше связанных видео
AWS Cloud9 | Cloud IDE | Concept | Environment Setup | @Cloud4DevOps
Cloud Computing Explained
How to Run a Python Docker Image on AWS Lambda
HashiCorp Vault Secret Engine and Secret Engine path - Part 4 | HashiCorp Vault tutorial series
AI Expert Explains Future Programming Jobs… and Python
Transcribe Audio Files with OpenAI Whisper
5.0 / 5 (0 votes)