4 Signs That You Need To Change Your Sediment Filter

DIY and SAVE
22 Oct 201705:29

Summary

TLDRIn this video, the creator explains when and how to replace a sediment filter in your water system. They cover four key signs to change the filter: visible dirt, downstream sediment, reduced water pressure, and the general 3-6 month replacement rule. The video also provides a step-by-step guide for changing the filter, including turning off the water, removing the old filter, cleaning the canister, and installing a new one. Additionally, the creator emphasizes the importance of buying filters in bulk and avoiding cleaning old ones due to potential bacteria.

Takeaways

  • 🔧 A sediment filter protects water appliances like water softeners and boilers by removing dirt, sand, rust, and other undissolved particles.
  • 🏡 People living in the country with well or lake water use sediment filters more frequently compared to city dwellers.
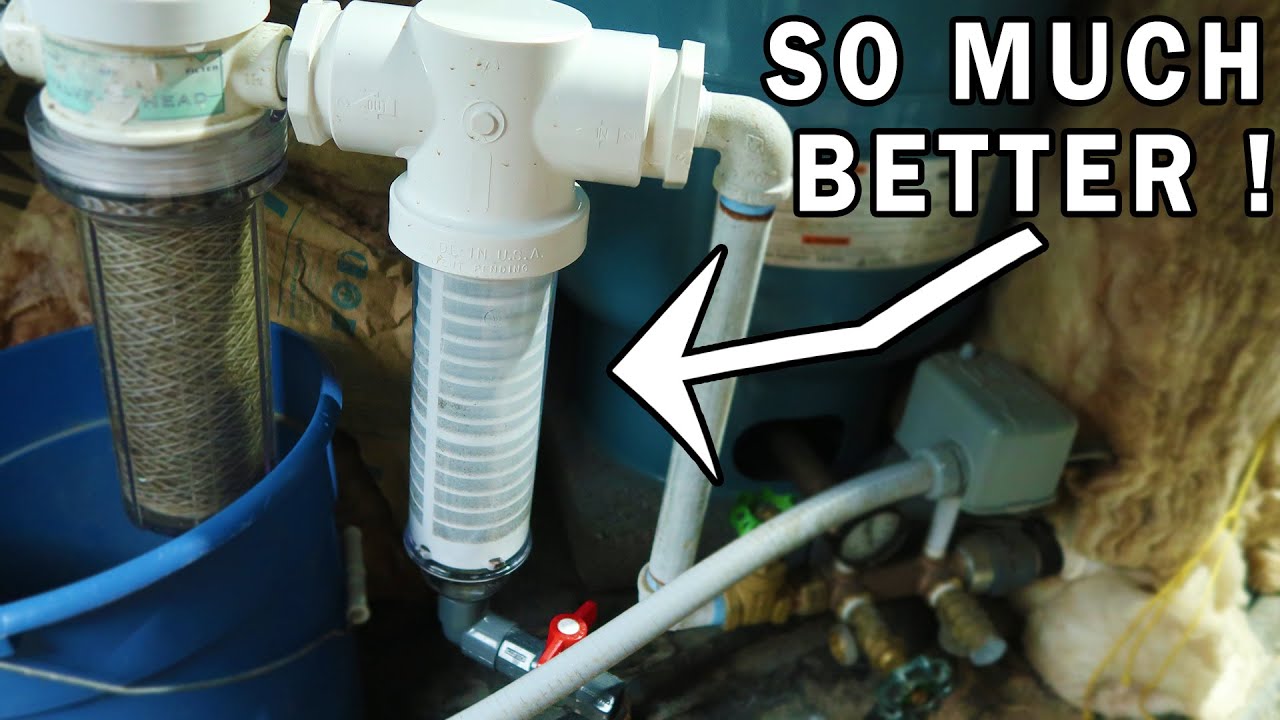
  • 🛠️ The filter is installed on the main water line, typically after a water pressure regulator and water meter.
  • 🧊 Clear sediment filter canisters allow you to see dirt buildup but may encourage algae growth; opaque canisters are stronger and prevent this.
  • 💡 Indication 1: If the filter looks dirty or you wouldn't feel comfortable drinking the water, it's time to replace it.
  • 🚽 Indication 2: If you notice sediment buildup in appliances like toilets or pre-filters, it's time for a change.
  • 📉 Indication 3: A noticeable drop in water pressure can suggest the filter is clogged and needs replacing.
  • 🗓️ Filters should be changed every 3-6 months, even if no other signs are present, to maintain optimal performance.
  • 🛑 When replacing the filter, turn off the water, release pressure using the valve, and have a bucket handy to catch any water.
  • 💧 After installation of a new filter, turn the water back on, check for leaks, and run the water for a few minutes to clear any trapped air or cleaning residue.

Q & A

  • What is the purpose of a sediment filter in a home water system?

    -A sediment filter is installed on the main water line entering a home to capture undissolved particles such as dirt, sand, rust, and silt, protecting appliances and plumbing from damage.

  • Who typically uses sediment filters, and why?

    -People living in rural areas who get their water from wells or lakes are more likely to use sediment filters because their water sources often contain more impurities compared to city water systems.

  • Why is a clear canister not always the best choice for sediment filters?

    -Clear canisters are convenient because they allow you to see how dirty the filter is, but they aren't as strong as opaque ones and can let light in, which increases the risk of algae growth inside the canister.

  • What are the four signs that it’s time to change a sediment filter?

    -The four signs are: 1) the filter looks visibly dirty, 2) sediment is building up in other appliances, 3) there’s a noticeable drop in water pressure, and 4) it has been 3 to 6 months since the filter was last changed.

  • How often should you replace a sediment filter?

    -Sediment filters should generally be replaced every 3 to 6 months, depending on factors such as water quality and how quickly the filter becomes dirty.

  • Why is it not recommended to clean and reuse old filters?

    -Cleaning old filters isn't recommended because they may harbor bacteria, and the chemicals used for cleaning could contaminate the water supply.

  • What is the first step in changing a sediment filter?

    -The first step is to shut off the water supply to the filter system.

  • Why should you press the pressure release button when changing a filter?

    -Pressing the pressure release button helps to relieve pressure in the canister, which makes it easier to unscrew and prevents water from spilling when you open the system.

  • How should you prepare for water spilling when changing the filter?

    -It's a good idea to have a bucket ready to catch any water that may spill out when you unscrew the sump from the filter cap.

  • Why is it important to rinse out the sump thoroughly when changing the filter?

    -Rinsing the sump well ensures that no soap residue or contaminants are left behind, which could affect the cleanliness of the water passing through the filter.

Outlines

00:00

🔧 Installing and Understanding Sediment Filters

In this section, the speaker introduces the concept of sediment filters and why they are crucial for protecting appliances, especially after upgrading a water softener and boiler system. Sediment filters capture dirt, sand, rust, and other undissolved particles, which is particularly important for people in rural areas using well or lake water. The speaker briefly explains how the water flows through the system, passing through various components like a water pressure regulator and meter before reaching the sediment filter. The filter has a clear canister to observe dirt buildup, but this type has downsides such as allowing algae growth, so the speaker plans to upgrade to a stronger opaque filter.

05:00

💧 Signs It's Time to Replace Your Sediment Filter

The speaker explains the key signs indicating it's time to replace a sediment filter. The first sign is visual dirtiness—if the water looks or feels unsafe to drink, or if the filter appears dirty, it should be changed. For opaque canisters, they recommend checking it manually. The second sign is finding sediment in downstream appliances like pre-filters or toilets. The third sign is a drop in water pressure, suggesting that the filter is getting clogged. Most filters should be replaced every 3-6 months, and the speaker advises against cleaning old filters due to the risk of bacteria. They recommend buying new filters in bulk for cost savings.

🔄 Step-by-Step Guide to Changing the Filter

Here, the speaker offers a detailed guide on how to replace a sediment filter. The first step is turning off the water, particularly in setups with three valves that can still allow water flow during filter changes. Next, the speaker advises pressing the pressure release button on top of the canister, followed by unscrewing the canister (or 'sump'). They recommend using a bucket to avoid water spillage. After removing the old filter, the sump should be thoroughly cleaned and rinsed to prevent soap or bacteria from contaminating the new filter. A replacement filter is then placed carefully over the raised section of the sump.

🛠️ Final Steps and Tips for Filter Replacement

In this section, the speaker covers the final steps for installing a new filter. Before repositioning the sump, they suggest lubricating the o-ring, although the speaker chooses not to in this case. The sump is then screwed back into place, ensuring the filter stays centered to avoid misalignment. They recommend hand-tightening but acknowledge that a tool can be used for extra security. Once the sump is in place, the water is turned back on, and the speaker advises checking for leaks. To finish, they suggest running the house water for a few minutes to flush out any remaining air or cleaning solution.

👍 Wrapping Up and Final Thoughts

In this closing paragraph, the speaker emphasizes the importance of ensuring all leftover air or cleaning solution is cleared from the water system after replacing the filter. They encourage viewers to subscribe to the channel for more content and to give the video a thumbs up if they found it helpful. The speaker ends with a call to action for further engagement with their channel.

Mindmap

Keywords

💡Sediment Filter

A sediment filter is a device installed on the main water line entering a home to capture dirt, sand, rust, silt, and other undissolved particles. It plays a crucial role in protecting household appliances and plumbing by filtering out these contaminants. In the video, the speaker uses a 10-inch sediment filter to safeguard their water softener and hot water boiler.

💡Water Pressure

Water pressure refers to the force at which water flows through pipes. If the pressure drops noticeably, it could indicate that the sediment filter is clogged and needs replacing. The video mentions pressure change as one of the signs to look for when determining if it's time to replace the filter.

💡Dechlorinator

A dechlorinator is a device that removes chlorine from water to make it safer for consumption and extend the lifespan of plumbing and appliances. In the video, the water flows from the sediment filter to a dechlorinator, highlighting its importance in the user's water filtration system.

💡Water Softener

A water softener is a device that removes minerals such as calcium and magnesium from hard water, making it 'soft.' This helps prevent scale buildup in plumbing and appliances. The video mentions the installation of a water softener to protect appliances from hard water damage.

💡Opaque Canister

An opaque canister is a non-transparent housing for filters, which is stronger than clear ones and helps prevent light from entering, reducing algae growth. In the video, the speaker plans to upgrade to an opaque canister to avoid these issues with the clear canister they currently have.

💡Filter Replacement

Filter replacement is the process of removing and replacing an old filter with a new one when it's no longer effective. The video details when to replace the filter based on dirt buildup, pressure changes, and a six-month usage limit. The speaker advises against cleaning old filters due to the risk of bacteria.

💡Three-Valve Setup

A three-valve setup refers to a plumbing system that allows water to bypass the filter while it's being replaced, ensuring continuous water flow. The video explains how to use this setup to avoid interruptions during filter changes.

💡Pressure Release Button

The pressure release button is a component on the filter canister that helps release built-up water pressure before unscrewing the canister. In the video, the speaker advises pressing this button before changing the filter to avoid water spillage.

💡O-ring Lubrication

O-ring lubrication involves applying lubricant to the rubber ring (O-ring) that seals the filter canister to prevent leaks. The speaker mentions this step as part of filter replacement, although they skip it due to the newness of their system.

💡Water Bypass

Water bypass is a feature in some filtration systems where water is rerouted to continue flowing while the filter is being changed. The video describes how the three-valve setup allows for this during filter replacement, ensuring no disruption in water supply.

Highlights

The video discusses four signs that it's time to replace your sediment filter and provides a step-by-step guide for doing so.

A sediment filter captures dirt, sand, rust, silt, and other undissolved particles from water entering the home.

Sediment filters are more common for homes using water from wells or lakes rather than those connected to city water.

The video explains the basic setup of a sediment filter and how it fits within a home's water system.

First sign to change your filter: If it looks dirty or the water seems unsafe to drink.

Second sign: If sediment appears in other appliances downstream, like toilets or pre-filters.

Third sign: A noticeable drop in water pressure, which may indicate a clogged filter.

Fourth sign: If it's been three to six months since the filter was last changed.

The video advises against cleaning old filters because they can harbor bacteria, recommending instead to buy a new replacement.

The presenter recommends buying replacement filters in bulk from places like Amazon, eBay, Walmart, or Home Depot.

Step-by-step guide to changing the filter: Shut off the water and press the pressure release button on top of the canister.

Use the tool that comes with the sediment filter to unscrew the sump from the cap, and have a bucket ready for any water spillage.

Rinse the sump thoroughly to avoid soap residue entering the water supply after filter replacement.

The video suggests lubricating the O-ring for a better fit, though the presenter skips this step due to having a new filter.

Final steps include screwing the sump back in place, turning the water back on, checking for leaks, and running the house water for a few minutes to clear out any trapped air or cleaning solutions.

Transcripts

play00:01

hey guys in this video I'm share with

play00:04

you four signs that it's time to replace

play00:05

your sediment filter and then how to do

play00:07

it I recently upgraded my water softener

play00:13

and hot water boiler and to better

play00:15

protect these devices and the appliances

play00:17

throughout my home I decided to install

play00:19

this sediment filter so what is a

play00:21

sediment filter basically it's a filter

play00:23

that you install on the main line coming

play00:25

into your home and it captures things

play00:27

such as dirt sand rusts silt or any

play00:30

other undissolved particles people in

play00:32

see these don't use these as much as

play00:34

those living in the country who get

play00:36

their water from a well or from a lake

play00:38

so let's have a quick look at my system

play00:40

so the water comes in from beneath my

play00:43

foundation and then into this pipe here

play00:45

and then up through a water pressure

play00:49

regulator a water meter and then into

play00:52

the sediment filter from there it moves

play00:54

on to a dechlorinator and softener and

play00:57

so on this is a 10-inch filter and it

play01:00

was installed about four weeks ago it's

play01:02

a clear canister which is convenient to

play01:04

see how dirty the filter is but the

play01:06

clear ones aren't as strong as the

play01:08

opaque ones the clear ones also allow in

play01:11

light which could help increase algae

play01:13

growth which is a bad thing so I'll be

play01:15

upgrading this soon to an opaque one so

play01:17

it's stronger and actually to a bigger

play01:19

one so basically what happens here the

play01:21

water flow is in this way and it goes to

play01:24

the outside of the sump and travels

play01:27

through the filter up through the middle

play01:29

and then out this pipe here so here's

play01:31

the first indication that is time to

play01:33

change your filter if it looks dirty

play01:35

if you don't feel comfortable drinking

play01:37

the water that is flowing through a

play01:39

dirty filter then it's time to change it

play01:41

if your canister is opaque pop it open

play01:43

once in a while engage how fast and how

play01:46

dirty it is getting number to downstream

play01:48

evidence if you see sediment building in

play01:51

other appliances such as another

play01:53

pre-filter or a toilet then it's time to

play01:56

change your filter number three pressure

play01:58

change if there's a noticeable drop in

play02:00

the water pressure then the filter may

play02:03

be getting plugged some filters have

play02:04

pressure gauges and this will be a good

play02:07

indication to tell if the pressure is

play02:09

dropping so the solution here might be

play02:11

to change the water filter and

play02:12

for six months they recommend changing

play02:15

these filters every three to six months

play02:17

if none of the factors which I just

play02:19

mentioned are true and the six-month

play02:22

factor is them it's time to change a

play02:24

filter when you start that a filter

play02:25

changing process make sure you have a

play02:27

replacement filter on hand don't bother

play02:30

trying you need to clean the old one

play02:32

it's just not worth it go buy a new

play02:34

cartridge the risk bacteria could be

play02:37

existing inside of the old one and then

play02:40

you could be adding chemicals as you're

play02:41

trying to clean it and then putting that

play02:43

back into the water you drink just not

play02:45

worth it I also try to go out and buy

play02:47

these in bulk when I can and save money

play02:50

so I look on Amazon eBay Walmart Home

play02:53

Depot any of those places you can buy

play02:55

filters the first step here is to shut

play02:57

off the water

play02:59

this is a tube help setup if you have a

play03:02

three valve setup this is how it or look

play03:05

when this one is shut off and this one

play03:09

is shut off the water can still flow

play03:11

through here when you're changing the

play03:12

filter otherwise this one is off and

play03:15

these two are on so the water can go

play03:17

through the next step is to push the

play03:19

right pressure release button on top of

play03:21

the canister you get a little bit of

play03:24

water come out but that's normal

play03:26

next unscrew the stump from the cap you

play03:28

may need to use the tool that comes with

play03:30

your sump for this

play03:36

it's a good idea to have a bucket handy

play03:39

for this so they don't get water

play03:40

anywhere just unscrewed the thump and of

play03:47

course it'll be a full of water to

play03:50

remove the old filter and washed out the

play03:52

sump make sure to rinse it very well so

play03:54

then your soap residue left over doesn't

play03:56

end up back into your water supply make

play03:59

sure you have water put aside to rinse

play04:01

out your sump otherwise you're not

play04:03

clearly to mean so that since your water

play04:04

is turned off next drop in your new

play04:07

filter and make sure it fits over the

play04:09

little raised section in the bottom of

play04:12

your sump

play04:16

at this point you can put some lubricant

play04:19

on your o-ring since this one here is so

play04:21

new I'm not going to do it at this point

play04:23

but this is the stage at which you would

play04:25

apply that so the next step is to

play04:27

reposition the sump onto the cap and

play04:34

then screw it back into place

play04:36

make sure it doesn't the filter doesn't

play04:38

fall to one side it has to be right in

play04:40

the middle so that it can go on over the

play04:43

stand-out inside of the cap I normally

play04:46

just hand tighten mine but if you want

play04:50

to use the tool to give it a little

play04:53

extra tape me do so now - the next step

play04:58

is to turn the water back on and check

play05:00

for leaks

play05:05

you might want to run your house water

play05:06

for a couple of minutes just to ensure

play05:08

any left over ear gets pushed out or any

play05:12

cleaning solution that you may have left

play05:14

behind inside of your filter it gets

play05:16

washed away I hope you found this video

play05:18

helpful and learning more about sediment

play05:20

filters if you want to see what else

play05:22

them up to please subscribe to my

play05:23

channel and if you like this video

play05:24

please give it a thumbs out

Rate This

5.0 / 5 (0 votes)

Связанные теги
Sediment filterWater filtrationHome maintenanceWater pressureFilter replacementWater safetyDIY guidePlumbing tipsAppliance careWater softener
Вам нужно краткое изложение на английском?