How I Finally Got Good at Drawing the Face - 3 Tips that took me out of Beginner Hell

oridays
30 Apr 202312:03

Summary

TLDRIn this art tutorial, Ori shares their journey from struggling with facial drawing to mastering it through dedicated practice. They offer three key tips: 'The Box Method' for accurate facial structure, drawing head turnarounds to understand 3D form, and studying anatomy for a deeper understanding of the head's structure. Ori emphasizes the importance of not just relying on 3D tools but understanding the fundamentals to improve art quality and consistency.

Takeaways

  • 🎨 The artist Ori used to struggle with drawing faces but has since improved by practicing and focusing on specific weak points.
  • 🏔 Ori took a two-month break to focus on training and improving their facial drawing skills, which led to a significant improvement in their art.
  • 📈 After the focused practice, Ori's art received more positive feedback, with one piece getting over 20,000 likes on Twitter.
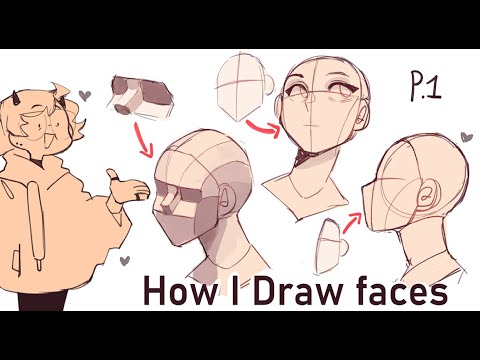
  • 📌 The 'Box Method' is introduced as a technique to help visualize the head in 3D, which helps avoid drawing illusions and correctly place facial features.
  • 👀 Ori emphasizes the importance of the center and side lines when using the Box Method to align facial elements and understand foreshortening.
  • 🔄 The artist suggests drawing head turnarounds to understand the 3D structure of the face and improve the accuracy of facial feature placement.
  • 🧠 Studying anatomy is recommended to provide a foundational understanding of the head's structure, which can greatly enhance drawing skills, even in stylized art.
  • 📚 Ori recommends 'Anatomy for Sculptors' as a valuable resource for learning anatomy, noting its visual explanations and organization.
  • 💻 While 3D tools can aid in drawing, Ori argues that a solid understanding of anatomy and structure is essential to use these tools effectively and not rely on them excessively.
  • 🔁 The video encourages viewers to practice and revisit studies to deepen their understanding in rounds, suggesting a medium level of anatomical knowledge is ideal for most artists.

Q & A

  • What was the main struggle the artist Ori faced in their early art journey?

    -The main struggle Ori faced was drawing faces correctly, as they felt it was their biggest weakness and something they really struggled with.

  • How did Ori overcome their frustration with their lack of skill in drawing faces?

    -Ori overcame their frustration by going off to the mountains to train intensively, focusing on their specific weak points and practicing drawing faces and figures.

  • What was the turning point for Ori in terms of receiving positive feedback on their art?

    -The turning point was when Ori posted a piece after two months of intensive practice, which received over 20,000 likes on Twitter, marking the first time they felt their art was consistently high in quality.

  • What are the three best tips Ori learned for drawing faces?

    -The three best tips are: 1) The Box Method, 2) Drawing head turnarounds, and 3) Studying anatomy.

  • How does the Box Method help in drawing faces?

    -The Box Method helps by providing a 3D perspective guide, allowing artists to avoid drawing illusions and correctly place facial features by thinking of the head as a box with defined front, side, and top planes.

  • What is the significance of drawing head turnarounds in Ori's art improvement process?

    -Drawing head turnarounds solidified the 3D form of the head in Ori's mind, helping them understand the structure and nuances from different angles, which significantly improved the accuracy of facial features' positions.

  • Why did Ori initially resist learning anatomy for the head?

    -Ori initially resisted learning anatomy because they thought that since their art was 2D and stylized, there was no need to learn the underlying anatomy.

  • How did studying anatomy impact Ori's art?

    -Studying anatomy had a significant impact on Ori's art by providing a deeper understanding of the structure of the head, which greatly improved their ability to stylize in a way that looks natural and believable.

  • What is Ori's opinion on the use of 3D models in art?

    -Ori believes that 3D models are not a replacement for understanding anatomy but are tools to help apply that understanding. They emphasize that a solid understanding of the structure is necessary to know when to follow or adjust the 3D model.

  • What book does Ori recommend for studying anatomy for artists?

    -Ori recommends the book 'Anatomy for Sculptors' for its easy-to-understand visuals and well-organized content, making it simple to find the needed references.

  • How does Ori rate the time investment and EXP points for each of the three tips?

    -Ori rates the Box Method as 1 out of 3 stars for time investment and 2 stars for EXP points. Drawing head turnarounds is rated 1-2 stars for time investment and 3 stars for EXP points. Studying anatomy is rated 1-3 stars for time investment and 2.5 stars for EXP points.

Outlines

00:00

🎨 Overcoming Artistic Struggles with 'The Box Method'

In the first paragraph, the artist Ori shares their journey of improving facial drawing skills. They recount the initial struggle and the breakthrough that came after intense practice in solitude. Ori emphasizes the importance of the 'Box Method,' a technique that conceptualizes the head as a box to avoid drawing illusions and to correctly place facial features. The method is practical for both troubleshooting existing drawings and as a guide for new ones. Key elements like the center and side lines of the box are highlighted for their role in aligning facial features and capturing the head's width and perspective accurately.

05:01

👤 Mastering Facial Structure Through Head Turnarounds

The second paragraph delves into the practice of drawing head turnarounds, a method that solidified Ori's understanding of the 3D structure of the face. This practice was crucial in overcoming issues with facial feature placement. Ori outlines a four-step process involving finding references, analyzing different facial planes, drawing a stylized base head structure, and translating this into a character of choice. The paragraph also touches on the benefits of using resources like Anatomy 360 for study and the importance of integrating real-life knowledge into stylized art.

10:04

💡 The Impact of Studying Anatomy on Artistic Growth

In the final paragraph, Ori discusses the transformative effect of studying anatomy on their art. Despite initial reluctance, understanding the underlying structure of the head significantly improved their drawing skills. The artist shares their approach to anatomy studies, which involved copying from various resources and then stylizing the learned structures. Ori recommends 'Anatomy for Sculptors' as a valuable resource and suggests a balanced approach to studying anatomy, avoiding the extremes of superficial knowledge or overspecialization. The paragraph concludes with a reflection on the role of 3D tools as aids rather than replacements for a foundational understanding of anatomy.

Mindmap

Keywords

💡Face Drawing

Face drawing is a fundamental skill in visual arts, particularly in character design and portraiture. In the video, the speaker discusses their journey to improve face drawing, which was initially a struggle. The video's theme revolves around overcoming this challenge, and the speaker shares tips that helped them progress from a beginner to a more skilled artist. The script mentions the speaker's frustration with their lack of skill in drawing faces and their subsequent determination to improve, which led to a significant increase in the quality of their artwork.

💡Beginner's Hell

The term 'beginner's hell' refers to the phase where a learner feels stuck and recognizes their limitations but is unsure how to overcome them. In the context of the video, the speaker was in a 'beginner's hell' with face drawing, knowing they were doing something wrong but not knowing how to fix it. This concept is central to the video's narrative as it sets the stage for the speaker's journey of improvement and the tips they share to help others in a similar situation.

💡Practice

Practice is the act of repeatedly performing an activity to improve at it. The script emphasizes the importance of practice in improving face drawing skills. The speaker mentions that they slowly got better over time by 'putting the reps in,' which means they did a lot of repetitive drawing exercises. The video suggests that consistent practice is key to overcoming weaknesses and improving artistic skills.

💡Box Method

The 'Box Method' is a technique used in drawing to help artists visualize the three-dimensional structure of a face or head. In the video, the speaker explains how thinking of the head as a box can help avoid drawing illusions and correctly place facial features. This method is one of the three tips shared in the video to help artists improve their face drawing skills, and it is demonstrated through critiquing old work and applying the method to fix it.

💡Foreshortening

Foreshortening is an artistic technique used to represent an object or part of an object as shorter than it actually is, due to the angle of view. The script uses the 'Box Method' to explain how to correctly apply foreshortening to the front of the face when the head is not viewed straight on. This concept is crucial for creating a more realistic and three-dimensional appearance in face drawing.

💡Perspective

Perspective in drawing refers to the representation of three-dimensional space on a two-dimensional surface, creating the illusion of depth. The video discusses the importance of perspective in drawing faces, especially when using the 'Box Method' to ensure that facial features are correctly aligned and foreshortened according to the viewer's angle. Understanding perspective is key to drawing faces that appear natural and believable from different angles.

💡Anatomy

Anatomy is the study of the structure of living organisms, including the human body. In the context of the video, the speaker talks about the importance of studying anatomy for drawing, especially the bones and muscles of the head, to understand how they affect the appearance of facial features. The video suggests that even when drawing in a stylized manner, a foundational understanding of anatomy is essential for creating accurate and believable characters.

💡Turnarounds

A 'turnaround' in art refers to a series of drawings that show a character or object from multiple angles, typically 360 degrees. The script mentions that drawing head turnarounds was a practice method that helped the speaker understand the structure of the face from different perspectives. This exercise is recommended in the video as a way to solidify the 3D form of the head in the artist's mind and improve the accuracy of facial feature placement.

💡Stylization

Stylization is the process of simplifying or exaggerating certain features in art to create a unique and consistent visual style. The video discusses how understanding real-life anatomy can help artists stylize characters in a way that looks natural and believable. The speaker shares their process of studying anatomy and then translating that knowledge into stylized versions of facial features for their artwork.

💡3D Models

3D models are three-dimensional representations of objects or characters that can be manipulated and viewed from any angle. The script addresses the use of 3D models in art, suggesting that while they can be a helpful tool for artists, they should not replace the understanding of anatomy and structure. The video argues that 3D models can aid in applying one's understanding but are most effective when the artist has a solid foundation in the fundamentals of drawing and anatomy.

Highlights

The artist shares their journey from struggling with drawing faces to mastering the skill.

Old art is showcased to demonstrate the artist's initial challenges with facial drawing.

The 'Box Method' is introduced as a technique to improve facial structure and perspective.

A critique of the artist's old work is used to illustrate the application of the Box Method.

The importance of the center and side lines in the Box Method for accurate facial feature placement is explained.

The artist emphasizes the Box Method's utility in avoiding drawing illusions and enhancing facial feature accuracy.

A recommendation for a practice exercise involving drawing a rotating box to improve perspective is given.

Drawing head turnarounds is suggested as a method to solidify the 3D form of the head in the artist's mind.

A step-by-step guide on how to perform head turnarounds for better facial feature positioning is provided.

The artist discusses the benefits of studying anatomy for a better understanding of the head's structure.

A personal anecdote about the artist's initial reluctance and eventual appreciation for anatomy studies is shared.

The process of studying anatomy, starting with the skull and moving to muscles and facial features, is outlined.

A book recommendation, 'Anatomy for Sculptors', is made for those looking to study anatomy for art.

The artist debates the role of 3D models in art, arguing they are tools to enhance understanding rather than replacements for it.

A call to action for viewers to subscribe and engage with the content for more tutorials and art.

The video concludes with a teaser for a future tutorial on hair drawing.

Transcripts

play00:00

Hey friends, welcome back to the channel. It's Ori here.

play00:02

So, the face used to be something I really struggled with getting right.

play00:06

I've obviously gotten a lot better at it now,

play00:08

but here's some old art to give you an idea of how it was like back then.

play00:11

And I was in this sort of beginner's hell where I knew I was doing something wrong,

play00:14

but didn't know how to fix it.

play00:16

Although I did slowly get better over time by just putting the reps in,

play00:20

I still always felt like it was my biggest weakness,

play00:22

and it wasn't until I reached a point where I was so frustrated with my lack of skill

play00:26

that I finally said screw it.

play00:27

and I went off into the mountains to train, determined to overcome my weakness.

play00:31

You can actually see that I posted this in June of 2022,

play00:35

and then I didn't post anything for two months as during that time I spent every day trying to

play00:40

work on my specific weak points and did tons of practice drawing the face and the figure.

play00:45

And two months later, you can see here that the next piece I made after doing all that practice

play00:48

was received a lot better on Twitter and was the first time I got over 20,000 likes on a single piece.

play00:54

And to be honest, it was only after this point in my art journey that I started to feel that my art was actually pretty good, or at least consistently high in quality anyway.

play01:02

And in this video, I'll be sharing with you the 3 best tips I learned during that two-month training arc for drawing the face, which finally got me out of beginner's hell.

play01:10

None of these tips are hard to do, they just take time, so I'll also be rating each tip based on the time investment needed.

play01:16

And since I like to see improving as leveling up, I'll also rate them based on how many EXP points I felt they gave me relative to the time invested.

play01:22

Let's get started!

play01:24

The first tip is "The Box Method" where you think of the head as a box.

play01:28

And instead of explaining how it does that, I'm just going to show you by critiquing my old work and applying it to fix it.

play01:34

So this piece might look okay at first glance and you might be wondering what's wrong with it.

play01:39

But the face in this piece is actually an optical illusion of sorts.

play01:42

Because the moment we think of the head as a box, we can see that although the front of the face is in a flat front view,

play01:48

or even just looking up a little, we can see the top of the head which isn't possible.

play01:54

So just to make this point clear, I have here a box with different color sides in 3D.

play02:00

Now imagine that this box is the face and that the green plane is the front of the face.

play02:04

And if we're looking at it straight from the front, it would look like this.

play02:08

And you can see that we can't see any other planes including the top of the box.

play02:13

However, in this piece, the top of the head is visible, which means the box should look like this.

play02:18

And so the front of the face should be foreshortened.

play02:21

And so applying that, the front of the face should look like this as a box,

play02:24

which means that the face is foreshortened going down,

play02:28

and the ears should be raised up since the side plane of the face goes like this as a box.

play02:32

And the shape of the eyelids also change since we're looking at it from above.

play02:36

And so applying those changes, the face should actually look more like this.

play02:40

So before, after, before, after.

play02:44

So as you can see, by thinking of the head as a box,

play02:47

we can avoid major errors such as drawing illusions, just like I showed you.

play02:51

And it also helps with placing the facial features correctly.

play02:54

There are two ways to use this box method.

play02:56

The first is just drawn on top of however you normally draw your head

play02:59

to troubleshoot errors, just like I showed you here.

play03:02

The second is to start by drawing a box before you draw the head,

play03:05

so you can use it as a guide to draw on top of.

play03:07

The most important lines on the box are the center and the side lines.

play03:11

The center line, of course, tells you where the middle of the head is.

play03:15

And that helps you place the left and the right facial elements correctly,

play03:19

as well as align the nose and the mouth. The second important line are the side lines.

play03:24

And by sideline, I mean the side of the box like here. And so this part.

play03:29

This line tells you where the front of the head stops and the side of the head starts.

play03:33

It's actually around the edge of the eyes here. And it's particularly helpful for drawing the

play03:37

side hair as it falls right around this line and also getting the face width correct.

play03:43

Since if you think of the front plane like a 3D box, you will remember to foreshorten it in

play03:47

perspective, meaning that the front of the head is the widest when facing the front.

play03:51

And as the head turns, you will see less of the front of the head and more of the side of the head.

play03:57

And in this example, you can think of the front of the face as the A and the side of the face as the B.

play04:02

So as the box turns, the B side gets more and more visible and the A side less and less. So the area

play04:08

of the face elements kind of shrink, so they squish together more.

play04:11

The box method also helps you place the ears correctly, as you can think of the ear line

play04:15

as a line that goes from the side of the eyes here, across the side of the head.

play04:19

Think of it like glasses. And this side line also applies from above or below in perspective,

play04:26

like here, and also here.

play04:33

So you'll realize that when the face is tilted up, the ears actually go down relative to the level of the eyes.

play04:40

And when the face is tilted down, the ears actually go up relative to the level of the eyes.

play04:46

Some points to watch out for when using the box method.

play04:49

One, remember it's just a perspective guide.

play04:52

The face is obviously not flat and things like the nose and the mouth will protrude beyond the box and that gets affected by perspective too.

play05:00

So you still need to draw in the structure of the face but using the box method will help you draw that structure in more accurately by forcing

play05:05

you to think three-dimensionally and giving you 3D guidelines to work with.

play05:10

I rate this tip a 1 out of 3 for time investment since it's something you can practice and apply immediately

play05:15

For the EXP points, I give it a whopping 2 stars which is amazing for the time investment

play05:20

because this tip has saved me from making so many drawing mistakes and I still use it to this day

play05:25

And if you want to go plus alpha and supercharge this tip to really level up your accuracy for the face

play05:30

I recommend doing the practice exercise I did here

play05:33

where you start by drawing a box and then rotating it

play05:35

and then you translate that into the box of the head

play05:38

which you then use to draw the head structure accurately in perspective

play05:42

then you can repeat it for higher and lower camera angles

play05:48

The second tip is to draw head turnarounds.

play05:51

This was the practice method I used to help me learn how the face is actually structured.

play05:55

Since doing it I stopped having major issues with getting the positions of the facial features right.

play06:00

Such as the eyes, nose, mouth, ears, eyebrows etc.

play06:05

Which was a big problem for me before.

play06:07

This is because drawing turnarounds solidifies the 3d form of the head in your mind.

play06:11

You get a clear idea of what it should look like from different angles and the nuances of each angle.

play06:16

Doing this study beforehand will also give you your own personal reference that you can refer

play06:19

back to if you get stuck or forget how an angle looks like in the future.

play06:23

The 4 steps to do this are:

play06:25

1. Find photos or a 3d model of a head and slowly turn it around. For this study I used Anatomy 360's head models.

play06:32

This isn't sponsored by the way I just find this stuff incredibly useful for doing studies

play06:37

As usual there'll be a link in the description to it and anything else I mentioned in this video if you want to check it out.

play06:42

Once you've got your reference the next step is to analyze it.

play06:45

What you want to study are the different planes of the face. Like, what is the structure around the eyes the cheeks forehead etc.?

play06:53

If this is too difficult to start with i recommend isolating each facial element one by one

play06:59

and studying their form from different angles separately first.

play07:02

For example just starting with only the eye structure and analyzing that.

play07:07

The third step is to draw a stylized base head structure while referring to your analysis.

play07:11

And by stylized I mean in the proportions of the kind of face you usually draw for your characters.

play07:16

If you don't have one yet I suggest studying the head proportions of an artist you admire and using that.

play07:21

Then use that base structure to output into a character of your choice.

play07:25

This final step is very important to translate the real life knowledge you gain from the analysis into a stylized form.

play07:31

In other words, it helps to activate the learning so you can actually use it when you're drawing characters

play07:35

In this case I focused on just outputting to a single character - Shiroko from Blue Archive.

play07:40

Because I like her design and I also wanted to practice drawing animal ears from different angles.

play07:45

In terms of time investment I would rate this a 1-2 stars as it depends on how many turnarounds you want to do.

play07:52

For experience points actually rate this 3 stars as this tip was definitely the biggest game changer for me and the more turnarounds you do the more you will learn.

play08:00

By the way, if you're enjoying this so far, I'd appreciate it if you could hit the like button as it really helps with the algorithm.

play08:05

Also, if you haven't already, make sure to subscribe and turn on the notification bell

play08:09

as 67% of people watching aren't and it'd be awesome to see that number go down to 50%.

play08:15

The third tip is to study anatomy.

play08:17

Even a basic understanding can make a big difference

play08:19

because the bones provide the structure for how the muscles attach and thus what the human figure actually looks like.

play08:25

And the head is no exception.

play08:26

And being completely honest I was actually lazy to learn anatomy for the head because I initially

play08:30

thought like, "bro, it's 2D you're going to stylize it anyway so is there any reason to learn the anatomy for the head?"

play08:37

So I kind of put it off for like three years.

play08:40

And yes I am face palming right now because that was how me earlier in my art journey thought.

play08:45

Like the moment I did anatomy studies of the head coupled with the other two tips the world just opened for me and my head

play08:51

drawing leveled up by like 100 times.

play08:54

Because in the end the anime style is a stylization of real life.

play08:58

So understanding how things work in real life will improve your ability to know what and how to stylize in a way that looks natural and believable.

play09:04

The way I did my studies was actually pretty simple.

play09:06

I just drew copies of the pictures from various books and resources.

play09:10

And then I would output what I had learned into stylized version to make it applicable like the previous tip.

play09:14

For example when I was learning the structure of the eye

play09:17

I would first study the anatomy and structure of it and then follow that up with practice of stylized versions.

play09:22

As for the order of learning, I first started with the skull.

play09:25

Then I moved on to the muscles and the structure of each facial features like the eyes the ears the nose etc.

play09:31

I've gone through many books and resources on anatomy but if I had to recommend just one it would be this "Anatomy for Sculptors" book.

play09:38

The book is easy to understand as it uses visuals to explain everything, and out of all the books I found it the best organized making it simple to find the reference you need.

play09:47

I rate studying anatomy a 1-3 stars for the time investment as it depends on how deep you want to go.

play09:53

You can go for surface level basic understanding and just learn the general structure of the bones and muscles

play09:58

or go all the way down the anatomy rabbit hole and learn all the little details.

play10:03

For the experience points received I give this a 2.5 stars as even though I feel anatomy studies

play10:08

are very useful for anime style art, there is definitely a point of diminishing returns where

play10:12

studying more of it doesn't need too much visible improvement for the time spent.

play10:16

However that doesn't mean you should neglect it either.

play10:19

Personally I feel a medium level of understanding is ideal

play10:22

which is deeper than a basic understanding but not as deep as a complete expert on the subject.

play10:26

And you can always do it in rounds.

play10:28

So you can do a round one for basic understanding, and then sometime later you revisit and do a round two and go a bit deeper.

play10:34

So you might be wondering what about 3D?

play10:37

3D has come a long way and many artists, myself included, use it in various parts of the workflow.

play10:43

So is any of this even necessary now that 3D models are so good?

play10:47

For example, Clip Studio has its own 3d functions and the recent 2.0 update now includes a head you can

play10:52

fully customize to make it look exactly the way you want.

play10:56

Using it as an underlay can both save you time and help you draw the head more accurately.

play11:01

So is there any point in doing all this practice for the head or anatomy in general when we can just draw on top of a 3D model?

play11:07

In my opinion 3D isn't a replacement for understanding it's a tool to help you apply your understanding.

play11:13

The thing is if you don't actually understand the structure of the face or the body to begin with

play11:18

you end up over relying on the 3D and you won't have the ability to know when you can follow it

play11:22

and when you should make adjustments because although powerful it's not perfect.

play11:27

It's just a tool and you want to make sure that you are the master over the

play11:30

tool and not a slave to it.

play11:32

That's why i think that even if you use 3D,

play11:34

improving your understanding of what you are drawing is necessary and will ultimately allow you to draw better.

play11:40

Anyway I hope you enjoyed this video!

play11:41

And if you did you might want to check out this hair drawing tutorial

play11:44

where I share the 5 tips that completely changed the hair drawing game for me and allowed me to draw it at a pro level.

play11:49

If you want to see more tutorials like this make sure to hit subscribe

play11:53

and turn on the bell icon so you can get notified whenever i make a new one.

play11:56

Also if you want to see my art make sure to check out my Twitter in the link below.

play11:59

This was Ori and I'll see in the next video. Bye!

Rate This

5.0 / 5 (0 votes)

Связанные теги
Art TutorialFace DrawingArtistic ImprovementAnatomy StudyDrawing TechniquesArt PracticeStylized Art3D ModelingArt TipsSkill Development
Вам нужно краткое изложение на английском?