Lecture 16: Induced Voltage in a Coil in a Rotating Machine

IIT Kharagpur July 2018
6 May 201928:27

Summary

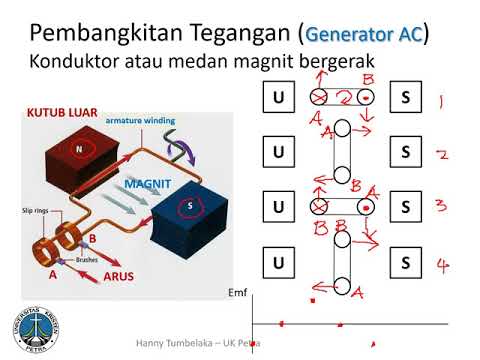
TLDRThe script discusses the generation of EMF in an electrical machine, specifically focusing on the Electromechanical II's 16th unit. It explores the concept through examples and diagrams, explaining how the direction of the magnetic field and the movement of conductors within contribute to the production of EMF. The lecture also delves into the impact of varying the number of turns and the speed of rotation on the generated EMF, using the right-hand rule to demonstrate the relationship between magnetic field orientation and induced current. The summary also touches on the practical aspects of using multiple coils to increase the efficiency of EMF generation and the importance of understanding the principles behind AC and DC electrical systems.

Takeaways

  • 🔧 The lecture discusses the generation of EMF in a DC machine, specifically the 16th unit of 'Electrical Machines II'.
  • 📚 The instructor uses diagrams to explain the concepts, starting with the direction of the magnetic field and how it affects the machine.
  • 🧲 The magnetic field is depicted as pointing upwards, and a conductor is shown moving through it, illustrating the principles of electromagnetic induction.
  • 🏗️ The concept of flux linkage is introduced, explaining how it is provided when the machine starts and how it relates to the induced electromotive force (EMF).
  • 🔋 The absence of voltage results in a back EMF of 0, which is a critical point in understanding the machine's operation.
  • 📉 The instructor demonstrates the relationship between the movement of the conductor and the induced EMF, using mathematical representations.
  • 🔌 The lecture introduces the idea of a transformer and how it can be used to step up or step down voltage, explaining the principle of mutual induction.
  • 🔄 The concept of rotating machines is touched upon, where the machine's operation is likened to a rotating mechanical system.
  • ⚙️ The lecture explains the importance of understanding the number of conductors and how they are arranged, which affects the distribution of the magnetic field (B).
  • 🌀 The instructor discusses the concept of alternating current (AC) machines, emphasizing that they are never designed with a single conductor due to the sinusoidal distribution of the magnetic field.

Q & A

  • What is the primary topic discussed in the script?

    -The primary topic discussed in the script is the generation of EMF (Electromotive Force) in electrical machines, specifically focusing on the principles and calculations related to it.

  • What is the significance of the direction of the magnetic field as mentioned in the script?

    -The direction of the magnetic field is significant because it determines the direction of the induced EMF and the resulting current in the electrical machine.

  • How does the script describe the movement of the conductor in relation to EMF generation?

    -The script describes that when a conductor moves through a magnetic field, it cuts through the magnetic flux lines, which induces an EMF according to Faraday's law of electromagnetic induction.

  • What is the role of the number of turns (n) in the EMF generation process as discussed in the script?

    -The number of turns (n) in the coil is crucial as it affects the total EMF generated. The script explains that the total EMF is proportional to the number of turns, with the formula EMF = n * (change in magnetic flux)/(time).

  • What is the concept of 'flux linkage' mentioned in the script, and how is it related to EMF?

    -Flux linkage refers to the product of the number of turns in a coil and the magnetic flux through the coil. It is directly related to EMF as the change in flux linkage over time determines the induced EMF in the coil.

  • How does the script explain the effect of the number of conductors on the EMF?

    -The script explains that increasing the number of conductors in a given space can increase the total EMF generated, which is beneficial for ensuring a smoother distribution of magnetic flux and reducing the chances of magnetic saturation.

  • What is the significance of the term 'synchronous speed' mentioned in the script?

    -The term 'synchronous speed' refers to the rotational speed at which the rotor of an electrical machine must rotate to maintain synchrony with the rotating magnetic field. It is crucial for the proper operation of the machine and is calculated based on the number of poles and the frequency of the supply.

  • How does the script describe the concept of 'back EMF' in electrical machines?

    -Back EMF, or counter EMF, is described as the voltage generated in the opposite direction to the applied voltage in an electrical machine. It is a result of the machine's inherent inductance and is an important factor in determining the machine's performance and efficiency.

  • What is the purpose of having multiple coils in an electrical machine as discussed in the script?

    -The purpose of having multiple coils in an electrical machine is to distribute the magnetic flux more evenly and to increase the total EMF generated. This also helps in reducing the complexity of the machine's design and improving its overall efficiency.

  • How does the script differentiate between DC and AC machines in terms of EMF generation?

    -The script differentiates between DC and AC machines by explaining that in DC machines, the EMF generated is unidirectional, while in AC machines, the EMF varies sinusoidally with time. The script also mentions that the principles of electromagnetic induction apply to both types of machines.

  • What is the role of the mechanical rotation in the context of EMF generation as explained in the script?

    -The mechanical rotation of the rotor within the stator's magnetic field is essential for generating EMF in an electrical machine. The rotation ensures that the magnetic flux through the coils changes, which in turn induces an alternating EMF in the case of AC machines.

Outlines

00:00

🔧 Understanding Electromagnetic Field Creation in Electrical Machines

The paragraph discusses the process of creating an electromagnetic field in Electrical Machines II, specifically the 16th unit of the course. The speaker uses a computer simulation to demonstrate the concept, explaining how the field direction changes from south to north and then to south again. The simulation shows a city with a river flowing through it, and the speaker indicates the direction of the magnetic field. The concept of flux linkage is introduced, and the speaker explains how the electromotive force (EMF) is induced when the magnetic field changes. The paragraph concludes with a mention of the next slide, which will include two coils, and the speaker hints at the idea that the EMF will be induced in both coils when they are moved at the same speed.

05:00

🌐 Exploring the Impact of Coil Movement on EMF and Understanding AC Voltage Generation

This paragraph delves into the effects of moving coils within a magnetic field and how it relates to the generation of alternating current (AC) voltage. The speaker explains that if a coil is moved at a constant speed, the induced EMF will be sinusoidal, resembling a sine wave. The paragraph also touches on the concept of using multiple coils to increase the number of slots, which in turn affects the distribution of EMF. The speaker emphasizes the importance of understanding the behavior of a single coil before moving on to multiple coils, as it simplifies the understanding of the system. The discussion concludes with a comparison between direct current (DC) and AC voltage generation, highlighting that AC voltage is not generated by a single coil due to its sinusoidal nature.

10:02

🔄 Analyzing the Rotational Dynamics and EMF Induction in Rotating Machines

The speaker continues the discussion on the rotational dynamics of machines and how EMF is induced as the machine rotates. They introduce a two-dimensional model to illustrate the concept, placing a rotor in the north position and explaining the movement of the rotor in terms of angular velocity. The paragraph discusses the relationship between the rotor's position and the induced EMF, which is dependent on the rotor's angular velocity and the number of poles. The speaker also explains the concept of electrical degrees and mechanical degrees, and how they relate to the rotor's movement. The paragraph concludes with a mention of the next segment, which will continue the exploration of these concepts.

17:41

🔋 Continuing the Discussion on Electromagnetic Induction and Machine Dynamics

This brief paragraph serves as a transition, indicating that the speaker will continue the discussion in the next segment. It suggests that the upcoming content is crucial for understanding the principles being discussed.

22:42

📚 Concluding Remarks and Acknowledgment

The final paragraph consists of the speaker's closing remarks, thanking the audience for their attention and indicating the end of the presentation. It serves as a polite and professional conclusion to the video script.

Mindmap

Keywords

💡EMF

EMF stands for Electromotive Force, which is the electrical energy per unit charge that an electric circuit develops to produce a current. It is a measure of the energy provided by a source to move electric charge through a circuit. In the video, EMF is discussed in the context of how it is generated in a machine and how it relates to the motion and magnetic fields involved. The script mentions 'unit EMF' and its calculation in the context of a rotating machine, illustrating the conversion of mechanical energy into electrical energy.

💡Magnetic Field

A magnetic field is a vector field that describes the magnetic influence on moving electric charges, electric currents, and magnetic materials. The video script refers to the magnetic field's direction and its interaction with the conductors within the machine to produce EMF. The orientation of the magnetic field, such as 'north pole looking upwards,' is crucial for determining the direction of the induced EMF and current.

💡Conductor

A conductor is a material that allows the flow of electric charge. In the context of the video, conductors are parts of the machine that move through the magnetic field, which induces an EMF. The script describes how the conductors are arranged and how their motion within the magnetic field is essential for generating the EMF, which is a fundamental concept in electromechanics.

💡Rotation

Rotation refers to the circular motion of an object around a fixed axis. In the video, rotation is central to the operation of the machine that generates EMF. The script discusses how the rotation of the machine's components, such as the rotor, leads to the generation of EMF due to the changing magnetic flux through the conductors. The concept is used to explain the periodic nature of the EMF produced by the machine.

💡Flux

Flux, in the context of electromagnetism, refers to the quantity of magnetic field lines passing through a given area. The video script uses the term 'flux' to describe how the magnetic field interacts with the conductors as they rotate. The changing flux through the conductors is what induces the EMF, and the script mentions 'flux linkage' to describe the product of the magnetic flux and the number of turns of the coil.

💡Induced EMF

Induced EMF is the electromotive force generated in a conductor when it is exposed to a changing magnetic field. This concept is fundamental to the operation of the machine discussed in the video. The script explains how the induced EMF is produced as the magnetic field changes due to the rotation of the machine's components, and it is key to understanding the generation of electrical energy from mechanical motion.

💡Rotor

A rotor is a part of an electric machine that rotates to produce a changing magnetic field. In the video, the rotor is mentioned as the component that moves within the magnetic field, causing the conductors to cut through the field lines and thus inducing an EMF. The script uses the rotor to illustrate the principles of electromagnetic induction in the context of the machine's operation.

💡Stator

The stator is the stationary part of the electric machine that houses the magnetic field. In the video script, the stator is described as having a certain configuration of magnetic poles that interact with the rotating rotor. The stator's role in generating EMF is crucial as it provides the magnetic field through which the rotor moves.

💡Back EMF

Back EMF, or counter EMF, is the voltage generated in an electrical circuit that opposes the change in current that produced it. In the video, back EMF is mentioned in the context of the machine's operation, where it represents the voltage that opposes the applied voltage when the machine's speed increases. The script explains how back EMF is related to the machine's speed and its electrical characteristics.

💡Synchronous Speed

Synchronous speed is the rotational speed at which the rotor of an electric machine rotates in synchronism with the magnetic field. The video script discusses synchronous speed in relation to the machine's operation, where the rotor's speed matches the speed of the rotating magnetic field. This concept is important for understanding the steady-state operation of the machine and the generation of a constant frequency output.

💡Magnetic Pole

A magnetic pole is an area of concentrated magnetic flux in a magnetic material. In the video, the magnetic poles are part of the stator's design and are crucial for generating the magnetic field that interacts with the rotor. The script mentions the arrangement of the magnetic poles and how they contribute to the overall magnetic field and the induction of EMF.

Highlights

Explanation of how the 16th unit of Electromechanical Systems II generates EMF based on several explanations.

Demonstration of the direction of the magnetic field and the city's orientation in relation to the magnetic field.

Discussion on the presence of a wire in the city and how it affects the induced EMF when moved.

Introduction of a demonstration with a single loop and the resulting EMF when moved at a constant velocity.

Illustration of how moving a loop at the same velocity in a magnetic field induces a constant EMF.

Introduction of two coils and their stationary state, and the effect of moving them at the same velocity on the induced EMF.

Explanation of the induced EMF in the first and second coils due to the movement at the same velocity.

Discussion on the difference in EMF when using a blue coil versus two coils.

Importance of understanding the behavior of a single coil versus two coils in an electromagnetic system.

Description of the final setup involving a rotating coil in a magnetic field and the resulting EMF.

Explanation of the linear relationship between the rotating speed of the coil and the generated EMF.

Introduction of the concept of slots and their role in the electromagnetic system.

Discussion on the number of slots and their arrangement in the system.

Explanation of how increasing the number of coils can improve the distribution of magnetic flux.

Introduction of the concept of AC (alternating current) and its generation using multiple coils.

Discussion on the importance of not using a single coil for generating AC due to the sinusoidal distribution of magnetic flux.

Explanation of the mechanical and electrical aspects of a two-pole machine and their relationship.

Introduction of the concept of rotational speed and its relationship with the generated EMF.

Discussion on the periodic nature of the generated EMF and its relationship with the rotational speed.

Explanation of the relationship between the generated EMF and the number of revolutions per minute (rpm).

Conclusion on the importance of understanding the principles of Electromechanical Systems II for practical applications.

Transcripts

play00:01

எலெக்ட்ரிக்கல் மெஷின்ஸ் II இன் 16வது

play00:04

யூனிட் EMF ஐ எவ்வாறு உருவாக்குகிறது

play00:08

என்பதை சில விளக்கங்களின் அடிப்படையில் மீண்டும்

play00:12

ஒருமுறை பார்ப்போம்.

play00:14

எடுத்துக்காட்டாக, அதற்கு முன் கணினியில்

play00:17

நான் காண்பிக்கும் விதத்தை புரிந்து

play00:20

கொள்ள முயற்சிப்போம், இது உங்கள் தெற்கு

play00:23

வடக்கு தெற்கு வடக்கு என்று மாறி மாறி

play00:28

வருகிறது என்று வைத்துகொள்வோம் மேலும் இங்குள்ள

play00:32

புலத்தின் திசையானது செங்குத்தாக மேல்நோக்கி

play00:35

இருக்கும், மற்றும் அந்த கடத்தி நகரும்

play00:38

ஒரு கோடு காட்டப்பட்டுள்ளது, அது நகரும் போது,

play00:43

நாம் இதைப் பெற்ற பிறகு, என்னால் இதை

play00:48

வரைய முடியும், ஏனென்றால் மேலே செல்லும் விசையின்

play00:52

காட்டினேன்.

play00:53

எனவே, இது உங்கள் ஃப்ளக்ஸ் அடர்த்தி

play00:57

விநியோகம் கொடுக்கப்பட்டுள்ளது.

play00:58

அது நகரத் தொடங்கினால், மின்னழுத்தம் இல்லாததால்

play01:02

தூண்டப்பட்ட மின்னழுத்தம் 0 ஆக இருக்கும்.

play01:06

நாம் இப்போது கணினியில் ஒரு டெமான்ஸ்ட்ரேஷன்

play01:09

உள்ளது.

play01:10

நீங்கள் v ஐ ஒரு வேகத்துடன் நகர்த்த அனுமதித்தால்,

play01:16

அது தென் துருவத்தின் கீழ் நகர்த்தபடும்

play01:19

போதெல்லாம் நேர்மறை மின்னழுத்தம் என்றும்

play01:22

அர்த்தம்.

play01:23

மீண்டும் ஒருமுறை நான் அதை ரீப்ளே

play01:27

x அச்சை vt ஆக மாற்றலாம், இது நேரம் மாறுபடும்

play01:33

மின்னழுத்தம் தூண்டப்படும் என்பதைக் குறிக்கிறது.

play01:36

இப்போது, அடுத்த ஸ்லைடில் நான் 2 கடத்திகளை

play01:41

வைத்துள்ளேன், அவை நிலையாக இருப்பதை

play01:45

நீங்கள் காண்கிறீர்கள், பிறகு முதல் வளைவு

play01:49

Blv வளைவு இடது கை கடத்தி மின்னழுத்ததை இருக்கும்.

play01:52

இப்போது, இங்கே மீண்டும் அவை நிலையாக இருந்தால்

play01:56

எதுவும் நடக்காது, ஆனால் அவற்றை அதே

play01:59

வேகத்தில் நகர்த்தினால், முதல் கடத்தியில்

play02:01

தூண்டப்பட்ட மின்னழுத்தம் இந்த சிவப்பு வளைவால்

play02:04

குறிக்கப்படும் மற்றும் இரண்டாவது

play02:05

கடத்தியில் என்பது இந்த சிவப்பு மூலம்

play02:08

தூண்டப்பட்ட மின்னழுத்தம் என்பதை நீங்கள் பார்க்கலாம்.

play02:11

பின்னர் வித்தியாசத்தை எடுத்துக் கொள்ளுங்கள்,

play02:13

நீல வளைவால் இரண்டு மடங்கு பெறுவீர்கள்.

play02:16

சுவாரஸ்யமான விஷயம் என்னவென்றால், ஒரு

play02:18

ஒற்றை கடத்தியுடன் விஷயம் தொடங்குகிறது,

play02:20

இப்போது இந்த ஒற்றை கடத்தி மற்றும் இந்த

play02:24

2 கடத்திகள் என்ன நடக்கிறது என்பதை

play02:27

நாம் அறிந்து கொள்வது அவசியம்.

play02:29

நான் ஒற்றை காயிலுக்கு வந்த பிறகு, காயில்

play02:32

.

play02:33

இப்போது, எனது கடைசி வகுப்பில், காற்று

play02:35

இடைவெளியில் இது தூரம் அல்லது சுழலும்

play02:38

இயந்திரமாக இருந்தால் நான் கோண நிலையில்

play02:41

எழுதுகிறேன் என்பதை உங்களுக்கு விளக்குகிறேன்.

play02:43

இப்போது நான் சொல்வதை நீங்கள் புரிந்து

play02:46

கொள்ள முடியும் என்று வைத்துக்கொள்வோம்,

play02:48

இவை ரோட்டரின் நான் கடத்தியை வைப்பேன்,

play02:51

பொருட்கள் சுழலும்.

play02:52

நான் உங்களுக்குச் சொன்னது போல், புரிந்துகொள்வதற்காக

play02:55

இதை வெட்டி இப்படிக் காட்டுகிறேன், இது

play02:57

சுழலும் மின் இயந்திரத்தைப் புரிந்துகொள்வதற்கான

play03:00

ஒரு வகையான லீனியர் என்று வைத்துக்கொள்வோம்.

play03:02

நீங்கள் ஒரு காயிலை எடுத்துக் கொள்ளுங்கள்,

play03:05

அது பல திருப்பமாக உள்ளது.

play03:07

உண்மையில், இது 2 திரும்பிய காயில் இருக்கும்.

play03:11

நான் X1 Y1 அல்லது போன்றவற்றை அழைக்கிறேன், ஏனெனில்

play03:15

ஒரு பெயரைக் கொண்ட, பல காயில்கள் இருக்கும்.

play03:18

எனவே, இது ஒரு காயிலை உருவாக்குகிறது

play03:21

மற்றும் நான் எந்த காயிலை பற்றி பேசுகிறேன்

play03:24

என்பதை அடையாளம் காண ஒவ்வொரு காயிலுக்கும்

play03:27

நிச்சயமாக பெயரிடப்பட வேண்டும்.

play03:29

எண்கள் பயன்படுத்தப்படுகின்றன உங்களுக்குத் தெரியும்

play03:31

அதே போல் மற்றொரு காயில் இருக்கலாம்,

play03:34

அதை நாங்கள் என்கிறோம்.

play03:35

எடுத்துக்காட்டாக, மற்றொரு காயில் என

play03:38

அழைக்கப்படலாம், மேலும் இந்த காயில்களை

play03:40

ஒரு குறிப்பிட்ட வரிசையில் அதற்கு

play03:42

ஒதுக்கப்பட்ட இடத்தில் வைப்பேன், மேலும்

play03:44

ஒவ்வொரு காயிலுக்கும் அதன் சொந்த இலவச

play03:47

டெர்மினல்கள் இருக்கும், மேலும் அவை தொடரிலோ

play03:50

அல்லது இணையாகவோ இணைக்கப்படும் எந்த

play03:52

விதத்தில் வசதியாக இருக்கிறதோ அதைச்

play03:54

செய்வோம்.

play03:55

எனவே, காயில்களை ஆகும்.

play03:57

அந்த மைனஸ் 2 பிளஸ் பின்னர் மீண்டும்

play04:00

மைனஸ் 2 பிளஸ் Blv, Blv, 2B lv மற்றும் அது n டர்ன்களை

play04:06

மற்றும் 2 டெர்மினல்களை உருவாக்கினால், இந்த

play04:09

மொத்த EMF இந்தப் பக்கம் nBlv ஆக இருக்கும், மேலும்

play04:12

இது எதிர் துருவமுனைப்புடன் n Blv ஆகவும் இருக்கும்,

play04:15

இதனால் அவை சேர்க்கப்பட்டு 2nB lv மின்னழுத்தத்தை

play04:18

உங்களுக்கு வழங்கும்.

play04:19

இப்போது இந்த B மாறுபடும் பட்சத்தில் அது அளவு

play04:23

வெவ்வேறு காயில்கள் இப்படித்தான் வைக்கப்படும்,

play04:25

இவை ஸ்லாட்டுகள் எனப்படுகின்றன.

play04:26

இப்போது, இந்த விண்டிங் -இன் பொருள்கள் இந்த

play04:30

ஸ்டேட்டரைப் போலவே இருக்கும்.

play04:31

இங்கேயும் இது போன்ற காயில்கள் , டீத்

play04:34

ஸ்லாட், டீத் ஸ்லாட் என்று வரிசையாகப்

play04:37

போகும்.

play04:38

ஏன் பல காயில்கள் இருக்கும் என்று

play04:40

தோன்றலாம், ஏனென்றால், நீங்கள் முதலில்

play04:42

ஒற்றை காயிலைப் பயன்படுத்துகிறீர்கள் என்றால், உங்களுக்கு

play04:45

2 ஸ்லாட்டுகள் மட்டுமே தேவை என்று நான்

play04:48

காட்டினேன், பின்னர் இரும்பின் மீதமுள்ள

play04:50

இடம் குறைவாகப் பயன்படுத்தப்படும், அது ஒன்றுதான்.

play04:53

இந்த இடத்தைப் பயன்படுத்தி காயில்களின் எண்ணிக்கையை

play04:55

அதிகரிக்க முயற்சிப்பது நல்லது, ஏனெனில்

play04:58

காயில்களின் எண்ணிக்கையை அதிகரிப்பது இந்த

play05:00

B விநியோகம் இனி செவ்வகமாக இருக்காது என்பதை

play05:17

உறுதி செய்யும், ஆனால் 2 3 காயில்கள்

play05:38

பயன்படுத்தப்பட்டால் நான் காட்டியது இது

play05:51

போன்ற ஓரளவு படியாக இருக்கும், மேலும்

play06:08

இது ஒரு சைன் அலை போல் இருக்கும்.

play06:29

எனவே, AC மின்னழுத்தத்தை உருவாக்க மக்கள்

play06:36

ஒருபோதும் ஒற்றை காயிலைப் பயன்படுத்துவதில்லை,

play06:41

ஏனென்றால் நீங்கள் அவ்வாறு செய்தால்,

play06:46

b விநியோகம் சைனூசாய்டலாக .

play06:48

இது B மற்றும் இது ஸ்பேஸ் மைண்ட் உங்கள்

play06:51

ஸ்பேஸ் ஆங்கிள்ஸ் .

play06:53

கோணத்தை தீட்டா எலக்ட்ரிக்கல் மற்றும் என 2 வழிகளில்

play06:57

அளவிடலாம், எலக்ட்ரிக்கலுக்கு நான் தொடர மாட்டேன்

play07:00

என்ற பின்னொட்டை எழுதவில்லை, எனவே

play07:02

என நான் எழுதினால் எலக்ட்ரிகல் டிகிரி

play07:05

கூடிய இயந்திர கோணம், அது போன்ற 2 நேர்க்கோட்டுகளுக்கு

play07:09

இடையே உள்ள கோணத்தை என்னால் அளவிட முடியும்.

play07:13

ஆனால் மற்றொரு கோணத்தை அறிமுகப்படுத்துவது

play07:15

ஏன் அவசியம் என்பதை புரிந்து கொள்ள முயற்சிப்போம்.

play07:19

உங்களிடம் 2 துருவ அமைப்பு இருப்பதாக

play07:22

வைத்துக்கொள்வோம், நான் அதை தோராயமாக

play07:24

வரைவேன்.

play07:25

இது வடக்கு என வைத்துகொள்வோம், இது தெற்கே வடக்கு

play07:29

தெற்கே என்று வைத்துக்கொள்வோம், உங்களிடம் ஒரு கடத்தி

play07:33

உள்ளது, என்பதை புரிந்து கொள்ள முயற்சிப்போம்,

play07:35

அது சில கோண வேகம் அல்லது வேகத்துடன்

play07:39

நகர்கிறது, அது ஒரு வேகம் n rps மற்றும்

play07:45

B விநியோகத்துடன் நகர்கிறது என்று

play07:47

வைத்துகொள்வோம்.

play07:48

B பரவலானது இந்த கோண தீட்டாவில் உள்ள

play07:52

B விநியோகத்தின் அடிப்படைக் கூறுகளைப்

play07:55

போன்றது என்று வைத்துக்கொள்வோம், இதில் இருந்து நான்

play08:01

கோணத்தை அளக்கிறேன், இந்த குறிப்பிட்ட

play08:05

வழக்கில் கடத்தி இந்த நிலையில் இருக்கும்போது

play08:10

அது ஒரு பாதி வட துருவமாகவும் மற்ற பாதி தென் துருவமாகவும்

play08:19

இருக்கும்.

play08:20

தென் துருவ மண்டலம் உள்ளது.

play08:24

இப்போது, தூண்டப்பட்ட மின்னழுத்தம் என்பது

play08:28

சந்தேகமே இல்லை ஆனால் அது இப்போது நேரம்

play08:35

கடந்து செல்லும் போது இந்த கடத்திகளின்

play08:40

நிலையை குறிக்கிறது.

play08:42

இப்போது இது கோணம் ஒரு வினாடிக்கு சுழற்சியுடன்

play08:48

தொடர்புடையது, நீங்கள் πDn ஆல் பெருக்குகிறீர்கள்,

play08:53

ஏனெனில் ஒரு சுழற்சியில் அது 2 π ஐ உள்ளடக்குகிறது,

play09:01

1 வினாடியில் அது V πDn க்கு சமமான தூரத்தை

play09:09

கடக்கும், மன்னிக்கவும் V என்பது πDn க்கு சமம்.

play09:13

1 வினாடி ஒரு சுழற்சியைக் காண்க, πD மீட்டர்

play09:18

என்பது நீங்கள் n சுழற்சிகளை செய்யும்

play09:20

1 வினாடியில் கடத்தி நகரும்.

play09:23

ஒரு வினாடிக்கு மீட்டரில் உள்ள வேகம் πDn ஆக இருக்கும்,

play09:28

அதுவே ஒரு நொடிக்கு ரேடியனில் ஒமேகா

play09:31

வேகம் 2πn ஆக இருக்கும், ஏனெனில் 1 வினாடியில்

play09:35

அது 1 சுழற்சியை 2π கோணமாக மாற்றுகிறது,

play09:39

எனவே, 1 வினாடியில் n சுழற்சிகளைச் செய்தால்

play09:42

அது ஒரு வினாடிக்கு இவ்வளவு ரேடியனாக

play09:45

முக்கியமானது.

play09:46

எனவே, நீங்கள் ரோட்டரை மற்றும் தொடுநிலை

play09:49

வேகம் என்ன என்பது இது ஒரு πDn ஆகும்.

play09:53

இப்போது நீங்கள் பார்ப்பது போல்,

play09:55

இந்த கட்டம் முக்கியமானது, மின்னழுத்தம் இல்லாத

play09:58

இந்த நடுநிலை நிலையில் கடத்தி இருக்கும்

play10:02

போது நான் எனது நேரத்தை எண்ணத் தொடங்கினேன்

play10:05

என்று வைத்துக்கொள்வோம், ஆனால் அது அங்கு

play10:08

சென்று, அது இங்கே வந்துவிட்டது, அது

play10:11

தென் துருவத்தின் எல்லைக்குள் வரும்

play10:14

தருணத்தில் அதில் தூண்டப்பட்ட மின்னழுத்தம்

play10:16

இருக்கும், ஒவ்வொன்றின் அளவும் இந்த B இந்த

play10:20

நீளம் கடத்தியின் இந்த வேகத்தில் இருக்கும்,

play10:24

இது πDn ஆகும், நீங்கள் கவனிக்கவும்..

play10:29

இது இப்படிச் செல்லும் பின்னர் அது இங்கு

play10:35

வரும் அது Bmax உடன் தொடர்புடைய அதிகபட்ச

play10:39

மின்னழுத்தத்தைக் கொண்டிருக்கும்,

play10:40

பின்னர் மீண்டும் மின்னழுத்த துருவமுனைப்பு

play10:42

பரிமாணத்தை 2 முனைகளில் தூண்டப்பட்ட மின்னழுத்தம்

play10:45

தலைகீழாக மாறுகிறது, எனவே தூண்டப்பட்ட

play10:47

மின்னழுத்தமும் இந்த இயல்புடையதாக

play10:49

இருக்காது.

play10:50

இந்த கடத்தி இந்த திசையில் ஒரு முழுமையான

play10:53

சுழற்சியை செய்யும் போது இது t என்று வைத்துக்கொள்வோம்,

play11:54

எனவே t 0 ஆக இருந்தது t அது இப்படி இருந்தது

play12:33

t அதிகரித்துக் கொண்டே இருந்தது.

play12:37

இப்போது, அது மீண்டும் அசல் நிலைக்கு வரும்போது

play12:45

அது 0 ஆக இருக்கும் மற்றும் சுழற்சி

play12:53

மீண்டும் தொடங்கும், இல்லை.

play12:57

நீங்கள் இந்த தீட்டாவை இங்கே 0 π இங்கே 2π என

play13:09

அழைக்கிறீர்கள்.

play13:10

இதேபோல் தூண்டப்பட்ட மின்னழுத்தத்திற்கு

play13:14

இந்த அச்சை நான் மாற்ற வேண்டும் என்பதில்

play13:22

சந்தேகமில்லை, ஆனால் t டெர்மினல் மின்னழுத்தம்

play13:28

உள்ளது, இது ஒரு முழுமையான சுழற்சியை உருவாக்கும்

play13:39

மற்றும் அது மீண்டும் மீண்டும் நிகழ்கிறது.

play13:48

2 துருவ இயந்திரத்தில் நாம் சொல்கிறோம்

play13:57

electrical இது எப்பொழுதும் எலக்ட்ரிக்கல் வேறுபடுத்துவது

play14:03

உண்மையில் சரியானதல்ல.

play14:06

உண்மையில், 2 துருவ இயந்திரத்தில் எலக்ட்ரிக்கல்

play14:12

கோணமும் மெக்கானிக்கல் கோணமும் ஒன்றுதான்.

play14:17

தீட்டா எலக்ட்ரிக்கல்மட்டும் எழுத மாட்டேன்; தீட்டா

play14:24

எலக்ட்ரிக்கல் mechanical க்கு சமம், ஏனென்றால்

play14:31

கடத்தி ஒரு முழுமையான சுழற்சியை செய்தால்,

play14:39

நான் நேரத்திற்கு எதிராக பார்க்க விரும்பும்

play14:46

வெளியீடு EMF ஆனது ஒரு முழுமையான சுழற்சியை

play17:40

சரி செய்யும்.

play19:06

நான் இங்கே நிறுத்துகிறேன், அடுத்த வகுப்பில்

play22:41

நான் இதைத் தொடர்வேன், அது மிக முக்கியமான

play26:59

கருத்துகளாகும்.

play27:42

நன்றி.

Rate This

5.0 / 5 (0 votes)

関連タグ
Electromagnetic InductionUnit EMFElectrical EngineeringEducational ContentMechanical MotionCurrent FlowInductive CoilElectrical ConceptsDemonstration VideoSTEM Education
英語で要約が必要ですか?