Sistem Pengukuran dan Teknik Pengolahan Data
Summary
TLDRThe video provides an introduction to measurement systems and data processing techniques in physics experiments. It covers topics such as measurement uncertainty, the importance of calibration, systematic and random errors, and the significance of precision and accuracy. The video also demonstrates how to report measurement results, including how to calculate and express uncertainty using statistical methods. Practical examples are given, such as measuring with rulers, vernier calipers, and digital instruments, and determining relationships using least squares method in Excel.
Takeaways
- 📏 Measurement involves comparing a quantity to a standard, like using a ruler to measure length.
- ⚖️ Measurement uncertainty can arise from factors like the smallest scale of the measuring instrument, systematic errors, calibration issues, and instrument wear.
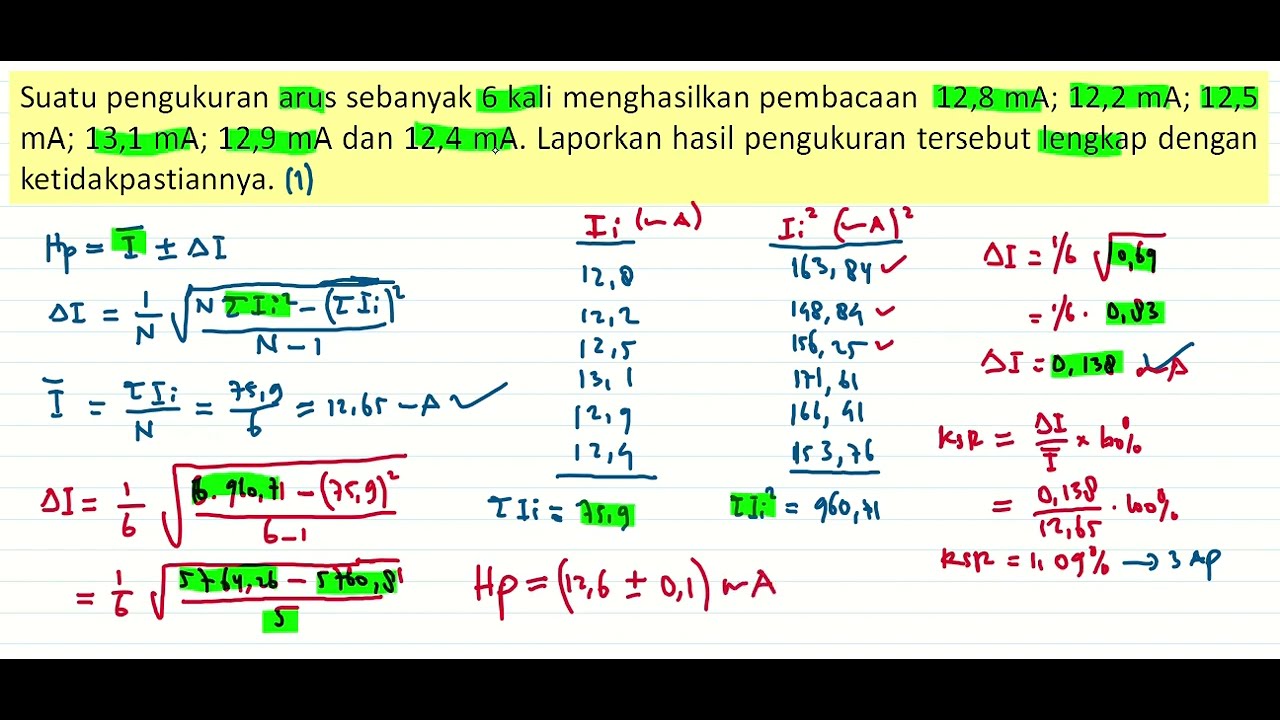
- 🔍 Reporting measurement results should include both the measured value and the uncertainty, following specific rounding rules.
- ✏️ When reporting measurements, the number of decimal places in the result should match the uncertainty, which should be expressed with one significant figure.
- 📊 For repeated measurements, the uncertainty is typically expressed as the standard deviation, and results should reflect the same precision level.
- 🧮 Measurement uncertainty can also be calculated for derived quantities, like density, using error propagation formulas.
- 📈 Graphical methods, such as plotting data and finding the best-fit line using least squares, help in analyzing experimental data.
- 💻 Tools like Excel can be used to create graphs, find best-fit lines, and calculate uncertainties.
- 🎯 Precision refers to the consistency of repeated measurements, while accuracy refers to how close a measurement is to the true value or literature reference.
- 🧮 Formulas for calculating precision and accuracy involve the standard deviation and comparison with a known reference value.
Q & A
What is the definition of measurement according to the script?
-Measurement is the process of comparing the value of a quantity against a standard. For example, to measure the length of a marker, one would use a ruler, which is a standard tool for measuring length.
What are some factors that can cause uncertainty in measurement?
-Uncertainty in measurement can be caused by several factors, including the smallest scale of the measuring tool, systematic errors such as calibration errors, zero-point errors, tool fatigue, friction in moving parts, and parallax errors.
How should the results of a measurement be reported?
-The results of a measurement should be reported as the measured value plus or minus the uncertainty. For example, if the measured length is 14.9 cm and the uncertainty is 0.05 cm, the result should be written as 14.9 ± 0.05 cm.
What is the significance of significant figures in reporting measurement results?
-When reporting measurement results, the number of decimal places in the result should match the number of decimal places in the uncertainty. Additionally, the uncertainty should be reported with one significant figure.
How do you handle measurement uncertainty when dealing with multiple measurements?
-For multiple measurements, the average of the measurements is taken as the result, and the uncertainty is determined using statistical methods. The uncertainty should be rounded to one significant figure, and the result should be adjusted accordingly.
What is the rule for rounding when the digit following the significant figure is 5?
-If the digit following the significant figure is 5, the number is rounded up if the significant figure is odd, and rounded down if it is even.
What is the difference between precision and accuracy in measurements?
-Precision refers to how close repeated measurements are to each other, while accuracy refers to how close a measurement is to the true or accepted value. A measurement can be precise without being accurate and vice versa.
How do you calculate precision according to the script?
-Precision is calculated as 1 minus the ratio of the standard deviation of the measurements to the average of the measurements, multiplied by 100%.
How do you calculate accuracy in measurements?
-Accuracy is calculated as 1 minus the ratio of the difference between the measured value and the literature value to the literature value, multiplied by 100%.
How should measurement uncertainty be determined for different types of measuring instruments?
-For digital instruments, uncertainty is the smallest scale division. For analog instruments without a vernier scale, uncertainty is half the smallest scale division. For analog instruments with a vernier scale, uncertainty is the smallest division of the vernier scale.
Outlines

Cette section est réservée aux utilisateurs payants. Améliorez votre compte pour accéder à cette section.
Améliorer maintenantMindmap

Cette section est réservée aux utilisateurs payants. Améliorez votre compte pour accéder à cette section.
Améliorer maintenantKeywords

Cette section est réservée aux utilisateurs payants. Améliorez votre compte pour accéder à cette section.
Améliorer maintenantHighlights

Cette section est réservée aux utilisateurs payants. Améliorez votre compte pour accéder à cette section.
Améliorer maintenantTranscripts

Cette section est réservée aux utilisateurs payants. Améliorez votre compte pour accéder à cette section.
Améliorer maintenantVoir Plus de Vidéos Connexes

IPA KELAS 7: OBJEK IPA DAN PENGAMATANNYA

Pendahuluan Statistika - Pertemuan 1

INTERMEDIATE { TOSS } 312, PHYSICS THEORY CHAPTERS WEIGHTAGE MARKS, PRACTICAL IMPORTANT QUESTIONS,

Pengukuran Berulang: Ketidakpastian Mutlak, Ketidakpastian Relatif | Contoh Soal

Metodologi Penelitian || Pertemuan 6 (Teknik Pengumpulan dan Pengolahan Data)

Praktikum Fisika Dasar I || Modul 1 Pengukuran dan Ketidakpastian
5.0 / 5 (0 votes)
