Pemeriksaan Golongan Darah Metode Tabung
Summary
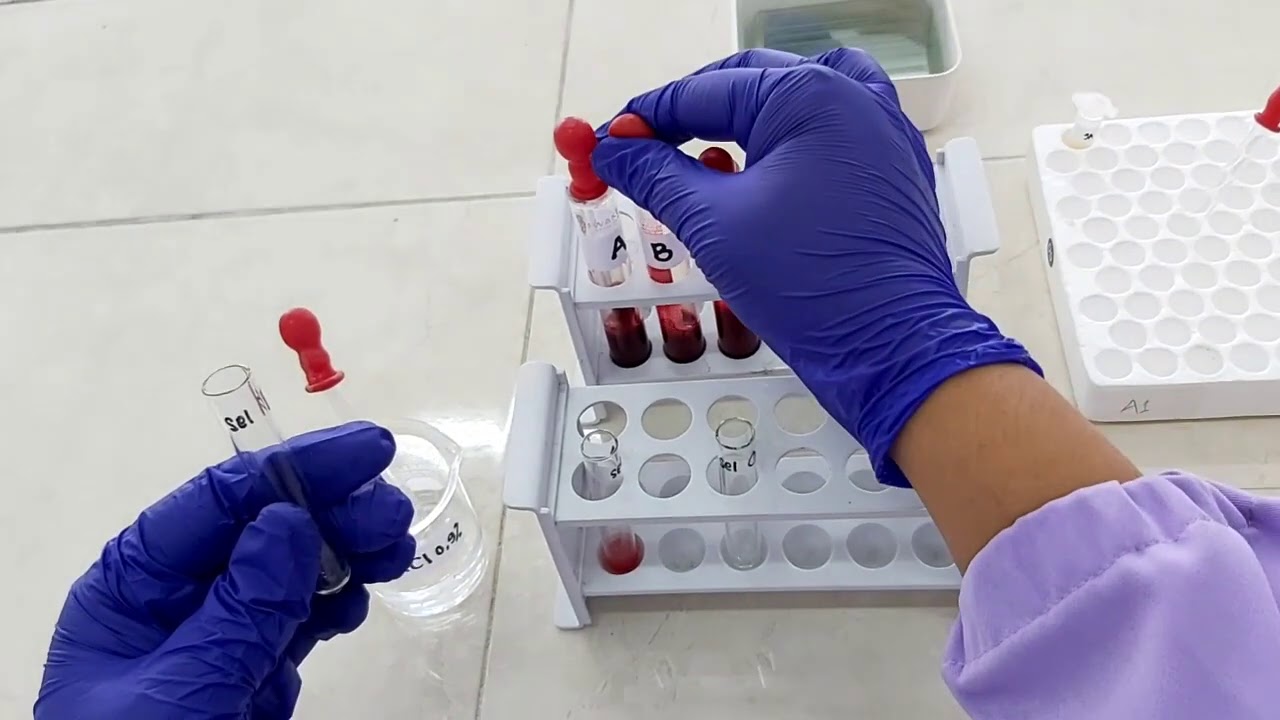
TLDRThis video demonstrates the procedure for blood group testing using the tube method in a limnology practical session. It guides viewers through preparing a 2% blood suspension with NaCl, adding specific antibodies (Anti-A, Anti-B, Anti-AB, Anti-D), and incubating the mixture. The process includes centrifugation and observation for agglutination, which indicates a positive reaction. The video clearly explains how to interpret results to determine both the ABO blood group and the Rh factor, illustrating a sample that tests as blood group B with Rh positive. The concise demonstration emphasizes proper technique, observation, and understanding the principle of antigen-antibody reactions in blood typing.
Takeaways
- 😀 The video demonstrates blood group testing using the tube method in a limnology practical session.
- 😀 The purpose of the test is to determine both ABO blood group and Rh factor of a blood sample.
- 😀 Essential materials include Anti-A, Anti-B, Anti-AB, Anti-D serums, 0.9% NaCl, test tubes, para film, and a centrifuge.
- 😀 A 2% blood suspension is prepared by mixing 1 drop of blood with 49 drops of NaCl, or 2 drops of blood with 98 drops of NaCl.
- 😀 Each test tube receives one drop of the respective anti-serum before adding the blood suspension.
- 😀 After adding the blood suspension, the contents are homogenized and the test tubes are sealed with para film.
- 😀 Incubation is performed for 5–15 minutes to allow agglutination reactions to occur.
- 😀 Test tubes are then centrifuged at 1000 rpm for 15 seconds to enhance visibility of agglutination.
- 😀 Positive agglutination indicates a reaction between blood antigens and the anti-serum, while no clumping indicates a negative reaction.
- 😀 In the provided example, the sample blood was determined to be blood group B with Rh positive.
- 😀 Proper homogenization, incubation, and centrifugation are critical to obtaining accurate blood typing results.
- 😀 The method offers a clear visual confirmation of blood group and Rh factor through agglutination patterns.
Q & A
What is the main topic of the video?
-The video is about blood group testing using the tube method, explaining the tools, materials, and procedure to determine a sample's blood type and Rh factor.
What is the purpose of using NaCl 0.9% in the procedure?
-NaCl 0.9% is used to dilute the blood sample to prepare a 2% blood suspension, which ensures proper mixing with antibodies for accurate agglutination results.
Which antibodies are used in this blood group testing method?
-The antibodies used are anti-A, anti-B, anti-AB, and anti-D (for Rh factor testing).
How is the blood suspension prepared?
-To prepare a 2% blood suspension, 49 drops of NaCl 0.9% are mixed with 1 drop of the blood sample, creating a homogeneous mixture ready for testing.
What is the next step after adding antibodies and blood suspension to the test tubes?
-After adding the blood suspension and antibodies to the test tubes, each tube is homogenized, covered with parafilm, and incubated for 5–15 minutes.
Why is centrifugation used in this method?
-Centrifugation at 1000 rpm for 15 seconds helps to settle the cells and enhances the visibility of agglutination, making it easier to read the results accurately.
How are the test results interpreted?
-If agglutination occurs in a tube, it indicates a positive reaction for that antigen. No agglutination indicates a negative reaction. The combination of positive and negative reactions determines the blood group and Rh factor.
What blood group and Rh factor were determined in the sample used in the video?
-The sample tested in the video was identified as blood group B with Rh positive.
Why is it important to shake the test tube before reading the results?
-Shaking ensures that any settled cells are resuspended, which allows accurate observation of agglutination and prevents false negative results.
What is the main difference between the slide method and the tube method for blood group testing?
-The main difference is in the tools and materials used: the slide method uses a slide for testing, while the tube method uses test tubes and involves incubation and centrifugation, which can provide more precise results.
Outlines

Dieser Bereich ist nur für Premium-Benutzer verfügbar. Bitte führen Sie ein Upgrade durch, um auf diesen Abschnitt zuzugreifen.
Upgrade durchführenMindmap

Dieser Bereich ist nur für Premium-Benutzer verfügbar. Bitte führen Sie ein Upgrade durch, um auf diesen Abschnitt zuzugreifen.
Upgrade durchführenKeywords

Dieser Bereich ist nur für Premium-Benutzer verfügbar. Bitte führen Sie ein Upgrade durch, um auf diesen Abschnitt zuzugreifen.
Upgrade durchführenHighlights

Dieser Bereich ist nur für Premium-Benutzer verfügbar. Bitte führen Sie ein Upgrade durch, um auf diesen Abschnitt zuzugreifen.
Upgrade durchführenTranscripts

Dieser Bereich ist nur für Premium-Benutzer verfügbar. Bitte führen Sie ein Upgrade durch, um auf diesen Abschnitt zuzugreifen.
Upgrade durchführenWeitere ähnliche Videos ansehen


5.0 / 5 (0 votes)
