Concave Mirrors Worked Example | Ray Tracing 2 of 5 | Geometric Optics | Doc Physics

Doc Schuster
28 Feb 201318:17

Summary

TLDRThe video covers the principles of light reflection, focusing on the behavior of four principal rays (P, F, C, and M rays) when interacting with mirrors. The speaker explains how these rays reflect off both diffuse and specular reflectors and how they converge to form images. Through various examples, including scenarios involving real and virtual images, the speaker also demonstrates how image size and orientation change depending on the object's position relative to the mirror. The discussion concludes with a focus on virtual images and the properties of convex mirrors.

Takeaways

  • 🔆 The script discusses four principal rays involved in image formation: the P Ray, F Ray, C Ray, and M Ray.
  • 📏 When an object reflects light diffusely, rays scatter in all directions, unlike a specular reflector like a mirror.
  • 🌟 The P Ray comes in parallel and bounces out through the focal point after hitting the mirror.
  • 🎯 The F Ray travels through the focus before hitting the mirror and exits parallel to the principal axis.
  • 🏹 The C Ray travels straight through the center of curvature and bounces back along the same path.
  • 🔵 The M Ray hits the center of the mirror and bounces back at the same angle, following the principal axis.
  • 🔍 Real images are formed where rays converge, and they can be projected on a screen since actual light is present.
  • 📉 The height of the image is typically smaller than the object and can be inverted, as seen in certain examples.
  • 🔄 Virtual images appear behind the mirror, but no light actually exists there, so they cannot be projected.
  • 🪞 The script hints at moving to convex mirrors next, which are easier to understand than concave mirrors.

Q & A

  • What are the four principal rays mentioned in the script?

    -The four principal rays are the P Ray (Parallel Ray), the F Ray (Focus Ray), the C Ray (Center Ray), and the M Ray (Middle Ray). These rays are used to trace the path of light and determine where an image forms.

  • What is the key difference between a diffuse reflector and a specular reflector?

    -A diffuse reflector scatters light in all directions due to its rough surface, making it possible to see the object from different angles. In contrast, a specular reflector (like a mirror) reflects light at the same angle it arrives, making it difficult to see the object itself.

  • How does the script explain image formation using the four principal rays?

    -The script explains that an image is formed at the point where the outgoing rays from the mirror converge. These rays include the P Ray, which comes in parallel and exits through the focus, the F Ray, which enters through the focus and exits parallel, the C Ray, which travels straight through the center, and the M Ray, which reflects off the center of the mirror.

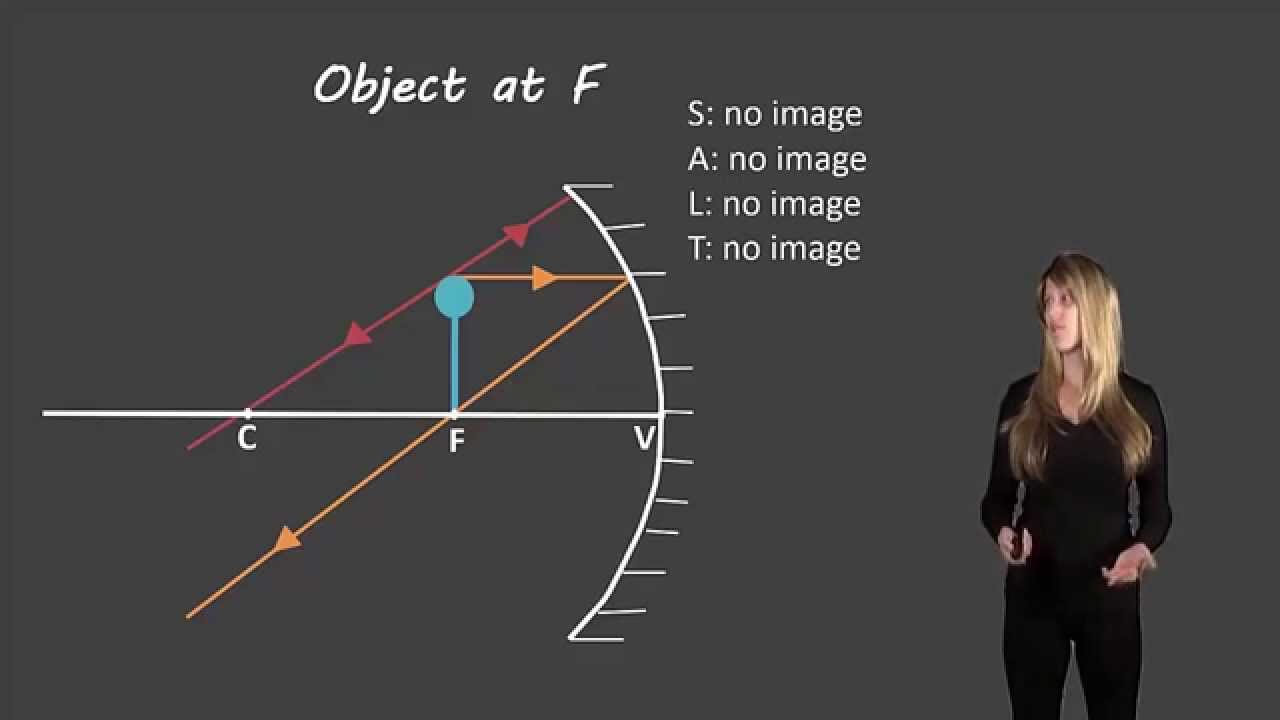
  • What happens to an object placed at the focal point of the mirror?

    -When an object is placed at the focal point, the outgoing rays do not converge, and the image forms at infinity, appearing infinitely large but still taking up the same fraction of the viewer’s field of vision.

  • What is the significance of the ‘line of action’ in the context of the mirror?

    -The line of action refers to the axis where the principal rays intersect the mirror. It's essential for determining where the rays meet to form an image, and it helps in tracing the correct path of the rays.

  • What properties does a real image have according to the script?

    -A real image is formed where outgoing rays converge, and it can be projected onto a screen because there is actual light at that location. The real image is inverted and can be smaller or larger than the object, depending on its distance from the mirror.

  • How does the size and distance of the image compare to the object in this example?

    -In the first example, the object is 4 cm tall and 18 cm from the mirror, while the image is 2.3 cm tall (negative because it's inverted) and 9 cm from the mirror. This shows that the image is smaller and closer to the mirror.

  • What changes when an object is placed between the center of curvature and the focal point?

    -When the object is placed between the center of curvature and the focal point, the image is larger and still inverted. In the example provided, the image is 6 cm tall and 16 cm from the mirror.

  • What is a virtual image, and how does it differ from a real image?

    -A virtual image is one that cannot be projected onto a screen because there is no actual light at the location of the image. It appears upright and is located on the opposite side of the mirror from where the object is placed, unlike a real image, which is formed by converging light rays.

  • Why do the rays seem to diverge when using a concave mirror in the final example?

    -In the final example, the rays seem to diverge because the image is virtual and located behind the mirror. The rays never physically cross, but to the eye, it appears as though they come from a point behind the mirror, creating the illusion of a larger object.

Outlines

00:00

🔍 Introduction to Light Rays and Reflection

In this paragraph, the speaker introduces the four principal rays (P Ray, F Ray, C Ray, M Ray) that are essential for understanding reflection. The object being studied is a diffuse reflector, which scatters light in all directions, unlike a specular reflector like a mirror. The paragraph explains how light reflects differently on surfaces and introduces the concept of how light behaves when hitting various objects. This serves as the foundation for exploring light rays and their interactions.

05:01

🧙‍♂️ A Mysterious Encounter with a Puzzle

The speaker recalls a childhood memory of an encounter with an old man in Wyoming who gave him mysterious scrolls. The man hinted that these scrolls would hold answers to something important in the speaker’s life. The scrolls contain drawings of objects and instructions to find out where images are formed, a challenge that the speaker now faces. This sets up a metaphorical journey where the speaker attempts to understand the deeper meanings behind these rays and mirror principles, starting with the P Ray.

10:02

🌈 Tracing the P Ray and Other Rays

Here, the speaker begins drawing rays and analyzing their behavior. The P Ray enters parallel and exits through the focus, while the F Ray passes through the focus and exits parallel. The C Ray travels through the center of curvature, and the M Ray bounces back at the same angle. By tracing these rays, the speaker explains how the image is formed at the point where the rays converge. The explanation highlights how diverging rays from an object are refocused by the mirror, creating a real image where the rays meet.

15:02

📏 Measuring Image Height and Distance

The speaker discusses how to calculate the height and distance of the image formed by the mirror. Using the object’s height (4 cm) and distance from the mirror (18 cm), the speaker determines that the image is smaller (2.3 cm), inverted, and located at a distance of 9 cm from the mirror. The explanation emphasizes that the image is real and can be captured on a screen, as it is formed by converging rays. The calculations and proportions demonstrate how the mirror alters the object’s appearance in terms of size and orientation.

🔄 Understanding Rays at the Center of Curvature

The object is placed at the center of curvature, and the speaker continues tracing the principal rays (P Ray, F Ray, C Ray, and M Ray) to locate the image. The rays converge at the center, creating an image that is inverted but of the same size as the object. This exercise demonstrates that when an object is at the center of curvature, the image formed is identical in size but flipped upside down. The speaker also notes that the image distance and object distance from the mirror are the same.

🔬 Object Between the Focal Point and Center of Curvature

The speaker examines a case where the object is between the center of curvature and the focal point. By tracing the rays, the image is determined to be larger than the object and still inverted. The speaker comments on the precision needed when drawing these rays, as slight deviations can cause noticeable errors. The experiment shows how the image becomes magnified when the object moves closer to the focal point, while still maintaining the inverted orientation. This setup leads to an image that is larger than the object.

🌌 Infinity and Focal Point Mystery

The object is now placed at the focal point, which creates an interesting scenario. The speaker explains that when the object is at the focal point, the rays emerge parallel, and the image appears to be at infinity. This means the image is infinitely large and far away, leading to an abstract conclusion where the speaker humorously notes the impossibility of truly visualizing an infinite image. This exploration emphasizes the unique behavior of rays at the focal point and how no real image is formed when the object is positioned there.

👁 Virtual Image Formation Behind the Mirror

In this final experiment, the object is placed beyond the focal point, and the speaker traces the rays that appear to intersect behind the mirror. Even though the rays do not actually cross behind the mirror, the eye perceives a virtual image as if it exists on the opposite side. The image is upright and larger than the object, forming a virtual, magnified image. The speaker concludes by explaining the properties of virtual images: they are upright and located on the opposite side of the mirror, though no light actually exists there.

Mindmap

Keywords

💡P Ray

The 'P Ray' refers to a principal ray in ray diagrams for mirrors and lenses. It travels parallel to the principal axis and, upon reflection, passes through the focal point of a mirror. In the script, the P Ray is described as coming in parallel and then bouncing out through the focus, demonstrating the basic behavior of light rays in mirror reflection.

💡F Ray

The 'F Ray' is another principal ray used in ray tracing. It enters through the focal point and exits the mirror parallel to the principal axis. In the video, the F Ray is used to illustrate how rays behave when entering at a specific angle, helping viewers understand how images form in concave mirrors.

💡C Ray

The 'C Ray' is a ray that passes through the center of curvature of the mirror. In the script, it is described as going straight through the center and bouncing back along the same path. This ray helps determine where an image will form in relation to the object and the mirror.

💡M Ray

The 'M Ray' is a principal ray that hits the center of the mirror and reflects at the same angle. In the script, the M Ray is described as being drawn in blue, hitting the mirror at the center, and reflecting back at an equal angle. It helps demonstrate how light reflects symmetrically.

💡Diffuse reflection

Diffuse reflection refers to the scattering of light in many directions after hitting a rough surface. The video explains how objects like Newton's surface, which is bumpy on a microscopic level, reflect light diffusely, allowing us to see them from various angles. This contrasts with specular reflection, where light reflects at the same angle, as with a smooth mirror.

💡Specular reflection

Specular reflection occurs when light reflects off a smooth surface, such as a mirror, at the same angle as it hits the surface. In the video, it’s mentioned as the type of reflection that doesn’t allow us to see an object’s details clearly, in contrast to diffuse reflection, which makes an object visible from different perspectives.

💡Line of action

The 'line of action' is the axis along which light rays interact with the mirror. It’s a critical reference line in ray diagrams. The video emphasizes that the line of action should intersect the mirror, serving as a guide for where rays will reflect and form an image. It plays a central role in determining the position of the rays.

💡Principal axis

The principal axis is the imaginary line that runs through the center of curvature and the focal point of a mirror or lens. It acts as a reference line for understanding how rays behave in optical systems. In the video, it is often referred to when discussing how the P Ray, F Ray, and other rays interact with the mirror.

💡Real image

A real image is formed when light rays converge and can be projected onto a screen. In the script, the real image is described as one where the rays physically intersect, and if you place a piece of paper at that point, you would see the image. Real images are inverted and can be smaller or larger than the object, depending on the ray diagram.

💡Virtual image

A virtual image occurs when light rays only appear to converge but don’t actually do so. In the script, it’s noted that virtual images are upright and appear on the wrong side of the mirror. The video uses virtual images to explain how magnifying mirrors work, as the viewer perceives the object as being larger and on the opposite side of the mirror.

Highlights

Introduction of the four principal rays: the P Ray, F Ray, C Ray, and M Ray, which are essential for studying light reflection and image formation.

Explanation of diffuse reflectors versus specular reflectors and their differences in light behavior.

The P Ray travels parallel to the principal axis and reflects through the focus of the mirror.

The F Ray enters through the focus and reflects parallel to the principal axis.

The C Ray travels through the center of curvature and reflects back along the same path.

The M Ray hits the mirror at the principal axis and reflects back at the same angle.

When the outgoing rays converge, a real image is formed, which can be captured on a screen.

An object placed at different positions relative to the mirror (e.g., between the center and focal point) affects the size and orientation of the image.

At the focal point, the rays reflect parallel and do not form an image, implying infinite magnification.

Virtual images are upright and located on the 'wrong' side of the mirror, where no actual light converges.

Explanation of how mirrors can create the illusion of a larger object by forming virtual images behind the mirror.

Illustration of how different rays interact with concave mirrors and the formation of both real and virtual images.

Detailed exploration of how the distance and height of images relate to the object’s position using ray diagrams.

Description of how light refocuses after being reflected, showing the role of the mirror in controlling image size and position.

Complex analysis of ray tracing inaccuracies, errors, and the visual interpretation of where image formation occurs.

Transcripts

play00:00

all right here are the ground rules one

play00:03

these are the four rays that we're going

play00:06

to be addressing the P

play00:08

Ray the F Ray the C Ray and the M Ray

play00:14

excellent so you also need to know

play00:18

ground rule number two that when there

play00:20

is an object and my object's going to

play00:22

kind of be like this thing right here it

play00:25

represents any possible thing I guess if

play00:28

this object gets bigger it would look

play00:30

like that and if it flipped over it

play00:31

would look like that uh and I guess it

play00:34

got shorter there also but remember that

play00:37

rays of light are coming out from this

play00:39

object if it is a diffuse reflector and

play00:41

I hope that your object is if you want

play00:43

to look at something that's a specular

play00:45

reflector then you'll have trouble

play00:46

really seeing what it looks like what do

play00:48

like what does a mirror really look like

play00:50

right

play00:51

so Newton though is lovely because you

play00:54

can see him from every angle because

play00:55

he's getting hit by light from

play00:56

everywhere and he's also uh reflecting

play00:59

that light from everywhere and that's

play01:00

because the surface of Newton is really

play01:02

bumpy like on a microscopic scale the

play01:04

surface of a mirror is like that though

play01:06

so every Ray that comes in comes out at

play01:07

the same angle where those guys are

play01:09

equal but here you got a ray coming in

play01:12

and there's a chance it's going to go

play01:13

that direction and if it's a little bit

play01:14

over it's going to go perhaps that

play01:16

direction if it's right here it's going

play01:17

to go that direction this is a diffuse

play01:19

reflector cuz lights's coming out every

play01:21

possible Direction but we're going to be

play01:23

studying only the four principal rays

play01:25

that we discussed it just a moment ago

play01:27

the P Ray the F Ray the C Ray and the M

play01:29

Ray here we go when I was a small

play01:32

boy my parents took me to Wyoming and at

play01:35

a quick trip an old decrepit man came up

play01:38

to me on my way to the bathroom and he

play01:40

said

play01:41

Son take these Scrolls they may be

play01:44

useful and he handed me this

play01:46

packet and it's time it's that point in

play01:49

my life when I'm ready to understand

play01:52

what he meant and why he gave them to me

play01:55

and uh oh there was one more thing that

play01:57

he said he said always remember the line

play01:59

of action of the mirror is not the

play02:01

mirror surface itself it has to be drawn

play02:03

where the principal axis intersects the

play02:05

mirror itself all right so he clearly

play02:09

has drawn for me an object on each one

play02:12

of these Scrolls and we'll have to find

play02:14

out where the image is formed and

play02:16

perhaps it will be the key to a puzzle

play02:19

I'll start with the pay each time and

play02:22

the pay comes in parallel and it's going

play02:24

to be like

play02:26

this and then it will bounce out through

play02:29

the focus and the focus is here so it

play02:32

will go like this and I am going to put

play02:36

arrows on the outgoing Rays so that I

play02:38

become clear on how this is working the

play02:41

next Ray is the F Ray the Fay comes in

play02:45

through the focus watch it wait for it

play02:48

it hits the line of action of the mirror

play02:51

and comes out

play02:54

parallel there it is coming out parallel

play02:58

and that is our F Ray leaving and then

play03:02

the next one that we like to discuss is

play03:04

the C Ray which is coming straight

play03:07

through the

play03:09

center and going back out straight

play03:12

through the center oh boy we've got

play03:14

ourselves a little problem Houston it's

play03:16

going to be like

play03:18

this whoa not like that it'll be like

play03:21

that where that's our C Ray hitting the

play03:24

line of action of the mirror coming

play03:25

right back out and then uh well I guess

play03:28

there one more right let's just go crazy

play03:30

and draw ourselves an mray I like to use

play03:32

blue for my mray the mray will be

play03:34

hitting the center of the

play03:38

mirror where it hits the principal axis

play03:41

and bouncing back out at the same angle

play03:44

looks pretty good there's my M Ray where

play03:47

all four of my Rays intersect it is

play03:50

there that an image is formed cuz see

play03:53

it's like this this is like here's a

play03:54

little bit of image Theory this thing is

play03:57

clearly a source of rays and they're

play03:59

diverging they're all going out here and

play04:02

they're spreading apart from each other

play04:03

and we've only drawn four of them there

play04:05

are really a multitude an infinite

play04:07

number of rays coming off in all

play04:08

possible directions but as these Rays go

play04:11

and hit the mirror the mirror refocuses

play04:13

them they were spreading apart and now

play04:15

they're converging again look at them

play04:17

all coming in here and they're ready to

play04:18

say hey and if you put a piece of paper

play04:22

right there I can't use that color I

play04:24

need to use the color for um for the

play04:26

object I think so I don't get confused

play04:28

if you put a piece of paper

play04:30

right here a screen as it were then you

play04:32

would find an image so let's label these

play04:35

things right here you've got your

play04:38

object and you've got your image and

play04:41

wherever two rays outgoing intersect

play04:44

then you will have a real image it's

play04:47

real because there's actually light

play04:49

there and if you put a piece of paper

play04:50

there you would see something you would

play04:53

see the arrow or the flower pot or

play04:56

whatever you had here as your object I

play04:58

hope it's a flower pot

play05:00

all right so if you've got a real image

play05:03

right here you can ask questions like

play05:05

how tall is that image and so the height

play05:08

of the image could be a question that

play05:09

you want to know and the distance of the

play05:11

image from the lens as well I already

play05:13

wrote down the height of the object was

play05:14

4 cm and it's 18 cm away from the mirror

play05:16

so we expect the height of the image to

play05:17

be a little bit less and we expect its

play05:19

distance from the mirror to be a little

play05:20

bit less also I am getting that it is

play05:23

2.3 CM 2.3 CM but guess what it's

play05:28

negative so I'm going to quickly change

play05:31

this so it says height of the image is -

play05:34

2.3 CM cuz it's below the line all right

play05:37

and the distance of the image well the

play05:39

distance of the image it's on the proper

play05:41

side of the mirror and that seems to be

play05:42

9 cm 9 cm interesting this is like a

play05:46

factor of two and that's like a factor

play05:47

of two with a minus sign in there but

play05:49

clearly the image is smaller than the

play05:51

object so we go to his next clue his

play05:55

next clue is an object at the center oh

play05:59

dang we put a line of action down here's

play06:03

the line of action of the mirror and

play06:05

we're going to be acting on that line of

play06:07

action and we need to make four Rays the

play06:09

pay pay comes in parallel ready wait for

play06:13

it here's our P Ray parallel to the axis

play06:17

and it goes out through the focus

play06:20

Pew mhm that is our P Ray and then we've

play06:25

got to have a um dang I lost that cap

play06:29

sorry

play06:31

sorry FR frame comes in through the

play06:36

focus comes out this direction

play06:42

parallel to the

play06:45

axis okay and oh shoot this is so badly

play06:50

done unbelievable all right well we're

play06:52

going to have to fudge it a little bit

play06:53

on the next ones uh we've got a Cay that

play06:56

is coming through the center and bounc

play06:59

ing out at the same angle at which it

play07:01

came in and it looks like it ought to be

play07:04

something like

play07:07

this that's our Cay and then an M Ray

play07:10

comes in through the middle and oh gosh

play07:15

did I say that was the C Ray that's

play07:17

definitely not the C Ray that's oh no

play07:20

that's the M Ray the C Ray to switch

play07:22

colors on you goes straight through C

play07:24

and then hits the mirror or does it no

play07:26

it doesn't really so I've got these

play07:28

three that are intersecting right here

play07:30

you see that I've got those three that

play07:32

are intersecting right there and I've

play07:33

definitely got an errant um what is this

play07:36

this green one that's a pay that pay

play07:38

really sucks and I'm not sure why well

play07:40

anyway don't worry about that if you've

play07:41

got three that intersect at a certain

play07:43

place that's definitely telling you

play07:44

something and I'm going to say then that

play07:46

my image is right here where these guys

play07:49

are hitting so there's the object and

play07:53

here's the image the outgoing rays are

play07:56

converging right there and the cool

play07:58

thing is they're at C which is really

play08:00

cool so uh notice it's just about the

play08:02

same height I'm not going to bother to

play08:04

measure it it ought to be the same

play08:05

height the height of the image is also 4

play08:07

cm but it's negative it's down below the

play08:10

axis and the distance of the image is 13

play08:13

cm so cool that's again the same ratio

play08:15

everything's equal with a minus sign

play08:18

there next up they've put the object in

play08:21

between the center of curvature and the

play08:24

focal point so okay we're going to have

play08:27

to be careful we need a pay

play08:29

the pay comes in parallel and oh line of

play08:33

action my apologies line of action right

play08:36

[Music]

play08:38

here the pay comes in

play08:43

parallel and goes out through the

play08:52

focus you should be drawing these at

play08:54

home do

play08:56

it and then we're going to get you an F

play08:59

Ray and the F Ray is supposed to come

play09:00

through the focus and go out

play09:04

parallel notice there's a lot of room

play09:07

for air here if I'm just slightly off

play09:09

then everything's going to be

play09:11

crazy but there

play09:13

is my f

play09:16

Ray and uh let's keep going we need a

play09:19

cray and the cray

play09:22

whoa the cay doesn't really make much

play09:25

sense does it so the cray comes as if it

play09:29

were coming from C but it leaves the

play09:33

object really that's what's supposed to

play09:34

happen it's supposed to leave the object

play09:35

and go that way that's the beginning of

play09:38

my C Ray it will ultimately hit the line

play09:40

of action up here way up here and then

play09:42

it will come back down

play09:45

through the center and it'll be going

play09:48

that direction when it comes back down

play09:50

so that's my C Ray a little bit weird

play09:53

Okay and then I want to give you an mray

play09:55

and the mray is supposed to come off of

play09:57

here here hit the middle and bounce out

play10:00

at the same angle let's see what the

play10:02

mray does for us I'm thinking that the

play10:04

mray is probably going to be shooting

play10:05

somewhere like right here uh we could

play10:07

aim there if you want or we could aim

play10:09

there I don't really care I'm going to

play10:11

kind of split the difference and say

play10:12

that the image must be somewhere in

play10:14

between all of these things so these

play10:16

four lines should be intersecting at a

play10:18

single point but they're not go figure

play10:21

they never quite do and this is

play10:24

approximately where my image is so we've

play10:26

got an object here and we've got an

play10:29

image here notice that the image is

play10:32

still inverted it's upside down but it's

play10:35

bigger now than the object is so if I'm

play10:37

in between C and F then I get this oh

play10:40

man the image is inverted so I'm going

play10:41

to say the height of the image is

play10:44

negative something let's find out how

play10:45

big it is it looks like it's

play10:49

-6 and the distance of the image is

play10:54

16 the distance of the image is 16 cm is

play10:58

on the proper side so it kind of looks

play11:00

like we're doing a uh 50% increase kind

play11:02

of thing these ratios all kind of make

play11:04

sense so let's go to the next puzzle and

play11:07

uhoh it's at the focal

play11:11

point let's begin we need a p p comes in

play11:16

parallel oh we need a line of action

play11:17

first line of

play11:19

action if you're getting bored you can

play11:21

stop watching this because I'm doing the

play11:23

same thing every single time the P comes

play11:26

in parallel hits the line of action and

play11:30

goes out through the focus oh

play11:34

interesting

play11:35

uhuh uhhuh wait a second I probably

play11:39

should continue this a little bit more

play11:42

all right and uh the next one is the Fay

play11:45

the Fay is supposed to go out through

play11:47

the focus and that can't really happen

play11:49

it's never going to hit the mirror so

play11:50

I'm not going to draw the Fay my C Ray

play11:53

though my C is supposed to start as if

play11:55

it had come from

play11:57

C so it's going to be like this it's

play12:00

going to be kind of kind of like this

play12:02

it's going to be kind

play12:04

of and then it's going to come back out

play12:06

in the same way and go try to go back

play12:08

through C again it's supposed to be

play12:11

straight here uhhuh and that guy was

play12:14

leaving also and there's one more Ray

play12:17

that I can do my M Ray is supposed to go

play12:21

through I didn't quite hit see there but

play12:23

I'm trying to make it look pretty so I

play12:26

have to cheat a tiny bit there and then

play12:29

it's going to come back out at the same

play12:31

angle at which it entered and it's going

play12:33

to be doing that so we've got three rays

play12:38

and these Rays well where are they going

play12:40

to meet haha I'll tell you they're going

play12:42

to meet at Infinity which means my

play12:44

object is at infinity and it is

play12:46

infinitely big wait a second you're

play12:49

saying right now that the height of the

play12:52

image is negative infinity and you're

play12:55

saying that the distance of the image is

play12:59

Infinity cool that means we have some

play13:02

very interesting magnification going on

play13:04

I guess it's infinite magnification but

play13:05

the issue is if you looked at the

play13:08

image on a screen way over there you

play13:11

would find that it is well still taking

play13:14

up the same fraction of your field of

play13:16

view because it's infinitely far away

play13:17

but it's infinitely big so you can still

play13:19

see it lovely doesn't make much sense

play13:21

not really putting things on the focal

play13:23

point is kind of weird there is no

play13:27

converging that happens because that's

play13:29

the essence of a focal point at the

play13:31

focal point if you send something in

play13:32

you're going to get out parallel rays so

play13:34

you don't get an image formed but really

play13:36

there is an image it's just infinitely

play13:37

far away I don't want to talk about this

play13:39

anymore let's go on there's oh dang and

play13:43

the final scroll we put more space over

play13:47

on this side let's see what he's going

play13:48

to do we need a pay the pay comes in

play13:51

here parallel and then goes out through

play13:54

the focus like this the p eay goes out

play13:59

through the focus like that and then uh

play14:04

what's the next one we do the F Ray the

play14:07

F Ray comes as if it had started at the

play14:10

focus see that's what it's all about

play14:12

it's like it's not going through the

play14:13

focus it's as if it started at the focus

play14:15

and it's going to hit the line of action

play14:17

of the mirror oh no I forgot my line of

play14:19

action never forget your line of action

play14:20

students never never never never never

play14:23

never do

play14:24

that so I'm supposed to go out through

play14:28

here as if I came from the focus and

play14:30

then when I hit the line of action of

play14:32

the mirror I'm going to go out parallel

play14:34

watch this I'll be

play14:37

like so it's all that direction and such

play14:41

and then oh this is kind of weird we've

play14:44

got a couple more that we can draw the C

play14:46

Ray is as if it had started at C and

play14:50

then it will go back towards C so it'll

play14:53

come order of doing this is pretty

play14:55

important it's going to go towards the

play14:57

mirror and then it's going to hit the

play14:58

mirror here and it's going to bounce

play14:59

back that direction so when it gets to

play15:02

here that's an outgoing Ray again and

play15:04

then there's finally one more Ray the M

play15:07

Ray is going through the

play15:10

middle mhm one more principal Ray going

play15:13

through the middle and coming back out

play15:15

at that same angle which is probably

play15:17

something like this and you notice that

play15:20

these rays will absolutely never cross

play15:22

each other but something very

play15:23

interesting is happening it's as if they

play15:25

once crossed each other that's a little

play15:27

bit weird but if you put your eye over

play15:29

here you could look here put that pretty

play15:32

blue eye right there you're looking this

play15:34

direction and you're thinking wait a

play15:36

second those Rays seem to be coming from

play15:38

an object there might be something over

play15:41

there shall we consider whether there's

play15:43

something over here behind the mirror

play15:44

there's nothing here but

play15:48

Darkness all the light is over

play15:51

here but it's as if something is over

play15:54

here causing an image whoa causing these

play15:59

Rays to come out from each other so

play16:00

let's Trace them back I'm going to trace

play16:02

where it looks like this blue one came

play16:04

from it looks like the blue one came

play16:06

from over

play16:07

here somewhere and I'm going to trace

play16:11

where this orange one came from it looks

play16:13

like the orange one came from right here

play16:16

oh sorry about

play16:21

that and it looks to me like the purple

play16:24

one came

play16:27

from I'm gonna oh gosh that's really

play16:30

disappointing okay well we'll just deal

play16:33

with

play16:34

it the purple one looks like it came

play16:37

from over here and the green one seems

play16:40

to have come

play16:43

from right in the middle of all of

play16:47

these good I got three lines that worked

play16:49

out and my C is just the absolutely

play16:51

terrible one I think I maybe didn't

play16:53

measure where my F and C were in

play16:55

relation to each other quite well so

play16:57

there is a apparently something here

play17:01

there's apparently something

play17:05

here is there something there of course

play17:08

not it's dark on the other side of the

play17:09

mirror but your eye thinks that there's

play17:11

something there and that's how we can

play17:13

use this kind of a mirror as a magnifier

play17:15

because when I look at it I see not the

play17:18

object I see the image as even bigger

play17:21

than it actually is so the distance well

play17:24

let's see first the height of the image

play17:26

first of all it's positive that's

play17:28

Pleasant

play17:28

and where the object was 4 cm this

play17:31

sucker is actually 9 cm oh cool what

play17:35

about the distance of the image well

play17:37

it's on the wrong side of the mirror so

play17:38

that's offensive to me and I'm going to

play17:40

say that that uh distance is about 4

play17:44

cm hm cool so what we've got right here

play17:48

is not real it's a virtual

play17:52

image two properties of virtual images

play17:54

that I want to note

play17:56

one it's upright

play17:59

two it's on the wrong side of the mirror

play18:02

there's nothing there if I put a piece

play18:05

of paper right there I would not see

play18:08

anything cuz there's no light there it's

play18:11

Darkness that's all I have to say with

play18:12

this we're going to do some convex

play18:14

mirrors next they're a lot easier

Rate This

5.0 / 5 (0 votes)

Ähnliche Tags
light reflectionray tracingmirrorsimage formationphysics lessonsopticsdiffuse reflectionspecular reflectionreal vs virtual imagesscience education
Benötigen Sie eine Zusammenfassung auf Englisch?