Using LUTs with your Blackmagic Camera
Summary
TLDRこのビデオスクリプトは、Blackmagic DesignのJakeがLot(ルックアップテーブル)の使い方について説明し、カスタムLotをDaVinci Resolveからカメラにアップロードする方法を紹介しています。Lotは、カメラが特定の色と明るさの入力に対してどのような色と明るさの出力を表示するかを指示します。ビデオでは、Pocket Cinema Camera 6K Proの4つのプリロードされたLotと、33ポイントのCubeを使用してカスタムLotを作成し、SDカードに保存してからカメラにアップロードする手順を示しています。また、カメラの設定やモニター設定でカスタムLotを適用する方法や、Blackmagic raw footageを使用する際のダイナミックレンジ設定の重要性についても説明しています。最後に、Lotをクリップに適用する方法や、ProResで記録する際のオプションについても触れています。
Takeaways
- 🎥 ブラックマジックデザインのJakeがLot(ルックアップテーブル)のアップロード方法について説明しています。
- 📹 Pocket Cinema Camera 6K Proには、4つのLotがプリロードされていますが、カスタムLotをアップロードすることができます。
- 🌈 Lotは、特定の色と輝度入力に対してカメラがどのような色と輝度アウトプットを表示するかを指示します。
- 🎨 DaVinci ResolveからカスタムLotを直接カメラにアップロードする方法が紹介されています。
- 📂 33ポイントのCubeを選択して、カスタムLotを名付けてSDカードに保存します。
- 🔄 SDカードをカメラに挿入し、メニューからLotを管理するオプションを選択して、カスタムLotをインポートします。
- 🔧 Lotを選んで適用すると、LCDやHDMIアウトプットにカスタムLotが使用されます。
- 🖥 モニター設定のDisplay 3D LotでカスタムLotを適用し、画面で確認できます。
- 🔘 F2のカスタム機能ボタンにLotの表示を割り当て、Lotのオン/オフを確認できます。
- 🎞 フィルムダイナミックレンジ設定が必要な場合、カメラの設定メニューから変更できます。
- 📤 DaVinci ResolveでLotをファイルに適用し、カラーリストがセットで使用したLotを確認できるようにすることができます。
- 🔄 ProResで記録する場合、Lotをクリップに記録するオプションがありますが、これはLotが画像に焼き付けられることを意味します。
Q & A
Blackmagic DesignのJakeが説明するのは何ですか?
-Jakeが説明するのはLUT(ルックアップテーブル)とそのアップロード方法です。
LUTはどのような役割を果たしますか?
-LUTはカメラが特定の色と明るさの入力に対してどのような色と明るさの出力を表示するかを教えるものです。
Blackmagic DesignのPocket Cinema Camera 6K Proには何個のLUTがプリロードされていますか?
-Pocket Cinema Camera 6K Proには4個のLUTがプリロードされています。
DaVinci ResolveからカスタムLUTをアップロードする方法を説明していますか?
-はい、JakeはDaVinci ResolveからカスタムLUTをカメラにアップロードする方法を説明しています。
Blackmagic Designのカメラはどの種類のLUTを受け入れますか?
-Blackmagic Designのカメラは17ポイントCubeと33ポイントCubeのLUTを受け入れます。
Jakeが作成したカスタムLUTの名前は何ですか?
-Jakeが作成したカスタムLUTの名前は「custom look」です。
LUTをアップロードするためにSDカードはどのように使用されますか?
-LUTを保存したSDカードをカメラに挿入し、メニューからインポートするように指示されています。
LUTを適用するにはどうすればいいですか?
-LUTを適用するには、カメラの設定に戻り、LUTメニューから適用したいLUTを選択し、確認する必要があります。
LUTを表示するために設定ボタンを割り当てる方法を説明していますか?
-はい、JakeはF2のカスタム機能ボタンにLUTを表示する方法を説明しています。
カメラのダイナミックレンジ設定を変更する必要がある状況は何ですか?
-画像が過度に satureatedまたはコントラストが多すぎると思われる場合、ダイナミックレンジ設定が間違っている可能性があります。
DaVinci ResolveでLUTを使用する方法を説明していますか?
-はい、JakeはDaVinci ResolveでLUTを使用し、カラーリストで簡単に有効または無効にできるようにする方法を説明しています。
ProResフォーマットで録音する際にLUTをクリップに記録する方法について説明していますか?
-はい、JakeはProResフォーマットで録音する際にLUTをクリップに記録する方法を説明していますが、これはLUTが画像に焼き付けられることを意味します。
Outlines

Dieser Bereich ist nur für Premium-Benutzer verfügbar. Bitte führen Sie ein Upgrade durch, um auf diesen Abschnitt zuzugreifen.
Upgrade durchführenMindmap

Dieser Bereich ist nur für Premium-Benutzer verfügbar. Bitte führen Sie ein Upgrade durch, um auf diesen Abschnitt zuzugreifen.
Upgrade durchführenKeywords

Dieser Bereich ist nur für Premium-Benutzer verfügbar. Bitte führen Sie ein Upgrade durch, um auf diesen Abschnitt zuzugreifen.
Upgrade durchführenHighlights

Dieser Bereich ist nur für Premium-Benutzer verfügbar. Bitte führen Sie ein Upgrade durch, um auf diesen Abschnitt zuzugreifen.
Upgrade durchführenTranscripts

Dieser Bereich ist nur für Premium-Benutzer verfügbar. Bitte führen Sie ein Upgrade durch, um auf diesen Abschnitt zuzugreifen.
Upgrade durchführenWeitere ähnliche Videos ansehen
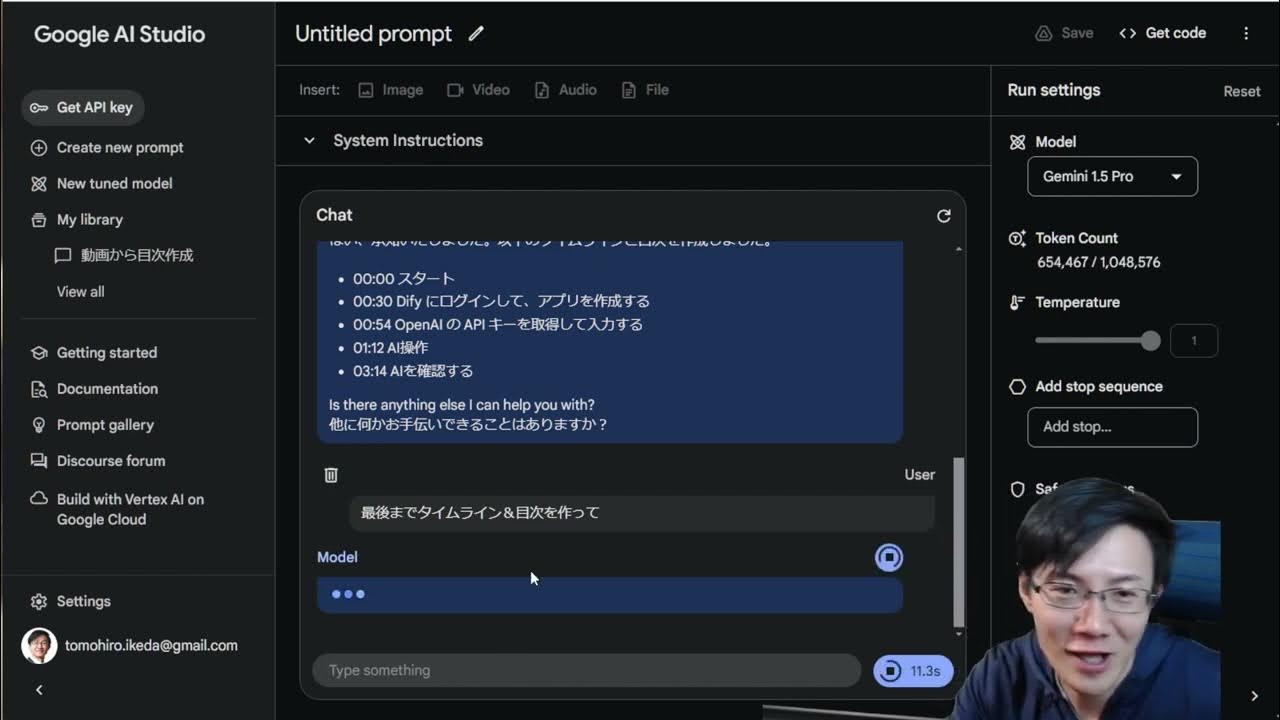
Gemini1.5proの動画データ分析は、Google AI Studioを使えばいけた!

Sony a6400 Tutorial For Beginners | Best Settings For Photo & Video

【必見】Snap Cameraに代わるパソコンカメラで使えるビューティーエフェクト見つけたよ!

How to Programme set an Electric Heater to come on and turn off with time, Delonghi Heater.
How To Summarize A PDF File With Claude AI?

Obsidian Copilot: The Best AI Integration for Your Notes
5.0 / 5 (0 votes)
