Your ISO Settings Are Ruining Your Filmmaking
Summary
TLDRこのビデオでは、ISOが露出にどのように影響するかについて誤解を解き明かし、低光条件下での撮影における「右に露出する」技術について説明します。ISOは露出を直接変化させるわけではなく、感光度を増やすことにより信号を増幅します。ビデオでは、ISO400、800、1600で同じシーンを撮影し、露出を比較し、ISOを下げてよりきれいな影を出す方法を示します。また、露出を右にすることでハイライトの詳細を失うリスクがあること、そしてシーンによって最適なISO設定を選択することが重要であると強調しています。
Takeaways
- 🎥 ISOは露出に直接影響を与えるわけではありませんが、露出の判断に影響を与えます。
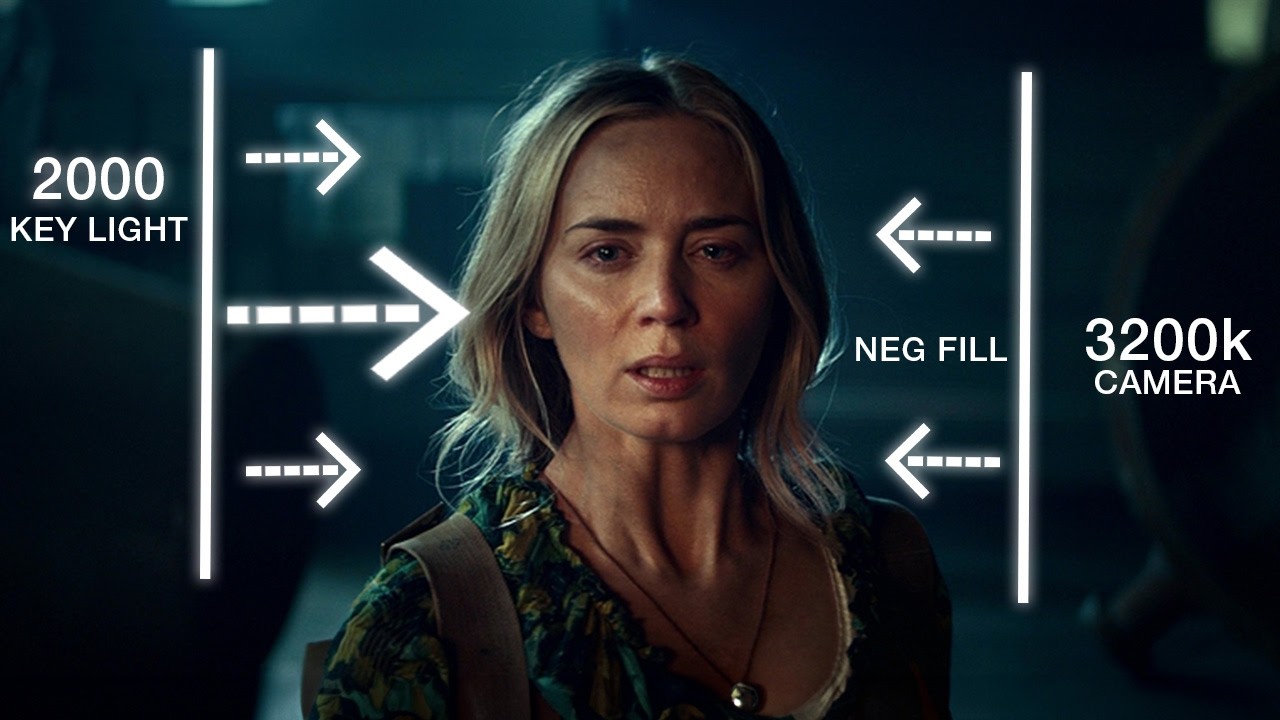
- 📸 露出はレンズの絞りとシャッタースピードの2つの変数のみによって決まります。
- 🔊 ISOはセンサーが記録した信号に増幅を加えるものであり、実際にセンサーに到達する光の量を変更するものではありません。
- 🌐 露出を右に設定する(Exposing to the Right)とは、センサーに十分な光を与えることです。
- 📽 フィルム撮影では、フィルムの感度を1ストップ낮く設定して「厚いネガ」を作り、よりきれいで豊かな画像を得ることが一般的でした。
- 🌑 低いISO設定を使用すると、シャドウ部分がきれいになりますが、ハイライトの詳細を失うリスクがあります。
- 🌟 高ISO設定は、ハイライトの詳細を保持したいシーンで役立ちます。
- 📹 カメラのダイナミックレンジは変更されませんが、ISO設定によりハイライトやシャドウのトレードオフが決まります。
- 🎬 低光シーンでは、ISOを下げてシャドウをきれいにし、ブライトなシーンではISOを上げてハイライトの詳細を保持することが推奨されます。
- 📚 ISO設定は露出方法に影響を与えるため、シーンや目的に応じて適切なISOを選択することが重要です。
Q & A
ISOが露出にどのように影響しますか?
-ISOは露出に直接的な影響はありませんが、露出の判断に影響を与えます。露出はレンズの絞りとシャッタースピードの2つの変数によって決まります。
ISOを変更することで画像のノイズがどのように変わりますか?
-ISOを上げると、信号を増幅する効果がありますが、実際にセンサーに到達する光量は変わりません。ただし、ISOを上げすぎると影のノイズが増大し、ISOを下げると影はきれいになりますが、ハイライトの詳細が失われる可能性があります。
「露出を右に」とはどのような意味ですか?
-「露出を右に」とは、センサーに十分な光量を与えることです。ただし、ISOを上げて露出を右にすると、実際には左に露出している可能性があるため、ISOを下げて光量を増やした方がよいです。
フィルム撮影における「露出を右に」とはどのような手法ですか?
-フィルム撮影では、フィルムの標準ISOより低いISOで露出し、印刷時に1ストップ下げることで、より濃いネガを作り、きれいで豊かな画像を得る手法です。
ハイライトの詳細を保持したい場合はどうすればよいですか?
-ハイライトの詳細を保持したい場合は、ISOを上げて露出を右にし、ハイライトに余裕を持たせることが必要です。ただし、これにより影のノイズが増大する可能性があります。
ビデオの作者はどんなシーンで低いISO設定を使用しますか?
-ビデオの作者は、低光条件下のムーディなシーンで低いISO設定を使用し、きれいな影を得る傾向があります。
ビデオの作者はどんなシーンで高いISO設定を使用しますか?
-ビデオの作者は、明るい日の外景や美しい夕日の空の詳細を保持したい場合に高いISO設定を使用します。
ISOを変更する際のトレードオフとは何ですか?
-ISOを変更する際のトレードオフは、影のきれいさとハイライトの詳細の間です。低いISOでは影がきれいになりますが、ハイライトの詳細が失われる可能性があります。高いISOではハイライトの詳細を保持できますが、影のノイズが増大します。
ビデオの作者はなぜ第二ネイティブISOを使用しないと述べていますか?
-ビデオの作者は、第二ネイティブISOを使用するとノイズが使い物にならないと感じており、特に影の部分で顕著なため、使用しないようにしています。
技術が進歩することでISOの使用はどのように変わりますか?
-技術が進歩することで、高ISO設定を使用してもノイズをあまり心配する必要がなくなり、より柔軟な露出設定が可能になるでしょう。
Outlines
🎥 ISOと露出の誤解を解く
この段落では、ISOが露出にどのように影響するかを探ります。ISOは露出に直接的な影響を与えるとは思いますが、実際はISOはカメラセンサーが受信した光量を増やすことではありません。露出はレンズの絞りとシャッタースピードの2つの変数によって決まります。ISOは記録された信号の増幅に過ぎず、センサーが受信した光量を実際には変えません。アナログとして、オーディオエンジニアがヘッドホンの音量を上げると、入力レベルを下げることがISOに相当します。逆にヘッドホンの音量を下げると、入力レベルを上げることがISOを上げることになります。実際には、ISOを変更することは、信号を増幅するだけであり、光量を増やすわけではありません。
📸 露光を右に設定する意味
このセクションでは、露光を右に設定することの意味とその効果について説明します。露光を右に設定とは、センサーに十分な光量を与えることですが、ISOを上げて露光を右に設定すると、実際には信号を増幅しているだけです。フィルム撮影では、フィルムの感度を下げることで厚いネガを印刷し、よりクリーンで豊かな画像を得ることができました。デジタルでも同様の概念が適用され、ISOを下げて露出を右に設定し、ポストプロセスで明るさを下げることにより、ノイズを抑えることができます。しかし、これによりハイライトの詳細が失われる可能性があるため、露出のトレードオフは状況やシーンによって異なります。
🌟 ISO設定と露出のトレードオフ
最後のセクションでは、ISO設定と露出のトレードオフについて話します。カメラには常に同じダイナミックレンジがありますが、あなたはシャドウがクリーンでハイライトの詳細を失うか、またはシャドウにノイズを増やしてハイライトの詳細を保持するかを選ぶ必要があります。シーンや状況によって最適なISO設定は異なります。例えば、明るい日の外景撮影や美しい夕日の写真を撮る場合、ISOを上げてハイライトの詳細を保持することは有益です。逆に、暗いムーディなシーンを撮影する場合は、ISOを下げてシャドウをクリーンにすることができます。技術が進歩するにつれて、ノイズを気にすることなく高ISO設定を使用できるようになるでしょう。
Mindmap
Keywords
💡ISO
💡露出
💡ノイズ
💡露出を右に向ける(Exposing to the Right)
💡ダイナミックレンジ
💡シャッタースピード
💡絞り
💡フィルム撮影
💡ハイライト
💡シャドウ
Highlights
ISO并不直接影响曝光,而是影响我们对曝光的判断。
真正决定光线到达传感器的只有光圈和快门速度。
ISO是在传感器记录信号后对信号进行放大,并不改变传感器接收到的光线量。
ISO的调整类似于音频录制中的音量调节,改变的是信号的放大程度而非输入信号本身。
通过实验展示了在不同ISO值下,保持光圈和快门速度不变,图像曝光看起来不同,但实际上是信号放大的结果。
通过后期调整,可以将不同ISO值拍摄的图像调整到相同的亮度水平,从而证明ISO并不改变曝光。
正确的曝光(exposing to the right)意味着给传感器提供充足的光线,而不是通过提高ISO来实现。
在胶片摄影中,通过降低胶片速度来获得更厚的负片,从而获得更丰富、更清晰的图像。
降低ISO并增加场景光线可以使得图像更干净,尤其是在暗调场景中。
使用较低的ISO设置会牺牲高光细节,因为高ISO设置倾向于使图像欠曝,从而保留更多的高光信息。
高ISO设置在保留高光细节方面有优势,但会增加阴影部分的噪点。
摄影师需要根据场景和需求决定是否牺牲高光细节以换取更干净的阴影。
在低光场景中,如果可以通过调整光圈或增加光线来控制曝光,那么使用高ISO并不是必要的。
随着技术的进步,未来使用高ISO设置可能不再需要担心噪点问题。
ISO设置的选择不会直接影响曝光,而是影响你如何曝光图像。
Transcripts
wasn't quite as clean as
[Music]
have you ever tried shooting a low-light
dimly lit scene you exposed for the mood
that you want maybe you bump up the iso
a little bit but no matter what you do
it always looks nice to a degree but
then you look at movies like The Social
Network or the Batman just to name two
and they look freaking clean and it
makes you want to throw away your dual
native ISO camera because you bought it
mainly for its low light capabilities
but seriously how do we turn this
into this
how about we shudder some myths brace
yourself because maybe everything you
thought you knew about exposing to the
Right iso low light and noise could be
completely off track to begin it's
crucial that we dismiss the notion that
ISO directly affects exposure while it's
true that ISO does have an impact on
exposure the effect isn't really
straightforward essentially ISO affects
our Judgment of exposure but it doesn't
alter the amount of light actually
hitting the camera sensor the only two
variables that truly dictate how much
light will reach the sensor are the
aperture of the lens and the shutter
speed so to make the concept simple
every camera has a sensor and that
sensor captures light and turns it into
an electrical charge that is then
converted into a digital value the
sensor has a certain dynamic range a
camera applies ISO amplification to the
signal after the signal is already been
recorded by the sensor it doesn't
actually alter how much light the sensor
received in the first links so ISO
doesn't really affect exposure but it
buys us to expose a certain way I'll
give you an example by making an analogy
with audio recording imagine that you
are an audio engineer and you're
recording a singer
and uh you make the headphones volume
very loud this represents the iso given
the eye volume you may be biased towards
decreasing the input level of the mic
and that represents the amount of light
hitting the camera sensor so in this
analogy you are under exposing the
sensor and the opposite is true if the
volume of the headphones is very low
you're going to make the input level of
the mic higher this recording is
stronger level hence overexposing the
sensor basically changing the iso value
works like an amplifier we have a signal
and we can either boost it or not but we
can't change the nature of the synth
note once it's been captured by the
sensor so to demonstrate that ISO is
just an amplification of the signal and
not an actual increase of the light
hitting the sensor I recorded a scene at
three different ISO values 400 800 and
1600 without changing any other variable
so the aperture of the lens and shutter
speed remain the same all throughout and
you could say well they look different
Jimmy how can you say that ISO didn't
change exposure I mean look at this
yes but we didn't change the amount of
light on the actual scene if we take ISO
800 as our reference for the two other
ISO settings 1600 and 400 the camera
just Amplified the signal more for ISO
1600 and Amplified the signal less for
ISO 400 compared to ISO 800 and in fact
if we adjust the three images to match
the brightness level of the iso 800
image well they look exactly the same
ISO 1600 isn't noisier than ISO 800 if
pulled back by one stop and ISO 400
doesn't look any cleaner than ISO 800 if
pushed by one stop that's because
through these adjustments we've
effectively made all three images as if
they were shot at ISO 800. we basically
changed the amplification of the signal
in post instead of doing it in camera so
with this out of the way how do we make
our dark and Moody images cleaner well
this is where exposing to the right
comes into play exposing to the right
means to give the sensor a healthy
amount of light to work with but after
everything we've said it should be clear
that if you are exposing to the right by
raising the iso you're not really
exposing to the right you're just
boosting the signal and in fact by
erasing the ISL not only you're not
exposing to the right but you're
probably exposing to the left
exposing to the right isn't a digitally
bound practice if you ever shot film
even for photos you probably heard the
term thick negative exposing to the
right is what you would do with film and
what dlps did for a long time to get
richer and cleaner images when working
with film they would rate the film stock
One Stop slower than nominal so they
could print down a thicker negative to
bring it back to normal exposure if
you're confused I'll explain so if you
have a 500 ISO negative you would meter
it as if it was 250 so you would
increase the light levels or open up the
iris or a combination of both to expose
for ISO 250 but you are actually
recording at ISO 500 so you are
effectively and constantly overexposing
by exactly one stop then you take that
Overexposed image and you bring it down
by one stop in the printing process the
resulting image will be cleaner and
richer than the same image shot at ISO
500 and exposed for ISO 500 because by
printing down or in digital by lowering
the brightness of the image in posts
you're not only making the image darker
you're also pushing the noise floor down
which will yield a cleaner image so the
concept is very simple to get a clean
image especially for Moody shots even if
it sounds counter-intuitive you should
have more light on the scene and to have
more light on the scene you should use a
lower ISO setting which is going to
force you to compensate by actually
using more light or by opening up the
iris or by messing up with the shutter
speed but that's going to change motion
blur so mainly by increasing the light
levels and opening up the iris on the
lens
that sounds great so the more I
overexpose the more I can bring it down
in post the cleaner the image that I
will get
yes but there's a catch because by
overexposing or using a lower ISO you're
sacrificing highlights latitude meaning
that the highlights will clip faster but
why is that it's confusing right why do
we lose highlights detail with a low ISO
setting well go back for a moment to the
single recording example if we have a
high headphones level the iso we're
going to decrease the input level of the
mic which is going to leave us with a
lot of Headroom before audio clipping
while if the headphones level is very
low we're going to turn the mic level
all the way up to compensate and the
signal is going to be closer to the
clipping point and it's going to
eventually clip if there's a peak take a
look at this I'm exposing for the gray
patch here to have it always exposed at
the same ire level and we also have a
bright light bulb right next to it look
what happens if we expose at ISO 200 400
800 and 1600 the exposure on the gray
patch doesn't change but look at the
bulb as we bump up the iso remember we
increase the headphones level and we get
further away from the clipping Point
look how much more detail there is in
the bulb if we expose at ISO 1600
compared to ISO 200 or 400. obviously we
get more noise in the shadows but we
also get a lot more information in the
highlights because a high ISO level is
going to bias you to underexpose the
image thus gaining more highlights
information so at the end of the day
there's no magic here the camera it's
always going to have the same amount of
dynamic range and you're going to have
to decide where you want the trade-off
to be with some cameras changing the iso
will change the dynamic range slightly
but with most Cinema cameras this is not
the case anyway you're going to have to
decide where you want the camera to
perform at its best do you want very
clean Shadows by accepting to lose
highlights detail or do you want to be
able to get more highlights detail but
more noise in the shadows what's the
answer well it depends on the situation
and on the type of scene that you're
trying to capture if you're trying to
capture a low light Moody scene where
there's no super bright highlights or
you don't care if they're clipped then
lowering the iso will probably be a good
choice very clean Shadows not much to
recording the highlights anyway seems
pretty reasonable to me the opposite
might be true if you're shooting outdoor
in a bright sunny day or you want to
retain all the details in the sky during
a beautiful sunset then raising the iso
a bit will be super beneficial you will
gain some Headroom in the highlights
which you will need you'll also get more
noise in the shadows but if the bulk of
the image lives in the mid-tones and in
the highlights then who cares I
personally like shooting with my Sony
fx3 at high cell 400 for low light
scenes like the ones that you saw in the
intro of the video and the 800 for
daylight scenes where I can take
advantage of the extra stuff of
information and the highlights I
personally never use the second native
ISO of 12800 because it always looks
unusably noisy to me that increase in
sensitivity introduces what's called
Photon shot Poise that is noticeable not
in the shadows but more in the lower mid
range which for me is very annoying so
am I saying that high ISO settings don't
have a usage for a low light situation
well if you can control the amount of
light that's actually hitting the sensor
by opening up the iris or by increasing
the light levels on set then it's better
to do so if you can then bracing the iso
to get an image that it's not Pitch
Black is the only option you have and as
technology improves you're going to be
able to use high ISO settings without
having to worry too much about noise so
to sum it up remember that the iso
setting that you choose doesn't really
affect your exposure directly it affects
how you expose your image I hope that I
made the concept clear enough because
um talking to people I realized that a
lot of them were confused about this
subject and if I wasn't clear enough
feel free to ask any question that come
in the comments down below I'll be happy
to answer you and if you like this video
well you know what to do please like
share and subscribe and until next time
Weitere ähnliche Videos ansehen
5.0 / 5 (0 votes)