+$11k using Volume Profile - Is it better than VWAP?
Summary
TLDRIn this educational episode, Ross Cameron, a seasoned full-time trader, offers an in-depth tutorial on utilizing the volume profile indicator for technical analysis in trading. He explains the concept, its importance in gauging market sentiment, and how it can be used alongside the volume-weighted average price (VWAP) for better trading decisions. Ross shares his personal trading experiences, including a detailed walkthrough of his wins and losses, to illustrate the practical application of the volume profile in real-time trading scenarios.
Takeaways
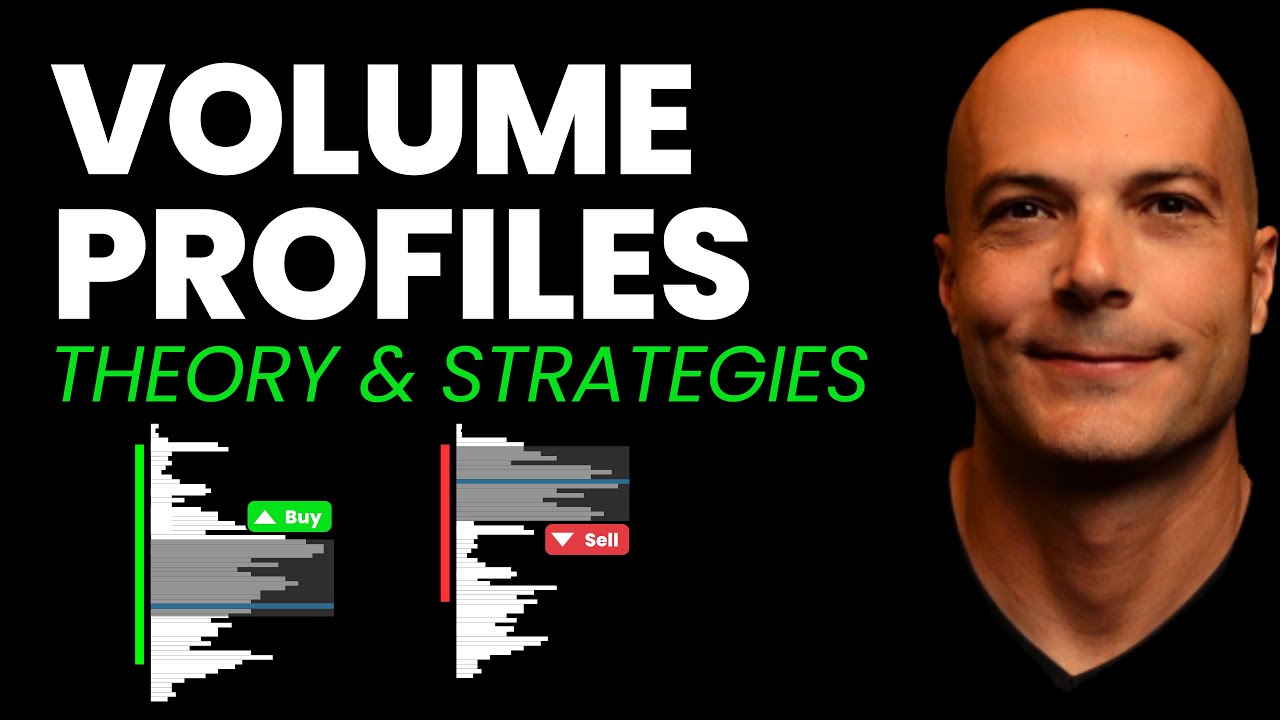
- 📈 The volume profile indicator is a technical tool used in trading to analyze trading volume at different price levels and identify the point of control (POC), which is a key price level where the most volume occurs.
- 🏁 When trading above the POC, bulls are in control, and when below, bears dominate, making the POC a crucial level for support, resistance, and crossovers.
- 👨🏫 Ross Cameron, a full-time trader with over a decade of experience, shares his insights and strategies, emphasizing the importance of real, audited profits over social media claims.
- 📊 Volume profile differs from volume-weighted average price (VWAP) in that it represents pure volume distribution across price rather than a moving average of price with volume factored in.
- ⚠️ The point of control can act as a pivot or trigger level, indicating potential shifts in sentiment when the price crosses this level.
- 📉 Ross experienced a challenging day with significant losses on certain trades, highlighting the risks and volatility inherent in trading.
- 📈 Ross's profitable trades on stocks like Lipo and Pali demonstrate the effectiveness of using volume profile in conjunction with other indicators like VWAP and MACD for entry and exit decisions.
- 🔍 Volume profile settings such as value area volume, row size, and volume up versus down can be adjusted to fit different trading styles and preferences.
- 📊 The indicator is primarily used on intraday charts, with Ross preferring the 5-minute chart over the 1-minute to avoid inaccuracies due to zoom level.
- 📉 Ross's losses on stocks like BMR and LR underscore the importance of risk management and the need to take profits when available rather than over-relying on potential big gains.
- 💰 Despite a day of mixed results, Ross finished with a net profit, emphasizing the importance of consistent strategy and learning from both wins and losses in trading.
Q & A
What is the main topic of the video?
-The main topic of the video is teaching how to use the volume profile indicator in technical analysis for trading stocks, cryptocurrencies, and other financial instruments.
What is a volume profile and why is it important in trading?
-A volume profile is a technical indicator that analyzes the volume occurring at different prices, showing where the most volume is taking place. It is important because it helps traders understand the point of control, which can indicate bullish or bearish sentiment and potential support and resistance levels.
What does the point of control (POC) represent in the volume profile?
-The point of control (POC) represents the price at which the highest volume of shares has been exchanged. It serves as a key indicator of potential support or resistance and can signal a shift in market sentiment when crossed.
How does Ross Cameron use the volume profile in his trading?
-Ross Cameron uses the volume profile as an intraday indicator primarily on the 5-minute chart to identify areas of high volume and potential changes in trend or support and resistance levels.
What are the standard settings for the volume profile indicator according to Ross Cameron?
-The standard settings for the volume profile indicator that Ross Cameron uses include a value area volume of 70, row size of 24, and volume up versus down settings.
How does the volume profile differ from the volume weighted average price (VWAP)?
-While VWAP is a moving average that lags behind price, the volume profile adjusts more rapidly to high levels of volume, providing a more immediate reflection of the point of control and areas of significant buying or selling pressure.
What is the significance of the point of control line's movement in relation to the stock's price?
-The movement of the point of control line indicates where the majority of trading activity is happening. If the stock's price is consistently above the point of control, it suggests a bullish trend, whereas if it's below, it indicates a bearish trend.
What is the role of volume in the context of the volume profile indicator?
-Volume plays a crucial role as it reports the number of shares traded at different prices, not just at different times. It helps in identifying the point of control and understanding the intensity of buying or selling at specific price levels.
How does Ross Cameron define a pivot or trigger in the context of trading?
-A pivot or trigger is a specific price level where a significant price movement or high volume is expected to occur. It acts as a critical level of support or resistance, and breaking this level can lead to a significant market reaction.
What is the importance of the volume profile indicator in identifying potential areas of support and resistance?
-The volume profile indicator is important because it shows the distribution of volume across different price levels, making it easier to identify areas that may act as support or resistance due to high trading activity at those levels.
How does Ross Cameron approach trading when the price is between the point of control and VWAP?
-When the price is between the point of control and VWAP, Ross Cameron exercises caution as this indicates a potential tug-of-war between buyers and sellers. He looks for the price to break out and hold above the point of control for a bullish signal or below it for a bearish signal.
What is the significance of the volume profile in Ross Cameron's daily trading routine?
-The volume profile is significant in Ross Cameron's daily trading routine as it helps him identify key support and resistance levels, understand market sentiment, and make informed decisions about when to enter or exit trades.
Outlines
📈 Introduction to Volume Profile Trading Strategy
Ross Cameron introduces the volume profile indicator, a technical tool used in trading to analyze trading volume at different price levels. He explains its importance in identifying the point of control (POC), which indicates whether bulls or bears are in charge of a stock's movement. Cameron emphasizes the indicator's utility for spotting support, resistance, and crossovers, and shares his personal trading results, highlighting the necessity of a cautious approach due to the inherent risks of trading.
🔍 Setting Up and Utilizing Volume Profile Indicator
The paragraph explains how to set up the volume profile indicator on trading platforms and the importance of using standard settings for consistency with other traders. It details how the volume profile displays the number of shares traded at various prices, as opposed to times, and how it helps in understanding market sentiment and identifying potential trend changes. The narrator discusses the differences between volume profile and volume-weighted average price (VWAP), noting that volume profile adjusts more rapidly to high volume levels and can provide clearer insights into areas of support and resistance.
📊 Comparing Volume Profile with VWAP for Trading Insights
This section compares the volume profile's point of control (POC) with the VWAP, discussing their significance in gauging bullish and bearish market sentiment. The narrator illustrates how the POC can act as an additional level of support or resistance, helping traders to understand price movements better. The paragraph also includes a case study of a stock trade, demonstrating how the volume profile can guide trading decisions by indicating areas of high volume and potential reversal points.
💡 Using Volume Profile to Identify Key Support and Resistance Levels
The narrator shares his experience using the volume profile to identify critical support and resistance levels in the market. He explains how the volume profile can make certain price levels obvious as areas of significant buying or selling activity. The paragraph also discusses how the volume profile can help traders understand why a stock is consolidating at specific levels and how to use this information to make informed trading decisions.
📉 Trading Experiences and Learning When to Stop
In this paragraph, the speaker reflects on his trading experiences, highlighting the importance of using the volume profile to know when to stop trading a stock. He discusses a specific trade where the stock's price was above the point of control initially but later struggled to maintain levels above it, leading to a sell-off. The speaker emphasizes the importance of recognizing these struggles and the role of the volume profile in identifying such situations.
🤔 Analyzing the Volume Profile's Role in Trading Decisions
The speaker provides a detailed analysis of how the volume profile indicator influenced his trading decisions on a particular stock. He discusses the stock's price movements in relation to the point of control and VWAP, and how these indicators helped him understand the stock's bullish and bearish stances. The paragraph also includes a brief tutorial on reading and interpreting the volume profile and the importance of not overstaying a trade.
📊 Recap of Trading Sessions Using Volume Profile Indicator
This section serves as a recap of the speaker's trades, discussing the use of the volume profile indicator in various trading scenarios. The speaker evaluates the effectiveness of the volume profile in identifying entry and exit points and its impact on his trading outcomes. He also provides insights into the psychological aspects of trading, such as the temptation to chase bigger profits and the importance of discipline in managing trade sizes and expectations.
🚀 Leveraging Breaking News and Volume Profile for Trading
The speaker narrates his experience trading a stock that had breaking news, using the volume profile to understand the stock's price action. He describes how the stock's price moved in relation to the point of control and VWAP, and how he capitalized on the situation to make a profitable trade. The paragraph underscores the value of combining news catalysts with technical analysis for effective trading.
📉 Reflecting on Trading Losses and the Importance of Risk Management
In this paragraph, the speaker reflects on his trading losses and the importance of risk management. He discusses specific trades that did not go as planned and how he managed to recover from a significant loss by switching to a different stock. The speaker emphasizes the need for discipline in trading, especially when dealing with losses, and the importance of not letting emotions dictate trading decisions.
📈 Summarizing the Day's Trading and Setting Goals for Improvement
The speaker summarizes his day's trading activities, highlighting both profitable and unprofitable trades. He discusses the overall net profit after accounting for fees and commissions and sets goals for improving his trading performance in the future. The paragraph concludes with advice for viewers on the importance of learning from experienced traders and the value of using a simulator before trading with real money.
Mindmap
Keywords
💡Volume Profile
💡Point of Control (POC)
💡Bulls and Bears
💡Support and Resistance
💡Crossovers
💡Volume Weighted Average Price (VWAP)
💡Intraday Trading
💡Pivot Points
💡Relative Volume
💡MACD
Highlights
Introduction to the volume profile indicator and its importance in technical analysis.
Explanation of how the volume profile shows different prices with the most volume, indicating areas of support and resistance.
The concept of the point of control (POC) and its significance in determining the balance between bulls and bears in the market.
Demonstration of volume profile settings and how to apply them on trading platforms.
Comparison between volume profile and volume weighted average price (VWAP) in terms of market sentiment and trading decisions.
Trader's personal experience and results, emphasizing the reliability and audited nature of profits in contrast to other social media traders.
Real-time trade recap of the day, showing both profitable and losing trades, and the use of volume profile in decision-making.
Detailed analysis of a specific trade on a stock, illustrating how volume profile helped in identifying entry and exit points.
Discussion on the pros and cons of using volume profile as a technical indicator in trading.
Trader's strategy of doubling daily goals and providing full-length classes on helpful strategies or indicators.
The importance of watching the POC for support, resistance, and crossovers in trading.
How volume profile can be used on different time frames, with a focus on intraday trading.
Case study of a stock trade that resulted in significant profit, using volume profile for decision support.
Trader's approach to risk management, including setting daily goals and maximum loss limits.
The use of volume profile in conjunction with other technical analysis tools, such as MACD, for a comprehensive trading strategy.
Final thoughts on the value of volume profile in understanding market dynamics and making informed trading decisions.
Transcripts
in today's episode I'm going to teach
you how to use the volume profile
indicator volume profile is a technical
indicator you can plot on your charts
that analyzes the volume that occurs and
it shows the different prices where the
most volume is taking place and it
communicates a central line that is the
point of control when a stock or
cryptocurrency Futures Contract whatever
is trading above the point of control
the Bulls are in charge when it's
trading below the bearss are in charge
and so it's especially important to
watch this POC pointed control line for
support and resistance and for
crossovers we're going to jump into the
charts here and I've got a full screen
slide deck that we're going to dive into
as well as promised this month each day
that I am double my daily goal which is
$5,000 or higher I'm teaching a full
length class on the strategy or the
indicator that I found most helpful on
that particular day so you can see right
here my p&l right now is
$1,661 and I will hopefully be the first
to let you know that hey my results are
not typical trading is risky but if
you're tuning in here for the first time
my name is Ross Cameron I'm a full-time
Trader I've been doing this for more
than a decade and what I want you to
know is that my profits are audited and
they are real and this is in contrast to
a lot of Traders on social media who
talk a big game but don't have the track
record to back it up so everything that
I I share with you in these episodes
comes from my own experiences trading
the markets all right let's go ahead and
dive into the slide deck here and we're
going to get this full screen and we're
going to start talking about how to use
volume profile so the topics of today's
class I'm going to Define volume and
volume profiles to make sure we're all
on the same page as we get started and
I'm going to show you how I use volume
profile in my trading then I'm going to
evaluate the pros and cons of using this
indicator and I'm going to rec cap each
of my trades from today now you will
note that my Biggest Loser I'm down
$3,719 and you know what those were my
first trades of the day on that stock so
today's a day where I went into the red
nearly to my daily Max loss which is
$5,000 my daily goal is five grand my
Max loss is five grand I went down
nearly five grand this morning before
recouping those losses and finishing in
the green thankfully and volume profile
helped helped helped lead the way to me
finding some profit in the market today
I got off to a rough start but I
finished strong so we will recap all of
these trades H at the end of this
episode all right so we're going to go
full screen here and by the way those of
you guys tuning in uh for the first time
I hope you guys enjoy this episode and
if you do I hope you hit the thumbs up
and you subscribe to the channel so
we're going to start with the definition
of volume most of you probably know what
volume is volume is the total number of
shares traded during a period of time so
volume is is traditionally displayed
along the time axis of a chart below
each Candlestick and it communicates
Trend and sentiment so right down here
is where the volume is displayed on this
chart so when I say the time access I
mean right along the very bottom we've
got time at the bottom right here and
then we've got um price on this axis
right here so we've got time and price
so as time goes on and price goes up of
course the chart looks like this which
is what we would like to see so this is
your standard uh volume pain we usually
call it a pain kind of like a window
pane you can sort of move this up and
down and we've got volume plotted on the
bottom now volume is incredibly
important in the market it is the number
of shares they're trading and it helps
communicate what sentiment is like in
this stock if it's really bullish we'll
see a lot of volume and of course we'll
see the price moving up quickly if it's
really bearish we'll see a lot of volume
and the price is moving down quickly so
this is sort of the relationship that we
look at as we're watching um these
stocks moving up and down and of course
the way I'm finding these stocks is
right here on my scanners so if we jump
back into the slide deck this is volume
which I think probably all of you are
familiar with although some of you may
plot volume slightly differently some
people use the same color regardless of
whether the candle is green or red I
want the color of the volume bar to
match match the color of the candle that
is very important for me because what it
helps me understand is whether we have
high volume on the buying candles or on
the selling Candles now what volume
profile does is it reports the number of
shares that traded at different prices
not at different times but at different
prices so it displays the volume across
the price axis of a chart and it's right
here so so this is actually displaying
all the volume that takes place and it's
aligning it to the different prices
right here and what we end up getting is
a point of control which is this uh Red
Line right here I'm going to talk about
that more in just one second but first I
want to make sure we all are using the
same volume profile settings so for most
um for most platforms and this not every
platform is going to have volume profile
but for most platforms you can go to
your indicators and you could type in
volume and then you'll look at all the
different volume um indicators that
exist inside your platform I want to use
volume profile and I'm going to choose a
visible range you could choose a fixed
range but then you have have to manually
select the range and I'm going to choose
visible range right here so you click on
volume profile you select the visible
range as I did right here and then you
will see the VP VR settings which are
the volume profile settings settings and
this is how I have it set up these are
the standard settings value area volume
is 70 row size 24 volume up versus down
this this is these are all the standard
settings that come when you first load
it up now I have my point of control by
default in red and that's the same as uh
what it is standard of course you could
change this to your liking if you would
prefer it look different um but it's I
think it's usually in this case
helpful to use more or less the same
settings that other Traders are using
especially that way if you're in a
community where you're looking at other
people's charts you can understand
exactly what someone's looking at it's
not like wait what in the heck is that
you know oh this is volume profile and
that's what that red line is about
because I don't use the red line for
anything other than the point of
control okay so now that you've got your
volume profile set up on your charts and
by the way in terms of time frames I do
not use it on my daily chart this is an
intraday indicator and I use it
primarily on the 5 minute chart but the
interesting thing with volume profile is
just like volume weight at average price
your volume profile is going to be the
same no matter what time frame you're
trading on because it's just showing you
the volume that's occurred today at the
different prices so the only way the
volume profile will change is if you're
looking at a very narrow view of the
chart in which case it's only going to
show you the profile for what's visible
so because I keep my five minute chart
zoomed out I have it on my five minute
time frame because I have my one minute
chart zoomed in if I put it on the one
minute time frame it would actually be
inaccurate so I'll show you an example
here of what this would look like so
oops uh well that's fine uh but I wanted
to grab um the volume profile so let me
just grab volume profile here let's see
copy and paste there we go so if I zoom
this in really tight here the volume
profile is going to start changing based
on how how zoomed in I am so let's see
if I zoom further out it starts moving
around so that's just something to be
aware of uh so for that reason I don't
use volume profile on my 1 minute chart
and that's just a choice of display and
it's because on my one minute I'm pretty
much always zooming zoomed in so my 1
minute is zoomed in like this so I can
see the price action very clearly and
then my 5 minute chart is zoomed out all
right so I choose to use it on the five
minute but you can do as you'd like all
right so now that we've got this on
let's talk about volume weighted average
price versus volume profile so many of
you know that
for probably a decade at least I've said
volume weighted average price is one of
my number one indicators I love having
volume weight a average price on my
charts because it clearly tells us the
average price of a stock with volume
factored in for the day so it is like
the equilibrium point of a stock and
when the the price is trading above it
we're bullish and when we're trading
below it we're naturally going to be
bearish so vwap is an area that is
fiercely defended when a stock dips down
so when we have a stock let's just say
that is really bullish and it makes this
nice move up and I'll just these would
be red candles but I'll just we'll do
just do this for now it's fine um so you
make you get this really nice clean move
up you get these pullbacks your volume
weighted average price is going to climb
up with you right and then what ends up
happening is if the price dips down and
breaks below vwap that's almost always a
high volume breakdown as you're dropping
and then if the price and of course if
you break below vwap your vwap is also
going to start to decline like this but
then if the price comes back up and
breaks back above vwap that breakout is
really important so we always pay close
attention to volume weight average price
as an area of support when the price
comes down to it if it can't hold we
usually see a big flush and then when it
comes back up a lot of times it's it's
resistance coming back up but if we can
break through it we often see high
volume on the breakout and a retest of
high of day so volume weighted average
price is important there's no question
about it and this episode is not going
to uh dissuade you of that importance
I'm going to continue use volume
weighted average price on my charts for
probably forever for the foreseeable
future for sure but volume profile is
pure volume which is great it displays
the prices where the volume is occurring
and of course a it averages in the price
and the volume volume weighted average
price it's essentially a moving average
so just like 9 EMA or your 20 EMA or 200
EMA it's always lagging a bit behind
price which is fine and it gives you
that average price at equilibrium over
the course of the day but volume profile
in contrast is going to adjust much more
rapidly when we have high levels of
volume so what often happens is a stock
will very quickly make a move up
sometimes on light volume but then it
comes into an area where we have a high
degree of volume and we have a lot of
consolidation and that's what ended up
occurring kind of right in this area
right here and this red line shows us
that this was the price that had the
peak amount of volume the price to the
penny is looks like about
$2.75 and that was well above the volume
weighted uh average price which is in
Orange down here so in this case
something that's interesting is that
there was a moment where the price was
below the point of control but above
vwap and what that sends are um contrary
indicators because on the one hand
you're above vwap which is bullish but
on the other hand you're below the point
of control which is bearish so it's a
spot to exercise caution in this case
the price bounced up it was not able to
hold up at these levels as it turned out
and the price came back down and then we
flushed back below the point of control
when we were back below the point of
control and we are wedged between point
of control and vwap here we were not
able to get back up and we ended up
rolling over and it's not super
surprising because usually when the
price is pinned between point of control
and vwap you're going to have basically
this upside resistance that was at this
critical pivot sometimes I'll refer to a
price as uh being a pivot which means if
we're below that level it's going to be
hard probably to break but if we do
break we'll see a nice move and if we're
above it then we want to see it has to
hold because if we break down well it's
like game over so a pivot is sometimes
also called a um a trigger so a trigger
again it's just a very specific price
where we expect something to happen in
terms of high volume and price movement
if we break that
level so the point of control also known
as PO is the price where the buyers and
sellers have exchanged the most
shares why is this helpful so what does
it mean if you see a price where buyers
and sellers are having the biggest
battle the highest volume and then we
see that the price is holding just below
that point of control price that to me
tells me that we have resistance at that
level and we're if we're below it the
Bears are winning the battle if we're
holding above it the Bulls are winning
the battle right so this tells me
sentiment and if I understand right now
that the Bulls are winning the battle
and the price is holding Above This
critical level then I'm going to have a
stronger long bias on the trade and I'm
going to have higher expectations that
this price can go higher if the price is
holding below this critical point of
control I'm going to be more concerned
that we will not see the follow through
that we want and we're going to see in
fact a reject and a flush back down what
does it mean if that battle line is
crossed right what if we have that very
clear point of control line the price
has been below it and then suddenly
snaps above it that tells us we're
having a shift in sentiment just like a
break of vwap so many of you may not
currently be using volume profile and
you may see these areas on a chart where
suddenly you get a spike of volume and
you're like man where did that come from
I I don't understand or you're seeing an
area that's clearly acting as support or
perhaps resistance and you're just not
understanding why that level is such a
battle and once you turn on volume
profile you're probably going to notice
that there are a number of levels that
suddenly become obvious because now this
indicator showing you oh that battle
there was because that was the point of
control that makes
sense okay so let's see um so vwap
versus point of control so the vwap and
I'm and I'm talking about the vwap price
like the current price of volume
weighted average price and I'll just
show you um on this uh chart right here
so so right now just for example the
point of control on this is below volume
weight average price it's at um let's
see the the current point of control
line I don't have it on my chart but
it's right around this level of 213 and
then the volume weight average price is
right here around sorry 513 and this
one's around
537 so right now the point of control is
a little bit low and that's because of
the high amount of volume that occurred
well right in this area it peaked right
in that area all right now we did get
some decent volume up in this area but
we're back below that level so as I look
at this right here you've got your
volume weight average price you got your
point of control so how how do I use
these two and how do I compare
them so the volume weight average price
is a well-respected technical indicator
we know when the price is above it the
Stock's bullish when the when the price
is below it the stock is bearish and
trading above and below point of control
we have a similar bullish bearish
sentiment and relationship so the point
of control is an additional price level
that helps you visualize potential
changes in Trend or areas of support So
now let's look at this here this is
going to be the stock that I suppose is
our case study today um lipo this stock
ended up going up
27% it might have even got just a smidge
higher than that it was really an
incredible squeeze and you can see that
this is a stock that I made $
7,569 on so this will be and was our
biggest percentage Gainer of the day now
before I I go into this chart I'll just
step back just to give you guys context
of how I found this stock so the way I'm
trading I find stocks using this
software that you can see right on my
screen and the top gappers scan right
here is showing us our number one
leading percentage Gainer pre-market and
that was Lio of 261 per premarket with
90 million shares of volume it now has
192 million which is incredible volume a
quarter of nearly a quarter billion
shares and the float is 4.6 million
shares the relative volume is
28,800 so to help you understand
everything that's going on here what we
have is a stock that is
up
261 float is 4.6 million shares it's got
28,000 times RV which is relative volume
that means the current volume today is
28,000 times higher than average which
is
outrageous um we have let's see so this
was this was the
float this was the percentage change
we've got the price which is which is
currently or it was
a146 right here this was the price and
we have guess what a news catalyst so
we've got a news headline on this stock
so this meets my criteria for being
worth trading because for me I'm looking
for stocks that this is what this stock
had and this is my minimum up
10% u a float of under 20 million shares
so this one met that criteria relative
volume of five just five is enough for
me price generally I prefer between 2
and 20 and this one was a little bit on
the cheaper side but I was still willing
to trade it and positive for news so
this not only met my criteria it
exceeded my criteria in a number of
different respects okay so I find the
stock on my scanner this morning these
scanners are searching the market in
real time for stocks that meet my
criteria so i' I've trained it to look
for stocks that I like so when I see
lipo and I'll click on this so it comes
back up on our chart so I got to just
link my chart up so we're going to link
that up there we're going to click on
lipo so when I pull up lipo I see that
it's a pharmaceutical company it's a
NASDAQ listed stock and they have um
initiates phase 2A trial for um this um
this medication all right so that's our
catalyst so now we understand why the
stock is up this much today now you
don't have to be a pharmacist to
understand that the stock is a
pharmaceutical company it's got news and
the price is up I interpret that to be
positive I'm not an expert on the field
but I'm an expert on trading and so I
understand sentiment and how the the the
markets move especially in response to
different types of headlines so when the
stock first starts popping up I'm
watching it and I'm looking for my entry
now something that you'll notice with
both your point of control line and I'll
make this full screen and your volume
weight average price is that these
change as the price is moving so as the
price moves up your point of control is
moving up your volume profile is
changing and of course the volume weight
average price is moving up so when this
first was on the scanners it actually
started popping up at like 5:00 a.m. the
news came out early it pops up it pulls
back it comes up it pulls back and when
I sat down at about 700 a.m. it was our
leading percentage Gainer at about 70 at
that time I thought well I like it but
it's a little cheap I don't know let's
see what it can do and the other thing
that I said is if we look at our daily
chart on this the 200 EMA which is a
daily level of resistance is at 90 cents
so I kind of thought when we were up at
75 cents and then 80 cents we were going
to have resistance here which we did but
we were able to break through it which
was good now now we've come back down
but nonetheless um at pre-market I was a
little bit concerned about the risk that
this would not ped up super well okay so
if we uh scan forward here we're going
to watch as the price starts to break
away and suddenly because of the big
surge of volume that we got right here
your point of control jumps up right so
now your point of control comes up to
about this area we had all this volume
in this area so that's the new point of
control line and the price moves higher
so we dip down we come back up to about
85 cents here and right here we move
even higher this is one of the first
really good examples of the volume
profile showing an area of support right
here right look at that so this was an
area that was a battle those of you guys
who were watching this this morning in
this area it was really choppy and I
didn't trade it here I was like I don't
know guys it's it feels like there's a
major tug-of-war happening and there was
we were going above and below the point
of control line there was so much volume
here buyers were buying sellers were
shorting it was tug of-war and then we
pulled away we started to squeeze up but
now we were only like 4 cents away from
our 200 moving average and then it drops
back down and it comes down almost to
that point of control line where it
bounces as it comes back up right here I
thought in hindsight I should have just
gone ahead and bought that dip uh but
what I ended up doing was I connected a
trend line right here so I connected a
trend line right about there to connect
those two lines because I was like
clearly those are sign ific and I also
drew a trend line right about here so I
was connecting these lines right in this
area so now as the price came back up
here I was like well we're going to be
running into this resistance line and
we're right at the 200 EMA on The Daily
can we break this level and when we
broke that level I got in with my first
entry for the break of $1 so it was
right here where I took my first entry
that was where I bought the stock we
break a do
and we squeeze up to
A110 now at this point we're bullish
we're well above the point of control
we're well above the volume weight
average price there's no question that
the Bulls are in control right now the
the only regret that I have really is
that I didn't buy the dip back here off
of that previous point of control line
but you can see now the point of control
line is moving higher so we push a
little bit higher we push higher and
then we come back down we dip down a
little bit and going into the open we
squeeze all the way up here here to
about
$140 and the point of control continues
to to move uh higher as the price goes
up so now the point of control gets
really high right here at about 38 and
this is very interesting because right
here look at the volume weight average
price it's way down to like a dollar a
share so I'm like yeah we have supported
a dollar but the current trading price
is like a138 $140 so support is 40 cents
away I'm not going to hold it all the
way down to there and in this area here
I was looking for that trade on the
break through a150 and as we held this
support level I was like I think we're
in good shape I think we're going to see
that break and then we broke that point
of control level and at that point I was
like all right we're below the point of
control the Bears are starting to take
control of this stock so now we're below
the point of control line and here we
rally back up to it and we're struggling
at it do you see this struggle now we've
got a battle right here and
unfortunately although it did get back
above it it wasn't able to hold this
level it kept trying and then failing
trying testing holding and then
rejecting and so what ended up happening
was my best trades on it were right in
this area here and then once we start
experiencing this battle above and below
the point of control line we just became
too choppy now what I could also do here
on this is add my macd so those of you
guys who have um watched my classes on
how I use macd will notice that right up
here we had the macd that was open and
then we sort of had this crossover we're
sort of in this choppy area we go
positive and then we go back negative
right here so that ended up being the
macd reversal macd comes down it tries
to swing back positive but it fails it
tries but it fails and so the macd
basically tells us that we had a window
on this trade from about about 90 cents
here about
8590 up to about
a120 then it pulls back tries again but
fails right here pulls back and then it
goes but it really to be honest not the
cleanest chart your macd is giving you
kind of the the indicator to weit your
volume profile is showing you we've got
this major tug-of-war happening around
$1
38140 and it's not able to hold over
that level so the way I traded this was
I traded aggressively on the front side
of the move and then I stopped trading
it and I was done and I did not trade it
past this point right here we rejected
point of control we weren't able to hold
up and it just sold off for the rest of
the day now this is very interesting
here again see how it comes right back
up to that level to the penny and
rejects that means you're drawing when
you see something like that that tells
you you've drawn your ascending support
and resistance levels the right way now
those of you guys um who want to learn
learn more about technical analysis I'm
actually going to put a link in the top
of the comments it'll be pinned and in
the top of the description for my
ultimate technical analysis kit it's a
um it's a it's basically a comprehensive
a collection of PDFs that you can
download you can print them out you can
put them around your trading station and
you can use these to help you better
understand how I'm interpreting price
action and I'm doing this using
technical analysis if you haven't
already checked out um that download
make sure you download it print it out
and you can have it on your desk cuz
learning how to draw these support and
resistance lines the right way really is
critical cuz there's Traders no doubt
who bought right into this level and
then what does it do it rejects all
right so make sure you check out that
download that'll be a um a free gift for
you guys today okay so now we're going
to jump back into the slide deck here so
my first trade here on
lipo was based on breaking news so we
had a news headline right I was using
volume profile to help me understand uh
essentially in this case when to stop
trading it when I was first trading it
we were well above the point of control
but this did help me understand when to
stop trading it when we had this uh area
of challenge up here uh and then we sold
off at the open and I was glad I took my
profit now the next stock I want to look
at is y
IBO yibo I'm um I'm up $1,100 on so this
is not a huge winner for me today uh but
I want to cover the volume profile on
this one as well um I mean we will for
all of them but this is just the next
one that we'll talk about okay so here
this stock popped up kind of early at
about 4:15 a.m. it dips back down it
rallies back up it pulls back and then
kind of this 5:15 a.m. sort of
struggling in this area notice our point
of control line right so we're basically
again straddling it we're below it below
it below it above it below it below it
so this is an area in other words of
consolidation now granted we are above
the volume weighted average price the
whole time which is bullish but we're
not firmly holding above the point of
control we're generating a lot of volume
in this consolidation range and we're
kind of struggling to break out and then
what ends up happening is we start to
pull away we start to base out and hold
$5 which is psychological support at the
half dooll hold
so we hold five and we pull away up to
525 550 up to 570 and then we start to
pull back so now let's jump forward to
the next slide here what ends up
happening is we come back up here to 550
we pull up right here the a point of
control line moves higher we have this
pop up this pullback and then right off
of this level we squeeze up to about 650
right here and then we start to sell off
so this again is our point of control
you can see that it moves as the price
moves now as we go further into the day
you'll see this point of control line
ended up staying right here around this
545 level so we were below it then we
were above it and then we went back
below it which tells us that this stock
was really not easy to trade so now
you've sort of got double levels of
resistance coming back up you've got
vwap and you have the point of control
we sell off we sell off and then we rip
up here at the open which I think caught
a lot of Traders by surprise including
me we squeeze up for a second I got a
dip and a rip on the halt resumption we
halt we open higher a quick rip and then
we quickly roll over and we come all the
way back down we try to bounce off right
around this point of control line and
then we go lower we come back up to it
and then we go lower so again just
reaffirming this is a level where there
is a real battle and for the most part
today we were trading below it we were
above it for a short period we weren't
able to hold we went back negative then
we got back above it and almost
immediately rejected on high selling
volume so the volume is telling such a
story here you basically have a short
burst of buying and then heavy selling
following it so this tells me that there
were people that were unloading the
stock they were happy to get rid of it
and ultimately the selling outweighed
the buying and so the stock maintained a
bearish stance below vwap and below the
point of control line so although I got
a small scalp on it the volume profile
really wasn't very good and I wasn't
able to get position for a nice trade
which was sort of disappointing this
gives you a zoom in on the 10-second
chart here um and and what you have here
is sort of this Ascension the break of
vwap up to point of control and then it
wasn't until we broke and held above
point of control that we got this quick
move and I think that's really
interesting because normally you would
expect the Big Break will come as soon
as you break vwap but in this case
because the point of control line was
above vwap we broke vwap but then we had
another piece of resistance right here
so we ran into the next level and we
couldn't break that we pulled back and
then we're pinned between vwap and and
the point of control but in this case
because of the time a day and the strong
B buying volume here and I think because
of the fact that the daily chart on um
let's see uh why why
IBO was unique what was unique about
this daily chart is that it's a blue sky
setup the all-time high was back here at
$4 and when it squeezed up here there
was no resistance none whatsoever this
is a stock that's a somewhat recent IPO
now today it's got 30 million shares of
volume and unfortunately it's a red
candle but it's also not uncommon
because there's often people that got in
prior to the IPO they're going to take a
day like this to cash in now it's also
true that there is no upside resistance
so these can sometimes move a lot higher
but I always approach that with a little
bit of skepticism so unfortunately y IBO
I I was a little bit cautious on it let
me just check I think this was the
Chinese yeah and this was a Chinese
stock as well so I was like ah I don't
know if we're going to be able to trust
it and no surprise it did not hold its
levels so not shocking but ALS so not
really a big deal now if we look at this
chart
here uh you'll also notice uh sort of
this big difference between the point of
control line and how high the volume
weight average price remained right
volume weight average price remained
High because I I mean I guess just the
average of the prices the amount of
volume that occurred at these high
prices but ultimately this was the price
right here that in totality had the most
volume by far and so this became the
area of point of control below it
bearish above it somewhat bullish but
again still with a grain of salt because
it's below the volume weight average
price so some really interesting price
action on this one wibo okay so now
we'll jump back here and um we'll look
at Pali okay so P AI this one was
interesting this one had breaking news
at 8:30 a.m. and it completes microbiome
study confirming da da so it's another
one of these sort of bio tech stocks and
I'm familiar with P because I've traded
it before but what I also know is that P
doesn't always hold up it gives us moves
it gives us volatility but it doesn't
always hold those levels so when it
first hit my scanner I'm thinking all
right it's on my high day momentum
scanner so that's the scanner right in
this area and I am able to evaluate of
course the time of day of the alert the
price of the stock the flow the volume
the the relative volume and then I can
see the news headline right here so I do
all of that and I see all right this has
news it's moving higher the float 728
th000 shares super low float this is a
stock that has moved in the past I
should pay attention to it so I put it
on my level two and I just had it kind
of on side chart I was like if it starts
to squeeze it starts to squeeze and in
this candle right here it starts to pull
away now at this point where's the point
of control it's way down at 480 right
vwap is down at like 470 so we're above
point of control we're AB above APAP So
based on all of that the position is
bullish at the beginning of this move
not surprising so we punch up here to
530 we pull back and then we push up to
550 we pull back and then as we break
550 we go almost straight here to
56586 up to 640 micro pullback and we
punch up to 660 so look at this volume
volume is increasing and then peing at
the high but that high volume has the
effect of pulling the point of control
way up real quick the volume weighted
average price moves up a little bit more
slowly lagging behind and once again we
get this similar position where the
price goes below point of control above
vwap bearish because we're below the
point of control line right we come back
up we can't sustain we drop back down
now we're between the two what happens
we roll over so we really want to see
when we have these pullbacks that we
hold the point point of control line
when we go below the point of control
line that's not good so on this one I I
had it on watch as soon as it had news
at 8:30 there were people in the chat
room that said hey P's got news keep it
on watch so at that point I was like
good call I didn't see the news headline
come out but thank you for bringing it
to my attention so I put the chart up on
a side chart and I pulled up the level
two so at that point all I was waiting
for was volume to come in right here we
got the first burst of volume a little
dip and then we got more right here so
once volume was coming in I was like I'm
jumping into this thing and I was
honestly surprised that we got a full
dollar a share out of it from 530 540
all the way up to 640 650 I think we had
hit a high of
660 so a solid trade on Pali palii which
ended up making it my biggest winner of
the day now what prevented me from
giving back that profit and going back
for another trade right in this area was
seeing that point of control line so
again this was really helping keep me
out of a trade that uh that I really
kind of wasn't set up uh quite right any
longer now I'll pull up um the charts
again and I'll show you the macd because
once again reaffirming that if you have
macd it's also going to give you an edge
in making sure you're not overstaying
your welcome here on these so oh let's
switch to the 10-second time frame all
right so 10-second chart here on this
one this was a fast moving stock all
right so we're going to pull this back
here
let's see all right so right in here
we're going get zoomed in and look at
the macd so you could see on this one I
don't usually use macd on a 10-second
chart but you can see again that's the
crossover right there so you know once
you have that crossover the moving
averages are converging we're coming
into this consolidation Zone below the
point of control you know it's just it's
not bullish anymore and the one of the
problems on this was this highest volume
candle being red that is a red flag
literally you could say so red flag
there on the high volume being red and
this had a chance right here to Rally
back up and when it failed that that was
when I was like this is not so great so
so that was P now if we jump back over
here um let's talk about the pros and
cons then we'll go over um the recap of
the Le of the rest of the trades from
today so what are the pros of using uh
volume profile the pros I would say is
you have a better understanding of the
point of control control in a stock
again you can use this on any Financial
instrument point of uh volume sorry
volume profile you can use it on Forex
or crypto or Futures whatever I'm using
it on stock but you can use it on
anything you can do technical analysis
on above the point of control is bullish
below is bearish and volume profile it
adds depth to the Candlestick patterns
because um it it helps you and sometimes
I put these slides together real quick
before I teach this class so I just
finished trading today and and I added
this slide so it helps you understand
why a stock is consolidating at various
levels so in this case it understanding
all right we're consolidating at this
level because this is the point of
control we're right below this critical
level that's why we're having resistance
here I think it's important and helpful
to see that now the cons of using volume
profile the only downside in my opinion
is that it's yet another indicator to
watch in your trading and if you don't
use indicators consistently you might as
well not use them at all because they're
really only useful if you're using them
consistently in you're trading if you're
using it you know on one out of every 10
trades then you're mostly ignoring it so
the the one time you use it maybe it's
not helpful right any just like anything
else there's no strategy that's right at
100% of time there's no indicator that's
right at 100% of time so it's in
totality if you use it consistently does
it work now in this case I think um
volume profile is a helpful indicator to
use and to have on your charts but I
would use it on the 5 minute time frame
because it just will that'll show you
your point of control line and that's
really the most important thing uh one
thing that I do is I align it to the
left some people have it aligned to the
right and I don't like that because I
don't want it covering my candlesticks
so I just put it on the left and to be
honest you probably could if you really
wanted to get rid of the blue and the
the red here or the blue and the orange
and just have the point of control
control line um but I don't do that the
developing um you know I don't use those
right here this is um I I don't I
haven't found this to be helpful so this
is more of a um a standard deviation
offset but again not not helpful for me
so I just leave the point of control
line and and that's it when I see the
price is above it that's what I like to
see um it it is certainly noteworthy
when we have the price break out of a
consolidation Zone you you have a
consolidation Zone like that you break
above that zone and you can hold above
it that's important but I'm going to
visualize that usually um with
horizontal support and resistance lines
based on prices around half dollars and
whole dollars so this is a clear level
that was like a flat top we broke above
it and now we're holding so it's kind of
a combination of your technical analysis
that you're going to do with ascending
and horizontal support and resistance
lines and adding in point of control
along with volume weight average
price okay so now let's talk about my
biggest uh loser of the day so my
biggest winner as you can see was Pali
uh Lio and then Li boo those are my
three stocks I was green on but actually
had four stocks today that I was red on
and I started the day by going in the
red on my very first trade so I sat down
this morning at about
645 and at that time I was looking at
the scanners and I saw lipo or Li yeah
lip
and I I thought you know I don't know
about it I'm not sure like I said it's a
little too cheap 200 EMA it's got some
issues we'll see uh and then BMR ends up
hitting my scans and BMR had news and
this one again you can see kind of like
P it ended up being r on the day right
now it's actually down
6% which is kind of ridiculous so on
this one we'll go back to we'll start at
the 10-second chart we'll start really
zoomed in um and so first of all I
noticed on The Daily an area of
resistance here at 573 do you see that
flat top right there and then I saw if
we broke that we had room up to 671 so
that was sort of the daily analysis that
I did I then zoom in I'm on the the 10c
and the one minute time frame I'm
looking for trades on this and as it
first pops up right
here I'm thinking this is like 748 745
I'm like okay I I think think I can work
with this and I actually take my first
trade right here at 741 right here we're
above point of control we're above vwap
everything is bullish we've got breaking
news so I'm like this is fine I get in
at 541 2500 shars I get out at um 5 like
53 or or 51 right here for like $200 a
profit then it squeezes up right here
and I was like I don't know if I want to
get back in because we've got this
resistance at 70 I think that's going to
be a problem so I hesitate right here I
don't get back in and then it comes back
up here and it just it happened so fast
where we're down here below sorry we're
down here below vwap which normally you
know is bearish we broke below vwap
that's not a good thing and then
suddenly we're back up above that level
so we rip right here and to be honest I
should have jumped back in right here as
soon as we were back over the point of
control and back overview app but I
hesitated cuz I was worried about this
level up around 73 so it finally comes
up here and I end up U buying this let's
see let me just check the time stamps
this is 54 yeah so I ended up buying
this at um
590 and I bought to anticipate that we
were just going to squeeze right through
six with a target of 605 to 610 what
ends up happening is we tap a high of
598 and then we drop back down here to 5
81 so I'm like all right you know that's
not too bad so I add to my position I'm
adding on this micro pullback right here
and I'm looking for the squeeze through
six but guess what happens we break six
for a hot second and then we flush back
down and rather than take profit off the
table up here I decided to add to the
position so I started with 2500 shares
and then once I was up on the trade I
was like you know what this is I think
this is the one it's up it's moving so
I'm adding at 605 and 610 and now I've
got 15,000 shares and my average is
598 right here and it dumps here down to
580 and I was like shoot well I got to
get out so I got out for a $2,000 loss
on my first trade and that's a that's a
big loss for my first trade of the well
it's actually technically my second
trade so now I'm down ,800 on the day
and I'm I'm like yikes that okay that
was not great it dips down to 580 and
then um right here it comes back up so
when it comes back up I got right back
in right at six once we got back over
the point of control line I was like
okay I'm going to get back in here at $6
and we pop up to 620 and then we drop
back down again and same thing happened
I stopped out a second time so I think
most of you would probably look at this
and be like Ross this should have been a
winner this should have been a winner
what's going going on why were those not
winning trades you were clearly up on
them and the problem
was and I think this kind of speaks to
you know let's get some context here you
look at my trades from the last week and
you'll see that I don't know why this
isn't like um kind of that's weird
anyways it doesn't matter um so you look
at my trades from the last week here and
you'll see that I just have been having
these really big green days and I felt
like um these are 20 ,000 $40,000 days I
felt like when BMR was starting to pull
away that this was going to be the one
so I was really quick to size up in fact
I didn't wait until I had my $1,000
cushion before sizing up to 15,000
shares and that was my biggest mistake
rather than chip a couple base hits I
right away was like here we go home run
potential part of that was because my
first entry was at 540 and now I'm
trading it up at 6 50 cents higher so
I'm like clearly it's up but I just got
myself too focused too quick on trying
to hit a big winner rather than just
taking the base hit off the table
because I had the potential on this to
lock up three base hits right one was
this one right here and then regardless
of the fact that I didn't get this trade
down here this still could have been a
fine base hit and this was a fine base
hit but instead you know schmuck that I
am I added on this too high and I
screwed myself up so now I'm read
$3,700 I actually feel like I was read
four grand but um maybe that was because
of the next trade um yeah it was okay
the next trade was
LR okay so now LR hits my scanners you
can see I'm read $386 on this one it
hits my scanner this morning pretty
early and uh again I'm like okay this
thing's hitting my scanners I'm going to
take a stab at it and look at this
rejection holy smokes
I got in at two bucks and it goes up to
240 I didn't take anything off the table
and I stopped out right here and I'm
glad I stopped out but man what a
rejection but again you know that could
have been a small base hit but I didn't
take my profit off the table because now
at this point I was down three
$3,700 on the day and I'm thinking I
need more than you know 20 cents a share
to kind of get me out of the hole I need
like a nice trade and that unfortunately
didn't happen on LR so now I'm down four
grand and as I said at the beginning of
this episode my daily Max loss is um
minus 5K that's my Max loss my daily
goal is 5K and my weekly goal is 15K
because I figure one day out of each
week I'll hit Max loss so three days of
5K green One Day 5K red and then that
cancels out one of these days and this
was 5K so Monday Tuesday Wednesday
Thursday Friday so whatever day happens
to be the red day um that's going to
cancel out one of the green days so
weekly goal is Daily Times three so this
was kind of my thinking here is you know
now you're starting to get real close to
your daily Max loss so let's take a step
back for a second BMR not obvious enough
didn't work LR not obvious enough also
didn't work what is obvious right now
and that's when I said you know what
it's time to trade lipo so I switched
gears and started trading lipo and that
that ended up being my savior for the
morning so that recouped all my loss and
put me in the green trading that on the
front side of this move as it broke this
ascending resistance level and we
started to pull away right so we already
talked about lipo so this gave me my
profit then I got the trade on Pali that
one came up next and then I gave back on
my last two trades 900 on tww oou and cl
di CDI this one was actually in the
morning um again this is a stock that
hit my scanner early very similar
actually to a couple of the others right
like this pop up and then nasty
rejection so $800 loss on that a little
bit
annoying and and here's the thing that
I'll say about trading in general to a
certain extent it's a little bit of a
numbers game which is that you can if
you trade for years and years and years
and years you know that you're right 65%
time there's just going to be a certain
number of Trades four out of 10 roughly
three out of 10 that you're you're going
to lose on no matter what it's just the
way it is so I step up to the play if I
see something moving I'll take a stab
I'll try to break the ice but I took
some losses on those today now my
starter sizes across the board ended up
getting bigger today uh partly because
of the momentum I've had in the last two
weeks and then lipo gave me a nice
cushion so then I was like all right I
can be a little more aggressive
so
twou um this one uh this one actually
did go higher um before rejecting but I
got stopped out on it anyways and that
was this morning um right in this area
now what was interesting about this
chart was that we had Gap fill on The
Daily up to 398 and we filled that
almost to the penny so the way I traded
this was initially you know we got this
halul up and then it opened dipped and
ripped and I hesitated on it here and
then it ends up pushing higher and I was
like gosh darn it I I kind of screwed up
this trade so it pulls back um right
through here comes back up right through
here and I got in um right in this area
for the break through high a day and it
just kind of stalled out and you know
what I wasn't I I just I don't know I I
I just thought that it was going to
break once we pulled away from that
level so if I back this up you'll see
the point of control Line's going to
move down a little bit so I'm going to
have to move it back into this area so
as it started to pull away here at 80
this is where I was like okay we're
going for three and I got stopped out
right here then it rips back up but I
was like whatever so anyways 10,000
shares lost 9 cents a share on that one
and at that point I was like you know
what I I think I'm good you know I I
peaked at about 14,000 today uh maybe
13,000 right around there so gave back
about two grand off the top on CDI I
guess a little bit and um CW oou and oh
and I actually gave back half of what I
had on W yibo I was up a bit more on
that and I gave back half so I
overstayed my welcome on that one a
little bit too and and so at that point
I was like you know what $11,000 is a
pretty solid day it's still double the
daily goal in gross profit now the one
thing I'll say today is that my
commissions are steep I traded a lot of
shares especially on lipo I was jumping
in jumping out jumping in jumping out so
my commissions on lipo are two over
$2,000 it's over 25% of my profit which
is a shame uh this is the cost of doing
business but you know it it is
unfortunate because I know a lot of you
guys trading with commission free
Brokers have zero commissions on those
trades but for me I paid the commission
on it and it is what it is so my net net
today after fees and commissions is
going to be
closer to 8 thou eight and eight and
change 8,000 something so I've got some
some real fees and commissions today for
sure but you know again at the end of
the day I I'm not too worried about it
because I don't typically trade those
low price stocks and it's still helped
me recover the losses that I had on BMR
and it's still a solid green day so I
had sort of a swing in the p&l from down
almost 5 to up 13 finishing at
11,600 have some fees and commissions
wasn't the cleanest day so my goal is to
try to do a little bit better tomorrow
now those of you guys um who want to do
a twoe trial at Warrior trading I'm
actually going to give you a link here
um it's going to be pinned to the top of
the comments uh and it'll be right next
to the link to download my technical
analysis toolkit uh so or my my
comprehensive guide so this is a link
for the twoe trial Warrior trading so
you guys can do this it's $20 for two
weeks that'll give you two weeks of
access and it gives you access to uh all
of the market data so you'll have
realtime uh scans and charts during your
trial you can have access to this
platform in addition to my broadcast and
a selection of classes from the warrior
Pro curriculum so you guys should
definitely check that out if you haven't
already and if you didn't already
download my technical analysis worksheet
that PDF make sure you check that out
you download you can print it out and I
want to encourage you to start testing
out some of the things you're learning
but I want to remind you as always my
results are not typical I've been
trading for a long time and so I always
want you to trade in a simulator before
you put real money on the line because
look if you can't make money in a
simulator you have no business trading
with real money so take it slow the
market will be here for you all right so
set a solid foundation learn the right
way and I always think it's great to
learn from someone who is actually
proven profitable and if you're ever
curious you can check out my broker
statements are on the footer of the
website Warrior trading and you can see
my audited uh performance records as
well so thanks as always for tuning in I
hope you hit that thumbs up subscribe
the channel and I will see you for the
next episode real soon
تصفح المزيد من مقاطع الفيديو ذات الصلة
The MOST POWERFUL Day Trading Indicator
INTRADAY STRATEGY - PIVOT + VWAP + EMA
How To Start Trading Stocks As A Complete Beginner - Ep.4
Unlocking the Power of Technical Analysis: Deep Dive into Our Signal Analysis
Answering Forex's Most Asked Questions
please use this trading system to make your first $100k
5.0 / 5 (0 votes)