Arduino Workshop - Chapter 5 - Interrupts
Summary
TLDRThis script introduces the concept of interrupts in microcontroller programming, contrasting them with the polling method for handling button inputs. It explains how interrupts allow the microcontroller to be notified of changes without constant checking, making them more efficient for complex programs. The video covers the basics of setting up interrupts in Arduino, including defining interrupt service routines (ISRs) and the importance of keeping ISRs short to avoid interfering with other tasks. It also provides practical tips and best practices for using interrupts effectively.
Takeaways
- 🔄 Polling is a method where a program frequently checks the state of an input like a button, but it's inefficient for complex programs.
- 🛠️ Interrupts provide a more efficient way to handle input changes; they allow the microcontroller to be notified of state changes without constant checking.
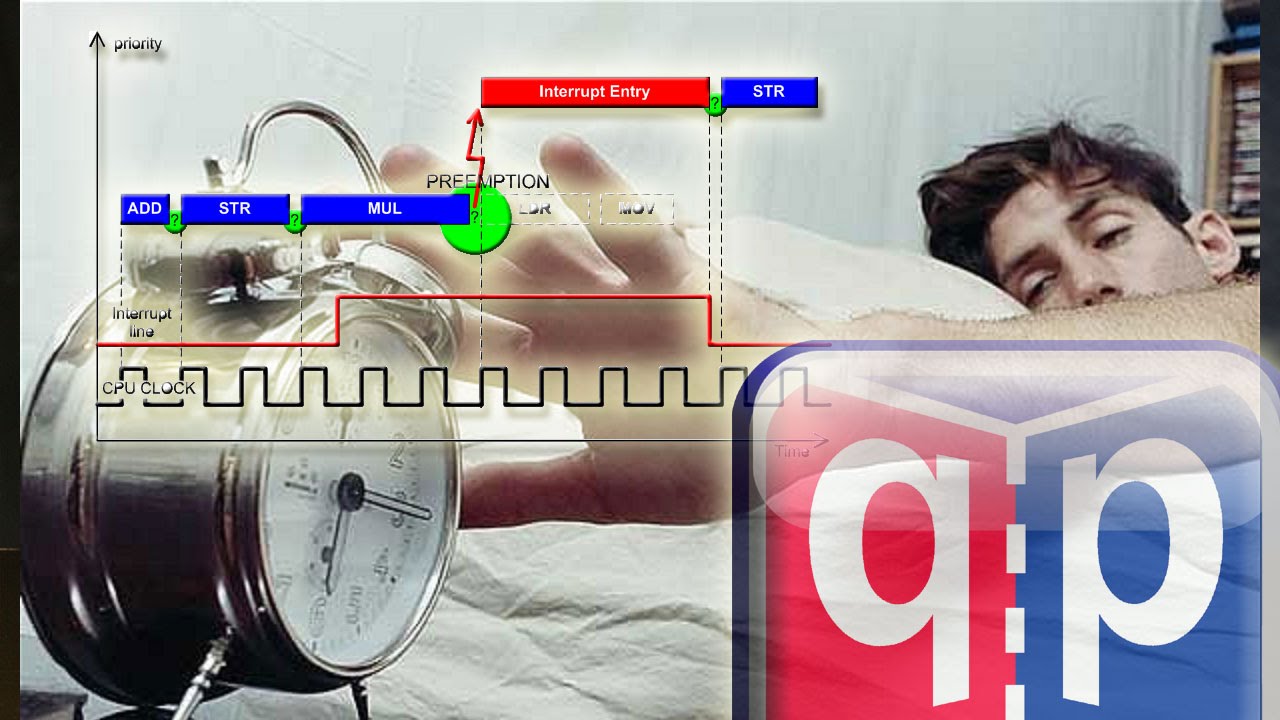
- 👮♂️ An interrupt is a hardware feature that can monitor an input pin and 'interrupt' the microcontroller to signal a change.
- 📬 The analogy of expecting a letter from the postman illustrates how interrupts allow you to be notified instantly of an event, freeing you to do other tasks.
- ⚠️ There are three types of interrupts: change, rising, and falling, each triggered under different conditions of signal transition.
- 🛂 The Interrupt Service Routine (ISR) is a specific function run when an interrupt condition is met, and it should be kept as short as possible.
- 🚫 ISRs cannot return values or take parameters, and certain functions like delay() do not work inside them due to their interrupt-based nature.
- 🔁 The 'volatile' modifier is used for variables changed inside an ISR to indicate they can change at any time, independent of the main program flow.
- 🔌 Only certain Arduino pins have interrupt capabilities, and not all chips support all types of interrupts on all pins.
- 🔄 When using interrupts, attachInterrupt is used to set up the interrupt on a specific pin with a designated ISR to be executed upon change, rising, or falling.
- 🔧 In practice, using interrupts can bypass the need for continuous polling in the main loop, making the program more efficient and responsive.
Q & A
What is the primary method discussed in the script for detecting button presses in simple programs?
-The primary method discussed is polling, which involves constantly checking the state of the button at a high frequency to detect presses or releases.
Why is polling not efficient for complex programs?
-Polling is inefficient for complex programs because it requires the microcontroller to frequently check the button state, even when it is often the same, which interrupts other tasks and processes.
What is an interrupt in the context of microcontrollers?
-An interrupt is a hardware feature on a microcontroller that can monitor the state of an input pin and can interrupt the microcontroller's current task to signal a change in state.
How do interrupts differ from polling in terms of efficiency?
-Interrupts are more efficient because they allow the microcontroller to perform other tasks and only check the button state when there is an actual change, rather than constantly polling.
What are the three basic types of interrupts mentioned in the script?
-The three basic types of interrupts are change, rising, and falling. Change interrupt triggers on either a rising or falling signal, while rising and falling interrupts trigger specifically on transitions from low to high or high to low, respectively.
What is an Interrupt Service Routine (ISR)?
-An ISR is a specific function that runs when an interrupt condition is met, allowing the microcontroller to respond to the interrupt event.
Why should the code in an ISR be kept as short as possible?
-The code in an ISR should be short to minimize the time the microcontroller is occupied with the ISR, ensuring it can quickly return to its main tasks and not interfere with other processes that require precise timing.
Why are the delay and Millie's functions not suitable for use inside ISRs?
-Delay and Millie's functions are not suitable for ISRs because they are based on interrupt functions, and only one interrupt can be executed at a time, which would conflict with the ISR's operation.
What is the purpose of declaring a variable as 'volatile' inside an ISR?
-The 'volatile' modifier is used to declare a variable that can be changed at any time by an interrupt service routine, ensuring the main program is aware of potential changes made within the ISR.
Which pins on an Arduino board are typically interrupt-capable?
-Typically, digital pins 2 and 3 on an Arduino board are interrupt-capable, but this can vary depending on the board model, and a quick Google search can provide specific information for different boards.
How can you determine which pins on an Arduino board support interrupts?
-You can determine which pins support interrupts by searching online for the specific Arduino board model along with terms like 'interrupt pins' or checking the board's datasheet or documentation.
Outlines
🔄 Understanding Interrupts in Arduino
This paragraph introduces the concept of interrupts as an efficient alternative to polling for input devices like buttons in Arduino programming. It explains how polling can be resource-intensive in complex programs and contrasts it with interrupts, which allow the microcontroller to be notified instantly when a change occurs. The analogy of a mailbox that alerts you to a letter's arrival is used to clarify the concept. The paragraph also outlines the three types of interrupts: change, rising, and falling, and emphasizes the importance of keeping the interrupt service routine (ISR) short to prevent blocking other tasks.
🛠 Implementing Interrupts with Debouncing
The second paragraph delves into the practical application of interrupts, particularly focusing on debouncing a push button. It describes the process of setting up an interrupt with global variables, pin modes, and the use of the 'volatile' modifier for variables that can change within an ISR. The paragraph explains how to attach an interrupt to a specific pin and choose the type of interrupt (change, rising, or falling). It also discusses the importance of keeping the ISR concise and the conditions under which the debouncing function is executed, including the use of a flag variable to indicate an interrupt has occurred.
🔍 Best Practices for Using Interrupts in Arduino
The final paragraph provides guidance on using interrupts effectively in Arduino projects. It advises on checking which pins on a specific board are interrupt-capable, either through documentation or a quick online search. The paragraph reinforces the power of interrupts for handling multiple tasks simultaneously and reiterates the best practices discussed earlier, such as keeping ISRs short and ensuring that only certain pins are used for interrupts. It concludes by highlighting the versatility of interrupts and encourages adherence to the established guidelines for successful implementation.
Mindmap
Keywords
💡Polling
💡Interrupts
💡Microcontroller
💡Interrupt Vector
💡Interrupt Service Routine (ISR)
💡Debouncing
💡Volatile
💡Pin Change
💡Rising Edge
💡Falling Edge
💡Arduino
Highlights
Introduction to the concept of polling as a method for checking the state of a button in a program.
Limitations of polling in complex programs due to the need for frequent checks.
Introduction to interrupts as an efficient alternative to polling for handling digital inputs.
Explanation of how interrupts allow the microcontroller to be notified of changes without constant checking.
Description of interrupts as hardware capabilities that can interrupt the microcontroller's operation.
Comparison of polling to checking a mailbox frequently versus interrupts as a notification system.
Clarification of the three basic types of interrupts: change, rising, and falling.
Importance of keeping the Interrupt Service Routine (ISR) as short as possible.
Explanation of the ISR's role in jumping from the main program to handle the interrupt and then returning.
Guidelines for using interrupts with Arduino, including keeping ISRs short and not using delay functions.
Details on the use of the 'volatile' modifier for variables changed inside an ISR.
Limitation that only certain pins on Arduino have interrupt capabilities.
Information on the different interrupt capabilities of pins, such as change, rising, or falling.
Demonstration of how to set up an interrupt in the Arduino IDE with example code.
Use of a 'button flag' variable declared as volatile to indicate changes detected by the ISR.
Explanation of how the ISR sets the 'button flag' and its role in triggering the debouncing function.
Advantages of using interrupts over polling for efficiency in complex programs.
Practical example of using interrupts with a button and an LED on an Arduino board.
Conclusion emphasizing the power and versatility of interrupts in programming for Arduino.
Transcripts
[Music]
in all of the sections that we've
covered so far we've been using buttons
and other Hardware devices as inputs to
control changes in the program such as
manipulating outputs and in the case of
a button we've had to make sure that our
program runs a check to see what the
button state is really regularly at a
high frequency so that we don't miss a
press or a release this method is known
as polling as it involves constantly
polling or checking the state of the
button this is all well and good for
simple programs with little else going
on however once your program starts to
grow and become more complex polling
doesn't work as well because you've got
heaps of other stuff going on at the
same time it requires your
microcontroller to stop whatever it's
doing and frequently check the state of
the button even if most of the time it's
exactly the same as it was
before fortunately there is a much more
efficient way to read the state of a
digital input using interrupts you may
have heard of interrupts before and
imagined them as a scary complicated
procedure but Arduino does a really good
job of making them incredibly user
friendly so what is an interrupt well an
interrupt is a section of hardware on
the microcontroller which is capable of
monitoring the state of an input pin by
itself and can literally interrupt the
microcontrol in whatever it's doing to
let it know that there is an interrupt
Vector ready that the state of Ain has
changed in this case or that it is high
or low the beauty of this this is is
that the interrupts are all taken care
of with Hardware flags and some very
lowlevel microcontroller instructions
which means you can be doing other
things and not have to worry about
constantly checking the button St a good
way to think of interrupts is imagine
you're expecting a letter from the
postman you could go out and check the
letter box every 2 minutes or more
regularly to see if it's been delivered
which wouldn't allow you to get much
done in between or you could have a
mailbox that makes a loud noise when a
letter is delivered so you can forget
about it but be notified instantly as
soon as it arrives leaving you free to
do whatever you like until that point as
mentioned before there are three basic
types of interrupts change rising and
falling when you tell the Arduino that
you wish for a PIN to have the
corresponding interrupts for it enabled
you tell it under what condition you
wish to trigger the interrupt on a
rising Edge a signal going from low to
high on a falling Edge which is a signal
going from high to low or either which
is rising or falling known as change
when this condition is met your uino
will will run a specific function that
is unique to that interrupt this
function is known as the interrupt
service routine or ISR as we'll refer to
it the key to interrupts is that the
code that executes in your ISR should be
as short as possible because as soon as
the interrupt is triggered it will jump
from whatever wherever your
microcontroller was in your program and
service the interrupt and complete the
ISR before it go back to where it left
off and that means that it can't do
anything else while it's running the ISR
so if you're using an LCD display or
connecting to a Wi-Fi network or
something that requires tight timing and
integration those processors will often
fail because whilst they might appear to
be only running in the background if
your microcontroller is locked up
executing an ISR it can't do anything
else it can be a bit confusing trying to
remember all that there is to using
interrupts so here is a list of some
basic dos and don'ts when using
interrupts with
Arduino keep isrs or the interrupt
service routines the function that calls
off the interrupt as short as possible
usually you're only using this interrupt
service routine to set a flag or change
a state rather than executing an entire
section of
code isrs cannot return values or take
parameters the delay and Millie's
function native to Arduino they will not
work inside isrs because they're based
on interrupt functions and you can only
have one interrupt being executed at a
time delay micros seconds which is a
subcategory of the delay function except
it stores and measures in microsc will
work because it's not interrupt based
any variable which is changed inside an
ISR should be declared with the volatile
modifier and only certain pins have
interrupt capabilities on the uino you
know only digital pins 2 and three have
interrupt capabilities and B aware that
not all chips support all three kinds of
interrupts across all of the pins some
pins may only allow for a change
interrupt which can determine whether
the signal is rising or falling but it
will be run on either and you will have
to run additional code to determine the
state of the input to determine whether
it was a rising or falling Edge other
pins will have the option for all three
so you can set it for a falling Edge a
rising Edge or a pin
change now that we've talked about what
interrupts are let's look at how to use
them so we'll take a look at the Arduino
IDE so I've got a basic function going
on here and it's incredibly similar to
the more advanced concept that we use
for if statements where we looked at
debouncing a push button and using some
if logic and some variables to keep
track of the state using debouncing to
ensure that our switch is pressed
cleanly and if statements to determine
whether it's been held or
released so it's almost exactly the same
we've got LED pin button pin and some
Global variables and the only one that's
different here that you notice is this
volatile int button flag now button flag
we're going to use as a binary one or
zero flag variable just like any other
except we've used the modifier volatile
which declares that this integer can be
changed without uh without the rest of
the Arduino body knowing about it to put
in perspective the whole microcontroller
is has its mind focused on executing
this interrupt service Vector sorry
interrupt service routine and not all
the rest of those functions aren't
running at all so you need to declare it
as volatile to make sure the Arduino
knows that this uh this variable could
change at any time inside an interrupt
service routine we have our debounce uh
variable as normal declaring some pin
modes and here we can see that we're
initializing this interrupt to the pin
so we use attach interrupt then inside
there we use digital pin to interrupt
and in Brackets the pin that you're
using so we could change that from two
to button pin but two makes it easier to
remember that we're using a specific
spefic interrupt capable pin then a
comma and you declare the name of the uh
the name of the function that you wish
to run so ISR button is the general rule
of thumb for declaring functions that
you're running as isrs so interrupt
service routine button and then we want
it to run on a change meaning whether it
transitions from a high to a low signal
or from a high uh from a low to a high
signal and vice versa so you don't
always have to use digital pin to
interrupt there's a couple of different
uh syntax formats for doing this inside
Arduino however digital pin to interrupt
is the safest it largely just depends on
the model of Arduino board that you're
using but generally speaking if you use
digital pin to interrupt rather than
just the pin itself most boards are
going to work without a
hitch now in this void Loop we have the
exact same set of instructions that
we'll using for standard debouncing so
we won't go through that too much the
only difference is we've added an extra
condition to determine whether our
Arduino enters into this whole
debouncing function as normal before we
had mli minus last press is greater than
debounce time if that is true then we're
going to run this section of code that
was ensuring that it could only be run
at a certain frequency filtering out
that noise now we're also adding an
extra condition for button flag and
button flag has to be true or one in
order uh for this to run at all and the
reason for this is that it's going to
bypass all of this because the if
statement isn't met and so the loop is
just going to iterate doing nothing and
the only way that button State H sorry
button flag can be equal to one is if
the isrb button function the interrupt
service routine for pin 2 is run in
which case all it does is set button
flag and that that process of changing a
variable uh changing the state of of a
flag variable like that is so short it's
a really good example of how to use
interrupt service routines we could put
all of that code inside the interrupt
service routine if we wanted and that
would work perfectly fine in this
example but if we had a lot of other
background process is running it it
would chew up more time that the Arduino
is stuck in that service routine because
as it is if it's only running through
instructions in the void Loop if you're
especially if you're running a whole
bunch of other libraries as we talked
about especially um for you know timing
specific Hardware or Services it's going
to be running the void Loop Shore but
every so often you'll Branch off into
another hidden interrupt service routine
that's running in the background jump to
all these different parts of the code
that you won't actually realize what
going on but if it's inside this ISR it
can't so that's why it's really
important that it's really short and
then so it it can only run that that uh
toggle function if the interrupt service
routine has already been run in other
words if it has uh detected a change be
it a press or a
release then the only other thing we've
added in is button flag is equal to zero
in other words when it executes the
toggle function including all of the
debouncing no matter whether it's a
press or a release button flag is set to
zero which means it will not run that
section of code until our interrupt
service routine has run again to reset
that flag so let's go ahead and load it
up make sure we've got the correct
settings hit upload and it's going to
work exactly the same as our previous uh
toggle button example did because it's
achieving the same goal but it's doing
it in a much more efficient manner so
when we press it it's a nice little
toggle switch I'm using pin 3 here but
you could also use pin 13 or any other
digital pin for the led the important
thing is there that if you want to use
an interrupt for button pin it can only
be pin 2 or three and you can find out
what pins are interrupt capable just by
Googling the board and saying Arduino
you know interrupt pins or tensy
interrupt pins or whatever board you're
using quick Google will bring up either
the data sheet or a documentation or
reference page and let you know what
they are and which pins can deal with
change interrupts or they can deal with
all three so Rising falling State
changes as well so that's a little bit
on using interrupts they're incredibly
powerful you can do all kinds of things
with them you can attach multiple pins
to the same ISR or you can you can use
it in however you like as long as you
follow those guidelines that we set down
before for the basic General uh best
practices for using interrupts
تصفح المزيد من مقاطع الفيديو ذات الصلة
RET & RETI Instructions of 8051 Microcontroller: Comparison and Explanation | Instructions of 8051
50. CAMBRIDGE IGCSE (0478-0984) 4.1 Interrupts
#363 Which ESP32 pins are safe to use?
Interrupts in 8085 microprocessor | Types of Interrupts in Computer Organization
Unit 2 L10 | RIM instruction | Read Interrupt Mask| RIM IN 8085 MICROPROCESSOR | Pending Interrupt
Read Interrupt Mask Instruction In 8085 | RIM Instruction In 8085 Microprocessor
5.0 / 5 (0 votes)