Pictavo Walkthrough
Summary
TLDRThis video script offers a comprehensive guide to creating a yearbook using Pictavo. It covers the initial setup, including account login, homepage navigation, and accessing the three core functions: building, managing, and selling the book. The tutorial walks viewers through planning content, designing pages, managing photos and portraits, setting up user permissions, and using the calendar for scheduling. It also details the process of uploading student rosters, setting sales goals, and exporting sales reports. The script emphasizes the importance of the ladder for organizing pages and provides tips on designing covers and pages using templates and customizing them with text, colors, and photos. Lastly, it outlines the steps for approving and submitting the cover and pages for production, ensuring a polished final product.
Takeaways
- 📚 The main screen in Pictavo displays your account info and three key sections: building, managing, and selling your yearbook.
- 🛠️ Build My Book lets you plan and design pages, manage photos, and oversee content creation.
- 📅 Manage My Book provides tools to manage your project schedule, user permissions, and track progress.
- 💰 Sell My Book allows you to set up products, pricing, sales goals, and export sales reports.
- 👥 User Management enables adding users, setting permissions, and grouping them for easy access control.
- 📋 The calendar helps organize events and tasks, assign deadlines to users, and track their progress.
- 👨🎓 Uploading a student roster is crucial for managing portraits and indexing for the yearbook.
- 🎨 Page design involves selecting templates, uploading custom covers, adding type, and customizing layouts.
- 📸 You can upload photos, edit their size, tag students or topics, and flow portraits into pre-designed grids.
- ✅ Once all pages and the cover are approved, you can submit them for final production and publishing.
Q & A
What is the first screen you see when you log into your Pavo account?
-The first screen you see when you log into your Pavo account displays your account information and the 'My Account' button. It also shows upcoming events or tasks when you click the three lines.
What are the three main functions of a yearbook building according to the script?
-The three main functions of a yearbook building are 'Build my book', 'Manage my book', and 'Sell my book'.
What does 'Build my book' allow you to do?
-'Build my book' allows you to plan content for each page, design your book, and manage all your photos.
In 'Manage my book', what can you monitor and set defaults for?
-In 'Manage my book', you can monitor project status, oversee user activities and permissions, and set defaults for page designing.
How do you set up your book within the advice advisor center?
-To set up your book, you first go to the 'Project specifications' section, then select 'Book setup', and click on 'Grids and guides' to choose your preferences.
What is the purpose of the 'User management' section?
-The 'User management' section is where you add new users to the book, assign permissions, and manage page access for them.
How can you create new events in the calendar?
-You can create new events in the calendar by clicking the 'New event' button and assigning it to users.
What is the process of uploading the student roster?
-To upload the student roster, you select the 'Upload roster' icon and ensure it is formatted properly.
How do you enable yearbook sales through buy the yearbook.com?
-You enable yearbook sales by going to 'Store setup' under 'Sell my book' and enabling 'by the yearbook sales'.
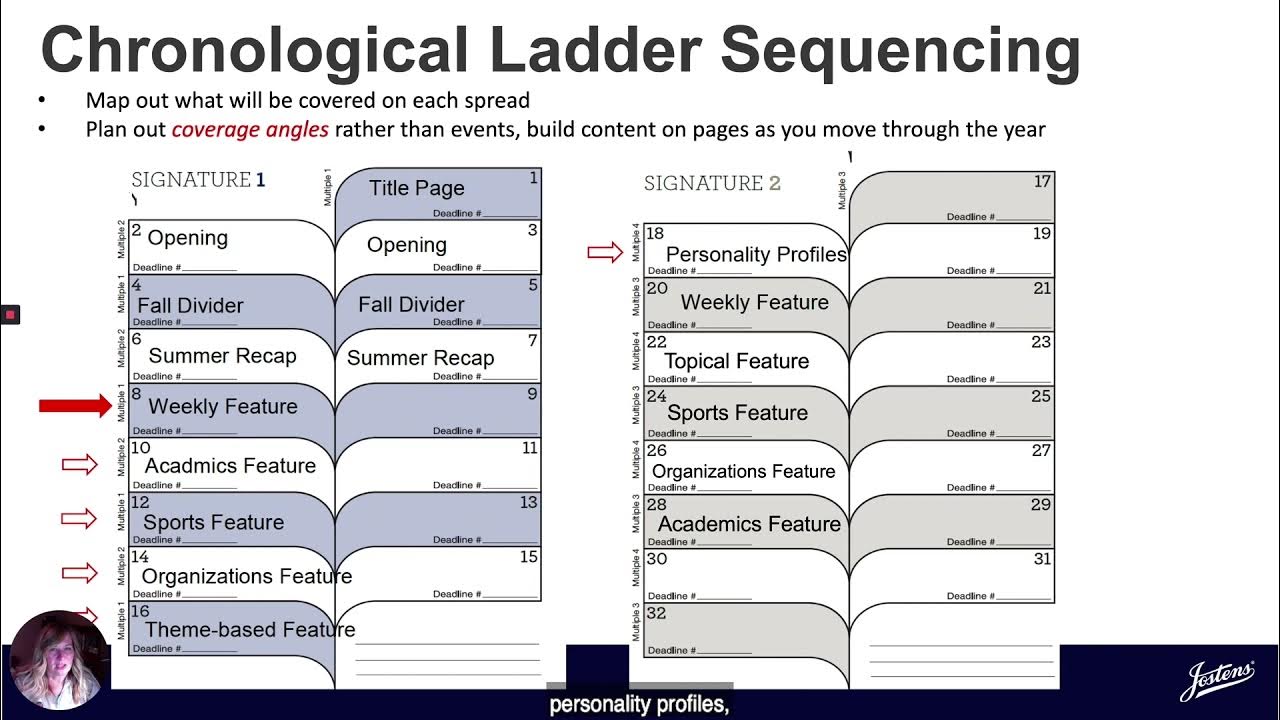
What is the 'Ladder' and how does it help in designing the yearbook?
-The 'Ladder' provides an overview look of your book and helps in planning content ahead of time. It allows you to create sections, sort pages, track user activity, and assign users to pages.
How do you add photos to the yearbook pages?
-To add photos, you select the 'Photo' icon, then 'Photos', click the 'Upload' button to add photos, find the photo you wish to use, and drag it into the photo box.
What is the final step before submitting your book for publishing?
-The final step before submitting your book for publishing is to approve and submit all your pages for printing after they have been designed and approved.
Outlines

هذا القسم متوفر فقط للمشتركين. يرجى الترقية للوصول إلى هذه الميزة.
قم بالترقية الآنMindmap

هذا القسم متوفر فقط للمشتركين. يرجى الترقية للوصول إلى هذه الميزة.
قم بالترقية الآنKeywords

هذا القسم متوفر فقط للمشتركين. يرجى الترقية للوصول إلى هذه الميزة.
قم بالترقية الآنHighlights

هذا القسم متوفر فقط للمشتركين. يرجى الترقية للوصول إلى هذه الميزة.
قم بالترقية الآنTranscripts

هذا القسم متوفر فقط للمشتركين. يرجى الترقية للوصول إلى هذه الميزة.
قم بالترقية الآنتصفح المزيد من مقاطع الفيديو ذات الصلة
Jostens: Adapting a Chronological Ladder
Yearbook Layout Basics | Organized Adviser

Current Affairs Yearbook 2024 Bangla PDF Download | TWS Academy | Jan - Dec 2024 CA | SSC | NTPC

Book summary video kaise banaye | How to make book summary video | Whiteboard animation

Creative Writing | GCSE Revision Guide | AQA
how to self study 📚 a step by step guide
5.0 / 5 (0 votes)
