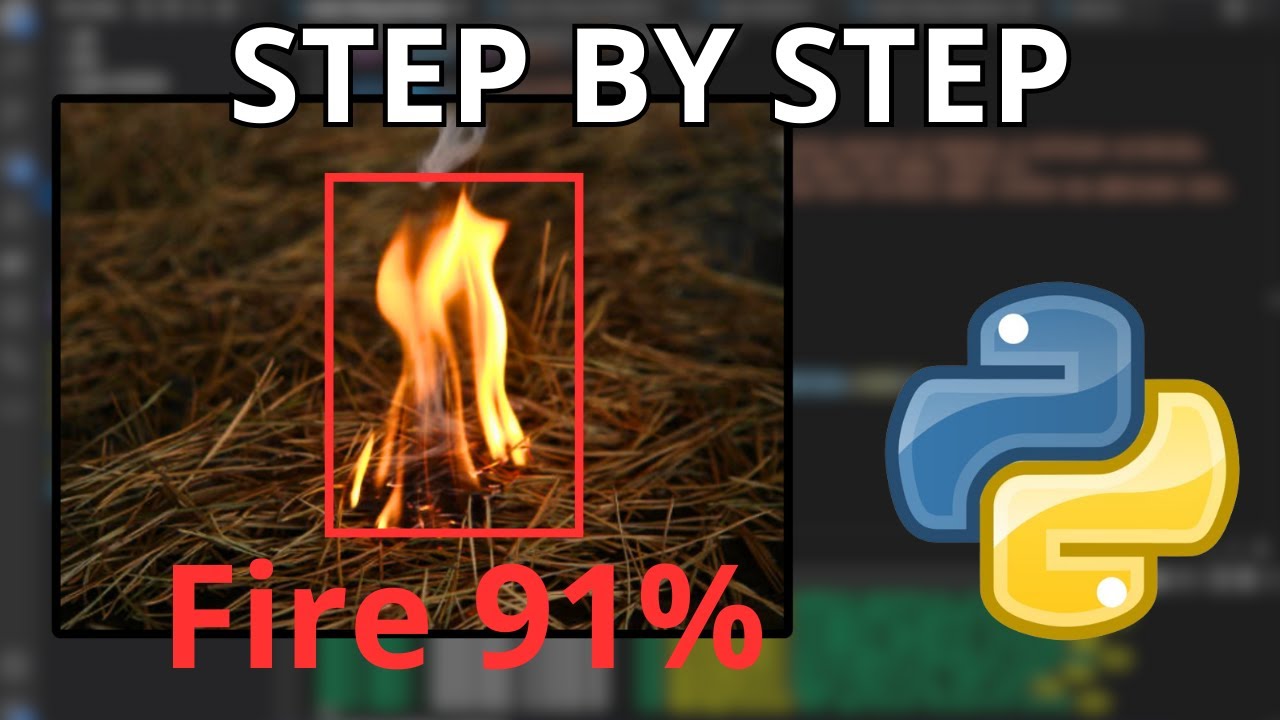
Train Your Custom Yolov8 Object Detection Model | step by step. #ml #ai #computervision #tech

Tech Watt
1 Mar 202321:06

Summary

TLDRThis tutorial guides viewers on creating a fire detection model using YOLOv8, a fast and accurate object detection algorithm. It covers preparing data, training the model, and testing its accuracy. By the end, viewers will have a functional fire detection model to enhance safety and security. The video also demonstrates how to use Google Colab for free GPU access to train the model and discusses the importance of data sufficiency for effective model training.

Takeaways

  • 🔥 This tutorial teaches how to create a fire detection model using the YOLOv8 object detection algorithm.
  • 💻 The tutorial covers preparing data, training the model, and testing it for accuracy.
  • 📁 It guides users to find a fire detection dataset on Roboflow.com in YOLO format.
  • 📂 The dataset includes images and corresponding labels, which are crucial for training.
  • 📝 The data.yaml file is highlighted as important, containing details about the training and validation sets.
  • 🚀 Google Colab is used for training the model due to its free GPU access, speeding up the process.
  • 📁 The data is uploaded to Google Drive and then mounted in Google Colab for accessibility.
  • 🛠️ The tutorial simplifies the training process to a few lines of code, emphasizing the ease of use of YOLOv8.
  • 🔍 It demonstrates how to check if the Google Colab runtime has access to the GPU.
  • 📊 The training process includes monitoring progress with metrics like F1 score and confusion matrix.
  • 📹 Post-training, the model is tested on video files to evaluate its fire detection capabilities.

Q & A

  • What is the main topic of the tutorial?

    -The tutorial is about creating a fire detection model from scratch using YOLOv8.

  • What is YOLO and why is it used in this tutorial?

    -YOLO (You Only Look Once) is a powerful object detection algorithm that can quickly and accurately detect objects in images and videos. It is used in this tutorial because of its efficiency and accuracy in detecting objects.

  • Where can one find a pre-made dataset for training the fire detection model?

    -A pre-made dataset can be found on websites like Cargo.com by searching for a 'fire dataset YOLO format'.

  • What does the data.yaml file contain and why is it important?

    -The data.yaml file contains information about the training and validation data, the number of classes to detect, and the class names. It is important because it provides the necessary configuration for the training process.

  • How does one prepare their data for training the YOLO model?

    -To prepare the data, one needs to organize the images and labels into 'train' and 'validation' folders, and ensure the data.yaml file is correctly configured with the paths to these folders.

  • Why is it necessary to upload the data to Google Drive and access it through Google Colab?

    -Uploading the data to Google Drive and accessing it through Google Colab allows the use of Google's free GPU resources to train the model, which can significantly speed up the training process.

  • What is the purpose of mounting the Google Drive in Google Colab?

    -Mounting the Google Drive in Google Colab allows the user to access the data stored in the drive directly within the Colab environment for training the model.

  • How does one check if the GPU is accessible in Google Colab?

    -One can check if the GPU is accessible by running the command 'nvidia-smi' in a code cell, which will display information about the GPU if it is available.

  • What are the steps to train the YOLO model as described in the tutorial?

    -The steps include setting the runtime to GPU, installing YOLO, importing necessary libraries, mounting Google Drive, moving the data file into the drive, writing a command to train the model with specified parameters, and running the training command.

  • What does the training output provide and where are the results saved?

    -The training output provides information about the training process, including the performance metrics. The results, including the best performing weights, are saved in a directory, which can be accessed and downloaded from Google Drive.

  • How can one test the trained fire detection model?

    -The trained model can be tested by running inference on video files using the downloaded weights and a script that leverages the YOLO model to detect fires in the videos.

  • What improvements can be made to increase the accuracy of the fire detection model?

    -The accuracy of the model can be improved by training it on a larger dataset with more varied images containing fire, which helps the model generalize better to new, unseen data.

Outlines

00:00

🔥 Introduction to Fire Detection Model with YOLOv8

The speaker introduces a tutorial on creating a fire detection model using YOLOv8, a robust object detection algorithm. They explain that this model can detect objects in images and videos accurately. The tutorial will guide viewers through preparing data, training the model, and testing its accuracy. The end goal is a functional fire detection model to improve safety and security. The speaker suggests using a pre-made dataset from Roboflow in YOLO format, available on their website, to simplify the process.

05:08

💻 Setting Up the Environment and Accessing Data

The speaker demonstrates how to upload the dataset to Google Drive for easy access during the training process using Google Colab. They show how to open a new notebook, change the runtime to GPU for free access to computational resources, and mount the Google Drive to the notebook. The data file, which contains labels and images, is highlighted as crucial for the training process. The speaker also explains how to check if the GPU is accessible and verifies the installation of YOLO.

10:11

🛠️ Training the Fire Detection Model

The tutorial continues with instructions on how to train the YOLO model. The speaker outlines the necessary steps, including specifying the model type (YOLOv8 Nano for speed), setting the directory to the data, and defining the number of iterations for training. They also mention the use of early stopping to prevent overfitting. The speaker runs into a few errors but corrects them and successfully starts the training process, which involves downloading necessary styles and loading images from the dataset.

15:20

📊 Analyzing Training Results and Running Inference

After training the model, the speaker discusses how to analyze the training results, mentioning the F1 score and confusion matrix as important metrics. They then proceed to run inference on the trained model using a video file to test its fire detection capabilities. The speaker shows how to modify existing code to use the newly trained model and discusses the need for a large dataset to improve detection accuracy.

20:23

🎉 Conclusion and Encouragement

The speaker concludes the tutorial by emphasizing the ease of creating an object detection model with YOLO and encourages viewers to subscribe, like, and comment on the video. They express gratitude for the viewership and anticipate that the tutorial will be shared with others. The speaker also credits YOLO for making the process straightforward and looks forward to the next tutorial.

Mindmap

Keywords

💡Fire Detection

Fire detection refers to the process of identifying the presence of fire in a particular area, often through the use of sensors or algorithms. In the context of the video, fire detection is the main theme, as the tutorial aims to teach viewers how to create a model that can detect fires in images and videos, enhancing safety and security.

💡YOLO (You Only Look Once)

YOLO is a popular real-time object detection algorithm capable of quickly and accurately identifying objects in images and videos. The video script focuses on using YOLO version 8 to create a fire detection model, demonstrating its effectiveness in object detection tasks.

💡Object Detection

Object detection is a computer vision technique that involves identifying and locating multiple objects in an image or video. The video tutorial is centered around creating an object detection model using YOLO, specifically tailored for detecting fires.

💡Roboflow

Roboflow is a platform mentioned in the script for obtaining pre-labeled datasets in YOLO format, which are essential for training machine learning models. The script instructs viewers to download a fire dataset from Roboflow to use for training the fire detection model.

💡Google Colab

Google Colab, or Colab, is a cloud-based Jupyter notebook environment that allows users to write and execute code on Google's servers. The video script guides viewers on how to use Google Colab to access GPU resources for free, which is crucial for training the fire detection model.

💡Dataset

A dataset is a collection of data, often used for training machine learning models. The script emphasizes the importance of having a sufficient dataset for training the fire detection model, including both images and corresponding labels.

💡Training

Training, in the context of machine learning, refers to the process of teaching a model to make predictions or decisions based on a dataset. The video script provides a step-by-step guide on how to train the YOLO model using the fire detection dataset.

💡Validation

Validation is the process of assessing the performance of a machine learning model using a separate set of data that the model has not seen during training. The script mentions validation data containing images and labels to ensure the model's accuracy.

💡GPU (Graphics Processing Unit)

A GPU is a specialized electronic circuit designed to rapidly manipulate and alter memory to accelerate the creation of images in a frame buffer intended for output to a display device. The script highlights the use of Google Colab's free GPU access to train the model more efficiently.

💡Inference

Inference in machine learning is the process of deriving conclusions from premises or making predictions based on a trained model. The video script concludes with running inference on the trained model to test its ability to detect fires in new, unseen videos.

💡YOLOv8

YOLOv8 refers to the eighth iteration of the YOLO algorithm. The script uses YOLOv8 to train the fire detection model, emphasizing its capabilities and ease of use for creating custom object detection models.

Highlights

Introduction to creating a fire detection model using YOLOv8.

YOLO's capability for quick and accurate object detection in images and videos.

Tutorial covers data preparation, model training, and testing.

End goal is a fully functional fire detection model for safety and security.

Using a pre-made dataset from Roboflow in YOLO format.

Explanation of the data set contents and structure.

Importance of having sufficient training data compared to testing data.

Details on the data.yaml file and its role in training.

Uploading the data set to Google Drive for access in Google Colab.

Accessing the data in Google Colab and setting up the runtime environment.

Installation and verification of the YOLO library in the Colab environment.

Single line command to train the YOLO model with specified parameters.

Explanation of the training process and the use of GPU acceleration.

Monitoring the training progress and results.

Downloading the trained model weights from Google Colab.

Using the trained model to perform inference on new video data.

Demonstration of the model's accuracy in detecting fire in test videos.

Discussion on improving model accuracy with more training data.

Encouragement to subscribe and engage with the tutorial content.

Transcripts

play00:00

had no everyone so in this tutorial I will show  you how to create a fire detection model from  

play00:06

scratch using yellow V8 yellow is a powerful  object detection algorithm that can quickly  

play00:11

and accurately detached objects and images  and in videos as well with this tutorial you  

play00:18

will learn how to prepare your data train  your model and test it accurately by the  

play00:23

end of this video you will have a fully  functional fire detection model that you  

play00:28

can use to enhance the Safety and Security of  your own or business follow along and discover  

play00:34

how easy it is to build your own custom fire  detection module using Euro version 8. foreign

play01:01

so in this tutorial we are going to take a look  at how you can take your own data set and train  

play01:08

a yellow object detection model so to begin with  you have to search for our data we'll be using  

play01:14

and since this is a tutorial we just head over to  cargo.com where we can get already made data so in  

play01:24

the browser yeah I just search for fire data set  YOLO format on cargo so we just head over to Cargo  

play01:31

and download the data set we'll be using okay so  here is a data set we'll be using and you can see  

play01:38

is from Robo flow so if you have been using your  low you can attest to it that robot flow have  

play01:45

been doing amazing job so you can head over to  robothrough.com to learn new stuffs for yourself  

play01:52

okay so just sign up for our account and download  this data set so just hit download and you'll get  

play01:58

it in a zip format so I've already downloaded  this so yes continue and I'll show you how to  

play02:06

extract this ZIP file so when you're going to  desktop this is exit file I'm having here and  

play02:14

write and extract it right click and just click  on extract here and you'll get new footage you  

play02:22

have this validation that's value trade and  data file so I'll just create a new folder  

play02:30

here I'll just call it data and in here  I'll just move this three Footers and one  

play02:41

file into it so we just move all into Data  so let's go ahead now and explore our data

play02:49

so if we open you can see a test we have  images so these are the image of fire Benny  

play02:58

at certain places that we are going to use  though the data is not that sufficient so  

play03:03

in your own use case you can make available  mini data so many images and they are label  

play03:10

so these are the icon responding label the voice  I read and when you come to test L3 it's the same  

play03:19

thing we have the images so this is the image  will be using to create our model and since  

play03:24

it's a training data it has to be sufficient or  it has to be more than that of your testing data  

play03:30

go ahead and also see its corresponding labels  and then we'll move back to oh our validation data  

play03:40

so it also contains image and labels as  well okay so the important thing here is  

play03:50

this data file data.yaml file so this contains  whatever we are going to trade and this must  

play03:59

remain like this you don't have to change it  to English our case we have train and this is  

play04:08

the powerful tree so we train forward slash image  the same for validation then the number of class  

play04:15

we are going to detect nice solidifier so it's  only one and then names we are verifiers so so in  

play04:22

case you have a video data set and you're having  different classes then you have to put fire let's  

play04:28

see then you have another like cards you just  have to click to cut and also change the number of  

play04:37

classes to to in this case now where are you  doing it for fire so you just have to keep  

play04:44

fire in this case so what I saw and I have to  close this one now okay so the next step here  

play04:52

is to move this your data file into your Google  Drive so that when we are using Google collab we  

play04:59

can get access to this data and yes train our  custom model so this is also easy to do just  

play05:08

open your Google Drive so you just have to drag  and drop it here and it will start uploading  

play05:14

so I've gone ahead and uploaded this so you can  see is the data here and it's what exactly we  

play05:21

are going to be using so what we can do is that  we can open this data file here and you can see  

play05:26

it contains the exact same thing we have in our  data file so you can see we have a bad Edition  

play05:32

which contains labels and images go back open  screen which also contains which is the exact  

play05:39

thing I've just uploaded into my Google Drive and  you have to do so if you want to use Google Now  

play05:46

to train your model and the reason will be using  Google connect is that will get free access to GPU  

play05:52

which was a read our model train so now that we  have our data in Google Drive we just go ahead now  

play06:00

and open Google cool app so this  type will Google up then we hit enter

play06:11

wide and open a new notebook so I have to go  ahead and change this account to my account

play06:19

so this is my account

play06:24

and then what I have to do here is to create a new  node we'll be using for this particular tutorial  

play06:33

okay so here is the new notes we'll be using for  this tutorial and what you have to go ahead and  

play06:39

do now is to mount our drag so I'll open here  and you will see the drive symbol here so yes  

play06:47

click on it I need to tell you Martin your  drive you have to confirm and it will Mount  

play06:53

Your Google Drive so that you have access  to the data we have in our Google Drive

play07:02

okay so one of the drive is mounted you can  see we always try fire so we can go to drive  

play07:07

go to my drive and then now you have access to  

play07:12

our stops here so we're gonna see we have our  data and in here we have test string validation  

play07:21

the data.tml file so we can close this app  now and go ahead and write some code so the  

play07:30

first thing we'll do is to check our run time  so we can just go to run time here and we got  

play07:38

change runtime and we'll set it to this none by  default so we set it to GPU and then click save  

play07:45

so now we are getting access to GPU  free GPU in this case which we'll use  

play07:51

so we can conserve that by attacking  Nvidia it's going to show up at all  

play07:59

Nvidia s and I and click enter  so we'll run the cell to check

play08:09

what happened so run this out to check whether  we are we access the GPU and you can see yes  

play08:17

so reality access to GPU here so we  can now go ahead and clear this one off  

play08:25

we can add a new cell and the next step is to  install you so you will just have to type install

play08:39

ities so

play08:45

you click enter so you can run this cell now and  

play08:48

you will be installed so it will take  some time depending on your data speed

play08:55

so actually training your own model is very  easy to invest better you just need about  

play09:01

three lines of code to do that so you  have successfully been installed We'll  

play09:06

add another code learn and what it will  do now is to import it so we'll see from

play09:13

alternatives

play09:17

we are going to import your

play09:21

back or cut you look just like this okay so do  something else to write it can run D cell to  

play09:32

check our yulu is properly installed and you can  see we have to check them out for all the lines  

play09:38

with ram so far that means we are doing good so  the last line here is the line we need to train  

play09:44

we need to use to train our model so to train  your model we have to just write exclamation  

play09:49

mark to Euro and Lower Keys so you write to YOLO  then the tax you are going to perform so the top  

play09:56

you are going to perform is a dictation please  just write the tit an volt you are going to  

play10:03

use so our mode here is to trade after the mode  you need to choose your model so the model type  

play10:10

we represent model types or model type we want to  use now is the Nando version so we have the large  

play10:17

the medium and the Nano version so who is the  Nano version because we need speed what we we  

play10:23

are using our model so we just have to write new  Loop V8 because we are using Yellow Version it  

play10:32

and for Nando you just type n is what you use the  knights module yes write scale here which stands  

play10:40

for Knight so we are using Nando dot 80 then  the next thing is to give the directory to where  

play10:47

your data is so for that the simple thing you  have to do is to come here then open my drive  

play10:56

then you open my data and then you copy right  click here and copy the path yes come here and  

play11:05

place this button so you can see our data is in  content drive my drive data and then data dot EML  

play11:15

fine okay after this you have to give ebooks  like how many iterations so this data trade  

play11:22

so you specify it works and you give a value so  you can give a higher value and this data will  

play11:30

train over and over and over and over but I also  have early stopping so in case it's training and  

play11:36

it sees no improvement in your data for some  number of times it automatically stop trading  

play11:42

so in this case let's specify in 30 because I've  already trained DC model that will use so I'm just  

play11:50

showing you how to train some yes enter something  like let's do a system to try to train any and you  

play11:57

can see for yourself then after that we have to  specify the image size so imgz you start foreignty

play12:07

in this case so with this right click 640 and  guess what we are done so this is all you need  

play12:13

to trim your fat so after this we'll run this if  we have error that's it if we don't it will kick  

play12:20

off and starts training so we are having some  arrows here and let me check the lines oh okay  

play12:27

so we need to specify here that this is our data  so we have to write our data is equal to this so  

play12:36

that is our data we need to specify that this is  a directory for our data and let's run this again  

play12:44

and I hope this time I run it through trade  we've got error wise again let me scroll shape  

play12:52

images this will be images and not image images  wow so guys we keep on getting this error because  

play13:02

we don't have equal to sign here tax is equal  to the debt mode is this so let's give it a try  

play13:11

I've made a lot of mistake writing this app so  let's try it this time around and you can see  

play13:18

era started training so it's downloading  some Styles I need to train so let's see  

play13:25

what you'll get you so is now reading our images  in in the tree and file so it's loading all  

play13:32

the image is there so this will take a while to  train so guys I'll ride back after the training  

play13:40

so guys I'm back and this is still training so  it has just started training now it took a lot  

play13:46

of time loading in the images it's not raining  and without the first epoch so we still have  

play13:54

to give this some time it's what I'm going on a  second break and I'll be back right after this

play14:18

okay guys so as you can see we have done  training so everything is successful so  

play14:24

the good thing is that it also show you where  your results are saved so it's a result as if  

play14:30

to rise detailed screen directory so you  guys have to click on the file icon here  

play14:37

and we can locate our run where did I see

play14:44

so you guys see we have the round folder here  

play14:48

and then you'll be your detailed folder up you  open your train there's that and you're gonna  

play14:52

see so what we need here is our width and  this weight will be stored in the weights  

play14:58

folder so we have the last and the best so  this is the best performing weight and all  

play15:04

you have to do here is to download it so you  click on download and it will get downloaded  

play15:09

but before that we can also have a look at some  training this guy here so we have the F1 cave

play15:19

so you can see this is how it looks you can also  this is not showing I don't know how to drag it  

play15:27

but just know that we have other case you can see  the confusion Matrix which is very important you  

play15:34

can also take a look at it it's not showing well  in collab I don't know why or you can download  

play15:40

this and also take a look at it so you can click  download and download it and look at it how well  

play15:47

your model is streamed so all we need here is the  wait fire I just went ahead and downloaded it so  

play15:54

with these simple steps we are able to train  our custom model and we are now going to run  

play16:01

inference on it and check whether it's going to  detect fire so we are now done with Google Cola  

play16:10

we've downloaded our weights so all we have to  do now is to open our pajam and write some code  

play16:17

so actually I said write some code but we are not  going to write code because you already have the  

play16:22

code for this remember we had a video on how to  run your EO ID you'll do this to be specific so  

play16:30

we are just going to leverage that same code and  change the weight file in our video then we can  

play16:36

just change the class so I've already prepared  a script for that which I'll open press it it's  

play16:43

on desktop here so fire detection and here is  it so what I'll do is create a new file here  

play16:50

so new python file and I'll just name this file  and I'll copy the same code and paste it there so  

play17:02

I'll paste this same code here and get rid of that  file so this your code will be using and there is  

play17:08

nothing new apart from the width so our width here  is fire.pt when you download it is best.pt so we  

play17:18

can also go to our download files so let's see  downloads and you can see this is the best DOT  

play17:24

PT file we've downloaded from Google connect so  I just change the name I rename it just brought  

play17:32

it in into python so instead of loading the  normal yellow model we are going to load fire.pt  

play17:40

and also I have a video file here called  fire through.mp4 which we are going to run  

play17:46

the inference on and this code is pretty much  the same code we've used in how to run YOLO in  

play17:53

the IDE so the link to that video will be in the  description and it will also be somewhere at the  

play17:58

top here so you can take a look at it so that  you understand this code better and also the  

play18:03

whole code will be on my GitHub repository where  you can visit them download it and use it for  

play18:08

yourself okay so that's pretty much it and also  what you have to do here is that in that tutorial  

play18:14

we have classes.txt which contains many classes  but in this case you just have to delete all  

play18:20

everything there and just do classes is equal to  file because it's only file that we want to detect  

play18:26

so that was the changes we've made so far and now  we can go ahead and test this out and see how best  

play18:33

it to detect fire so I'll run this around this  and we can see let's see okay so this is cool it's  

play18:40

detecting fire already and that's it the detection  is just good I have another video file we'll try  

play18:47

this on to check how well it will perform  this tool but I think is correctly detecting  

play18:55

that is fire wow so this is nice this  is performing good with our 57 that  

play19:05

Precision champion from here and there  and if you want a much higher accuracy  

play19:11

then you need a lot of data you need to train  this on a huge normal images containing file

play19:26

so that's the video let's run it on a second  video file which is fire 2. okay that's this  

play19:33

far too so let's do fire four so but the next  video is five four so let's run it on fire four

play19:44

wow so you can see how well is the 13 on fire four

play19:50

so I think the model is working great a  detecting fire okay it's getting some detections  

play20:00

so I think this can be improved  right it gets training it on more  

play20:05

data or a huge number of images containing fire

play20:16

so guys this is how easy it is to create your  own object detection model using YOLO and you  

play20:22

can see this is very easy so all credit is  to ultralight this for making this possible  

play20:28

by using few lines of code and this is the  main reason why I love the Yellow Version  

play20:34

is because it's very easy to use very  easy to train on your custom data set  

play20:40

and you you can attach that by yourself you  just have to go through few steps to achieve  

play20:46

this so if you like this video guys do your  best to subscribe give me a like write your  

play20:52

comments I'll be more than glad to reply you guys  so thanks for watching and I know you are probably  

play20:59

gonna share this with two or more people thank you  once again and I will see you in the next tutorial

Rate This

5.0 / 5 (0 votes)

الوسوم ذات الصلة
YOLOv8Fire DetectionObject DetectionMachine LearningAI TutorialData TrainingModel TestingSafety EnhancementGoogle ColabCustom Model
هل تحتاج إلى تلخيص باللغة الإنجليزية؟