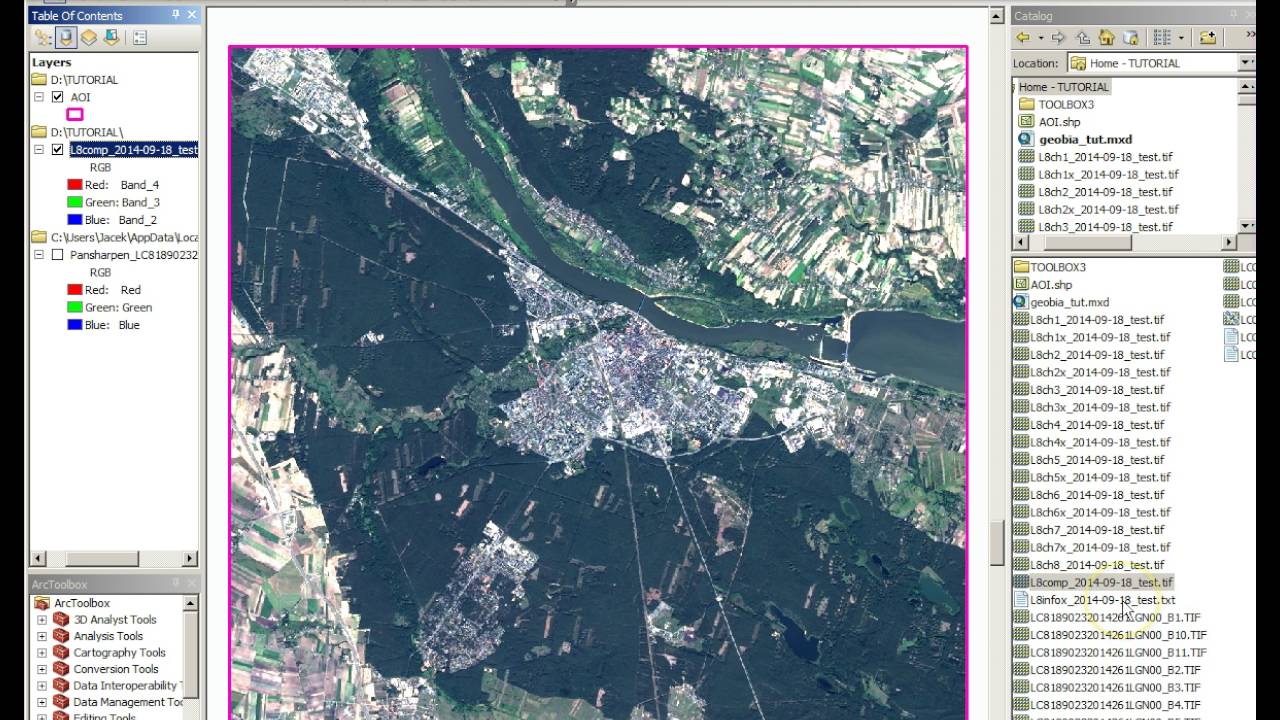
Band Composite & Mosaic of Landsat 8 data in ArcGIS

Vikas Ghadamode
28 Oct 202107:40

Summary

TLDRThis tutorial explains how to mosaic Landsat 8 data, starting with creating a band composite for multiple images. The instructor demonstrates the process of selecting and combining seven bands from each Landsat image, and then blending them using the mosaic tool in a GIS software. The tutorial walks through using the data management tools, raster processing, and setting properties like band combinations and histograms to achieve a smooth, unified image. The final output is a single, mosaic image from two different Landsat scenes, ideal for remote sensing analysis.

Takeaways

  • 🌐 The tutorial focuses on mosaicking Landsat 8 satellite imagery data.
  • 🔍 A band composite is created by combining specific bands of the Landsat 8 data.
  • 📈 The script describes the process of creating a false color composite using bands 5, 4, and 3.
  • 📁 Landsat 8 data consists of seven bands, each with a spatial resolution of 30 meters.
  • 🗂️ The tutorial uses data downloaded from the USGS Earth Explorer.
  • 🛠️ The Data Management Tool is utilized for both band composite and mosaicking processes.
  • 📂 A new folder named 'landsat 8 mosaic' is created to store the processed images.
  • 🔄 The script explains how to perform band composite for two different images before mosaicking.
  • 📊 Histogram equalization is applied to enhance the contrast of the images before combining them.
  • 🔗 The final step involves using the 'Mosaic to New Raster' tool to combine the two images into a single image.
  • 🎶 The tutorial concludes with a brief musical interlude.

Q & A

  • What is the first step in processing Landsat 8 data as mentioned in the script?

    -The first step is to perform a band composite for both images before mosaicking them.

  • What is a band composite in the context of Landsat 8 data?

    -A band composite is the process of combining different spectral bands of an image to create a multi-band image for analysis. In Landsat 8, seven bands are typically combined.

  • How many bands does Landsat 8 have, and what is their spatial resolution?

    -Landsat 8 has seven bands, all with a spatial resolution of 30 meters.

  • Which tool is used for performing band composites in the script?

    -The 'Data Management Tool' is used for performing band composites under the 'Raster Processing' section.

  • What specific bands are mentioned for creating a false color composite in the Landsat 8 images?

    -For a false color composite, bands 5, 4, and 3 are used.

  • After performing band composite on one image, what is the next step described in the script?

    -The next step is to perform the band composite on the second image in a similar way as the first image.

  • What is a mosaic in the context of remote sensing data processing?

    -A mosaic is the process of combining multiple images into a single continuous image. In this case, two different Landsat 8 images are combined.

  • Which tool is used for mosaicking the two Landsat 8 images?

    -The 'Mosaic to New Raster' tool, found under 'Raster Processing' in the 'Data Management Tool', is used to mosaic the images.

  • How is the histogram equalization applied to the images during processing?

    -Histogram equalization is applied to adjust the contrast of the images by selecting the 'Histogram Equalize' option in the image properties.

  • What does the script conclude about the final result after mosaicking the Landsat images?

    -After mosaicking, the two separate images are combined into a single image with equalized contrast, ready for further analysis.

Outlines

00:00

🛰️ Introduction to Landsat 8 Data and Mosaic Creation

In this section, the instructor introduces the tutorial topic, which is about creating a mosaic using Landsat 8 data. The process starts with a band composite for two images and then moves to the mosaic step. The instructor briefly explains what a mosaic is and mentions that the data has been downloaded from the USGS Earth Explorer. The focus then shifts to the first step of performing a band composite, mentioning the seven bands (Band 1 through Band 7) with 30-meter spatial resolution and the same projection system. The instructor demonstrates how to use the Data Management Tool in the software to perform band compositing, specifically navigating through options like 'Raster Processing' and 'Composite Band'. They emphasize naming the folders and saving the project correctly using path and row identifiers like 143/049.

05:01

📊 Band Composite and Contrast Adjustment

Here, the instructor continues by showing the process for creating a band composite for the second image. Similar steps are followed, including adding Bands 1 to 7, specifying the path and row (143/050), and adjusting the band properties for symbology (Bands 5, 4, 3 for false color composite). After both band composites are created, the instructor addresses the visible contrast between the two images. They suggest adjusting the contrast using the histogram equalization tool to reduce the difference between the images, making them visually comparable. This prepares the images for the next step, which is the mosaic process.

🖼️ Merging the Images into a Single Mosaic

This section focuses on the final step of the tutorial, where the instructor demonstrates how to merge the two prepared images into a single mosaic. Using the 'Mosaic to New Raster' tool within the Data Management Tool, they explain how to select both images, assign a folder, provide a name, and set the number of bands to seven. The instructor reiterates that a mosaic involves combining two or more images into one. Once the mosaic is ready, the same histogram equalization technique is applied to improve the final image's visual quality. The result is a single, seamless image composed of the two Landsat 8 images, successfully demonstrating the mosaic process.

Mindmap

Keywords

💡Mosaic

Mosaic, in the context of the video, refers to the process of combining multiple images into a single, larger image. This technique is commonly used in remote sensing to create a comprehensive view from several smaller images. In the script, the tutorial demonstrates how to mosaic Landsat 8 data, which involves combining different satellite images to form a complete picture of an area.

💡Landsat 8

Landsat 8 is a satellite that captures high-resolution imagery of the Earth's surface. It is part of the Landsat program, a series of Earth-observing satellite missions jointly managed by NASA and the U.S. Geological Survey. The video uses Landsat 8 data as the source for the mosaicking process, highlighting its importance in creating detailed composite images.

💡Band Composite

A band composite in remote sensing is a combination of different spectral bands into a single image to highlight specific features. The script mentions creating a band composite using bands 5, 4, and 3 for a false color composite, which helps in visualizing different features like vegetation more clearly.

💡Resolution

Resolution in the context of satellite imagery refers to the level of detail that can be seen. The script specifies that all seven bands of Landsat 8 data have a spatial resolution of 30 meters, meaning each pixel represents an area of 30 meters by 30 meters on the ground.

💡Projection System

Projection system refers to the method used to represent the Earth's surface on a flat map or image. The script ensures that all bands have the same projection system, which is crucial for accurate overlay and mosaicking of images.

💡Data Management Tool

The Data Management Tool is a software utility mentioned in the script used for managing and processing geospatial data. It contains various functionalities, including the ability to perform band composite and mosaic operations on raster data.

💡Raster Processing

Raster processing involves manipulating pixel data in raster images, such as satellite imagery. In the script, raster processing is used to create band composites and to mosaic images together.

💡UHS Earth Explorer

UHS Earth Explorer is a platform from which the script's presenter has downloaded Landsat 8 data. It is a source for obtaining high-quality satellite imagery for various applications, including the tutorial's mosaicking process.

💡Row and Path

Row and path are terms used to identify specific areas of satellite imagery. In Landsat, each image is assigned a unique path and row number. The script mentions specifying 'one four three zero four nine' as the row and path for the Landsat data, which helps in locating and processing the correct image.

💡Histogram Equalization

Histogram equalization is a method used to improve the contrast of an image. The script describes using histogram equalization to adjust the contrast of the band composite images before mosaicking, making features more distinguishable.

💡False Color Composite

A false color composite is an image where certain bands are assigned to colors that are not their natural counterparts, often used to highlight specific features. The script uses bands 5, 4, and 3 to create a false color composite, which is useful for distinguishing between different types of land cover.

Highlights

Introduction to the tutorial: Overview of mosaic process for Landsat 8 data.

Explanation of band composite: Starting with the creation of a band composite for two images.

Introduction to mosaic process: Detailed steps for performing mosaic on Landsat 8 images.

Downloading data from the USGS Earth Explorer for analysis.

Listing the seven bands available in Landsat 8 data (Band 1 to Band 7) and their spatial resolution of 30 meters.

Explanation of the same spatial resolution and projection system for all seven bands.

Navigating the Data Management Tool in GIS software to perform the band composite.

Steps to access the 'Raster' and 'Raster Processing' options for creating band composites.

Procedure to add bands one by one (from Band 1 to Band 7) to perform the composite.

Creating a folder and assigning a name ('Landsat 8 Mosaic') for storing the composite.

Demonstration of how to add row and path information (e.g., 143049) when saving composites.

Performing band composites for two different images to prepare them for mosaicking.

Explanation of using Band 5, 4, and 3 for creating a false color composite.

Applying histogram equalization to reduce contrast between the two images.

Final mosaic step: Combining two different images into a single image using 'Mosaic to New Raster' option in the Data Management Tool.

Transcripts

play00:02

hello everyone thank you for joining my

play00:04

tutorials today we'll learn how to

play00:05

mosaic landsat 8 data so what we'll do

play00:08

first we'll do a band composite for the

play00:11

both the images and after that we'll do

play00:13

mosaic

play00:14

okay so what is mosaic that i that also

play00:16

i will explain so first we'll see about

play00:18

the band composite how to do that and

play00:20

after that we'll mosaic both the landsat

play00:22

image so i have downloaded this data

play00:24

from the uhs earth explorer so after

play00:27

that you can able to add this is my band

play00:29

one i have added okay so this is here

play00:32

seven bands are there in the landsat

play00:34

data so band one band two

play00:36

band three

play00:37

band four

play00:39

band five

play00:40

band six

play00:41

and band seven so the special resolution

play00:45

of all the seven bands is 30 meter so if

play00:47

you'll see in the properties this is the

play00:50

30 meter resolution and all are having a

play00:53

same special resolution

play00:55

and all are having a same projection

play00:57

system okay

play00:59

so for that to doing a band composite i

play01:01

will go

play01:02

to the

play01:04

data management tool in the data

play01:05

management tool there is a

play01:09

projection and transformation there is a

play01:10

raster

play01:13

okay in the there is a raster

play01:16

in the raster

play01:18

there is a

play01:20

option that is a raster processing and

play01:22

there is a band compress or composite

play01:23

band okay where we need to go we need to

play01:26

go data management tool

play01:28

after that there is a raster

play01:31

in raster there is raster processing and

play01:33

composite path

play01:34

so here we need to add one to seven band

play01:37

band one

play01:39

then band 2

play01:41

band 3

play01:42

band 4

play01:44

band 5

play01:45

band 6

play01:47

band 7

play01:49

and here we need to select create a

play01:51

folder

play01:52

so suppose i will create one folder here

play01:55

for that i will provide

play01:58

name here

play01:59

suppose

play02:01

landsat

play02:03

8

play02:05

mosaic

play02:08

so

play02:09

we'll select the folder and i will

play02:12

provide name here

play02:13

okay so i will provide row and path here

play02:16

one four three zero four nine

play02:18

one four three zero four nine so this is

play02:21

the

play02:22

row and path i will provide and i will

play02:24

click on save and i will click on ok

play02:28

so

play02:29

same way

play02:30

what we need to do we need to

play02:32

do band composite for the second image

play02:34

also

play02:42

so now my band composite is ready here

play02:44

if i will go to the properties

play02:47

symbology

play02:49

band 5

play02:51

4

play02:52

and 3

play02:53

is the false color composite

play02:55

okay

play02:56

so

play02:57

i will do same with the another image

play03:00

which i want to mosaic

play03:03

so i will remove this

play03:05

then i have

play03:07

another image

play03:15

so here i will add band 1

play03:19

band 2

play03:20

band 3

play03:21

band 4

play03:23

band 5

play03:25

band 6 and band 7

play03:28

okay so this 7 image is there

play03:31

again we will go to the

play03:33

composite band

play03:35

and i will add

play03:36

band 1 to

play03:38

7 again

play03:45

here i will provide

play03:48

one four three

play03:50

zero five zero so this is a 50

play03:54

and i will click on okay

play04:05

so now my band composite is ready i'll

play04:07

go to the properties

play04:10

here i will provide a band 5

play04:13

4

play04:15

3

play04:16

apply and ok

play04:18

so now i have two images

play04:20

this i will remove from here

play04:30

so

play04:32

again i will add

play04:49

so i have 49.50 image okay

play04:53

so if i take it above here you can able

play04:55

to see i will right click go to

play04:57

properties

play04:58

and band five

play05:01

four

play05:02

three

play05:03

apply okay so here you can able to see

play05:06

there is a contrast

play05:08

in the

play05:10

both the bands you can able to see here

play05:11

in both the images so what we'll do

play05:13

we'll go to the right click properties

play05:17

and here you can use the histogram

play05:18

equalize apply and okay again you can go

play05:22

here properties

play05:25

then use histogram equalize apply and

play05:28

okay

play05:29

now there is a

play05:31

not that much of contrast

play05:34

now you can able to see clearly

play05:36

the two images

play05:38

so now what we are going to do we want

play05:40

to combine this both images into single

play05:42

image

play05:43

for that

play05:44

we have a tool

play05:46

in

play05:47

data management tool okay

play05:50

in the data management tool there is a

play05:51

raster

play05:52

in the raster there is a raster

play05:54

processing

play05:56

in the raster there is a

play05:57

raster data set in the raster data set

play05:59

there is a mosaic to your raster option

play06:01

is there

play06:02

so click on the mosaic new raster here i

play06:04

will add both the images

play06:08

and after that

play06:10

here i need to select a folder

play06:12

so i am working in landsat 8 so this

play06:15

folder i need to select

play06:17

and after that i will provide a name to

play06:20

it

play06:21

mosaic

play06:22

then number of band is seven

play06:25

we have used seven bands and click on ok

play06:29

so what we are doing mosaic means these

play06:31

two different images we are combining

play06:33

together

play06:34

and we are doing mosaic it

play06:43

so now my band composite is ready here

play06:47

i'll right click go to properties

play06:50

here if you'll select band 5

play06:53

4 and 3

play06:55

apply

play06:56

so now you can able to see this is ready

play06:59

and you can go for the histogram

play07:01

equalize

play07:03

so if i'll uncheck this you can see this

play07:05

is in one image now

play07:08

so this way you can mosaic

play07:13

so you can able to see these are two

play07:15

different images

play07:20

and we have mosaic them

play07:22

so simple this method you can able to

play07:25

use for the mosaic landsat data

play07:30

[Music]

play07:39

you

Rate This

5.0 / 5 (0 votes)

الوسوم ذات الصلة
Landsat 8Mosaic TutorialSatellite ImageryGIS TechniquesBand CompositeImage ProcessingRemote SensingData ManagementEarth ExplorerFalse Color
هل تحتاج إلى تلخيص باللغة الإنجليزية؟