Técnica de Modelado de Peter K. Thomas
Summary
TLDRThis video tutorial demonstrates a detailed wax modeling technique used in dental anatomy. It explains how to use two plates and specialized instruments for shaping wax, focusing on accurately replicating the details of teeth, including cusps and crests. The process includes heating tools, placing wax drops, creating cones, and marking specific points on teeth. The tutorial also emphasizes the importance of precise placement and temperature control for optimal results. Viewers will learn how to model both upper and lower molars and premolars, using a range of wax colors to represent different anatomical features.
Takeaways
- 😀 The technique involves using two plates and specific tools (Peter K instruments) to model the teeth.
- 😀 Step 1: Heat the instrument at the curve or 'elbow' and apply wax to fill the concavities of the plate.
- 😀 The wax should be heated correctly to ensure it sticks properly; if the wax separates, it means it was too cool.
- 😀 Use markers placed 5mm apart to guide the placement of wax drops during the process.
- 😀 The exercise develops skills in handling hot wax for detailed and precise modeling of teeth.
- 😀 Cones are created with different-sized tips depending on the desired thickness, with larger tips for thicker cones.
- 😀 Each tooth requires a specific placement of wax cones: vestibular and lingual cusps are modeled separately.
- 😀 Cera amarilla (yellow wax) is used for the cones, while red wax is used for creating triangular ridges.
- 😀 When creating cones for the molars and premolars, special care is taken to model each cusp accurately with appropriate thickness.
- 😀 For the final steps, blue wax is used for exterior ridges, ensuring the model matches the reference tooth structure.
- 😀 Each surface is carefully modeled to match the reference shape, including the height and positioning of crests, ridges, and cusps.
Q & A
What is the Peter K technique used for in this video?
-The Peter K technique is used for modeling dental prosthetics, specifically for wax modeling to replicate the anatomical features of teeth and dental crowns.
What tools are required to perform the Peter K technique?
-The tools required include two plates (Plate 1 and Plate 2), Peter K instruments, and a heated instrument for melting the wax.
What is the purpose of heating the instrument at the curved or elbow area?
-The purpose is to heat the instrument in the curved or elbow area, which is then used to melt the wax and apply it to specific areas of the dental model.
Why is it important not to let the wax slide to the tip of the instrument?
-It is important to prevent the wax from sliding to the tip of the instrument because this ensures that the wax is applied evenly and fills the concavities properly.
How can you check if the wax was heated correctly?
-To check if the wax was heated correctly, pass a finger over the applied drops of wax. If they do not detach, it means the wax was sufficiently heated. If they come off, the wax wasn't hot enough.
What are the purpose and placement of the marks at 5mm intervals?
-The marks at 5mm intervals are used to guide the placement of the wax drops, ensuring that they are applied at the correct positions on the dental model, such as for the cusps and crests.
How are the different cones for the cusps created and placed?
-The cones for the cusps are created by heating a thicker or thinner instrument, depending on whether a larger or smaller cone is needed. These cones are placed at specific locations on the dental model, with attention to the cusp type (e.g., cutting or stamping).
What is the difference between the cutting and stamping cusps on the dental model?
-The cutting cusps are placed near the edge of the model, while the stamping cusps are placed slightly inward from the edge, about a millimeter inside.
How are the triangular crests modeled in the process?
-The triangular crests are modeled using red wax, carefully placed and shaped to replicate the natural anatomical features of the molars and premolars, ensuring the proper contours are formed.
What role do the blue and red waxes play in the modeling process?
-The blue wax is used for the external ridges or outer surfaces, while the red wax is used for the triangular crests. Each wax serves a specific function in replicating the anatomical details of the teeth.
Outlines

此内容仅限付费用户访问。 请升级后访问。
立即升级Mindmap

此内容仅限付费用户访问。 请升级后访问。
立即升级Keywords

此内容仅限付费用户访问。 请升级后访问。
立即升级Highlights

此内容仅限付费用户访问。 请升级后访问。
立即升级Transcripts

此内容仅限付费用户访问。 请升级后访问。
立即升级浏览更多相关视频

Encerado gnatológico Técnica PKT

INICIANDO A ENCERAR

tutorial membuat batik motif Lembang dengan teknik colet
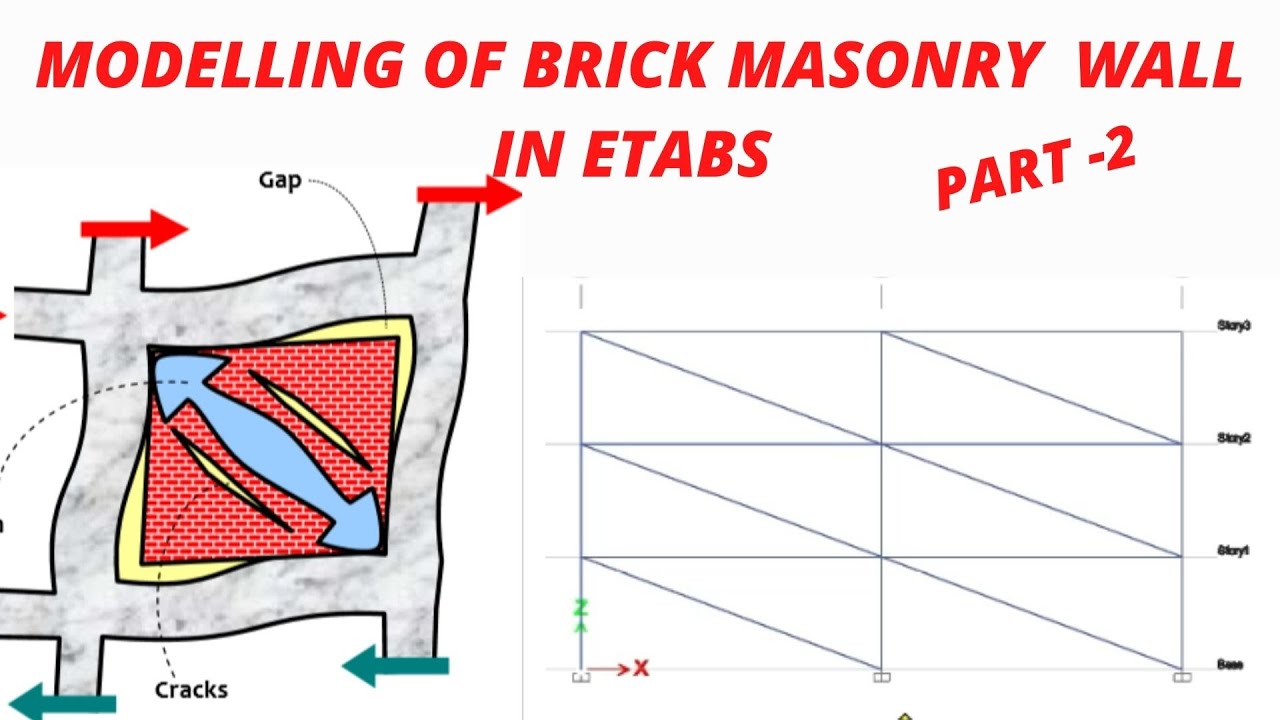
MODELLING OF BRICK MASONRY WALL IN ETABS ,STRUT ANALOGY, (PART -2)

Make A Bike Tire in Blender With A Non-Destructive Modelling Workflow

Properly Wash Your Car At Home | How I wash My Toyota RAV4
5.0 / 5 (0 votes)
