How to Shade with PENCIL for BEGINNERS
Summary
TLDRIn this rapid fire art tutorial, Darlene teaches the fundamentals of adding depth to line drawings through shading. She covers pressure control, smooth shading techniques, and understanding light behavior. With practical exercises and insights on light reflection, core shadows, and highlights, viewers learn to create realistic shading on a sphere and an apple, enhancing their artistic skills without needing special tools.
Takeaways
- π¨ Adding light and shadow to line drawings can create the illusion of form and depth, making the subject appear to jump off the page.
- βοΈ To improve shading, practice pressure control, smooth shading, and understanding light behavior.
- π Pressure control involves creating a range of values from light to dark by varying the pressure applied to the pencil.
- π Practice shading in a consistent manner across a page or within squares to develop muscle memory for consistent pressure.
- π οΈ Any pencil can be used for realistic shading; special pencils are not necessary, even a burnt stick can serve as a pencil.
- π To shade smoothly, avoid gaps between strokes and use a dull pencil tip or the side of the lead for broader strokes.
- π€² Use an overhand grip and pivot from the elbow and shoulder for longer, gap-free strokes when shading large areas.
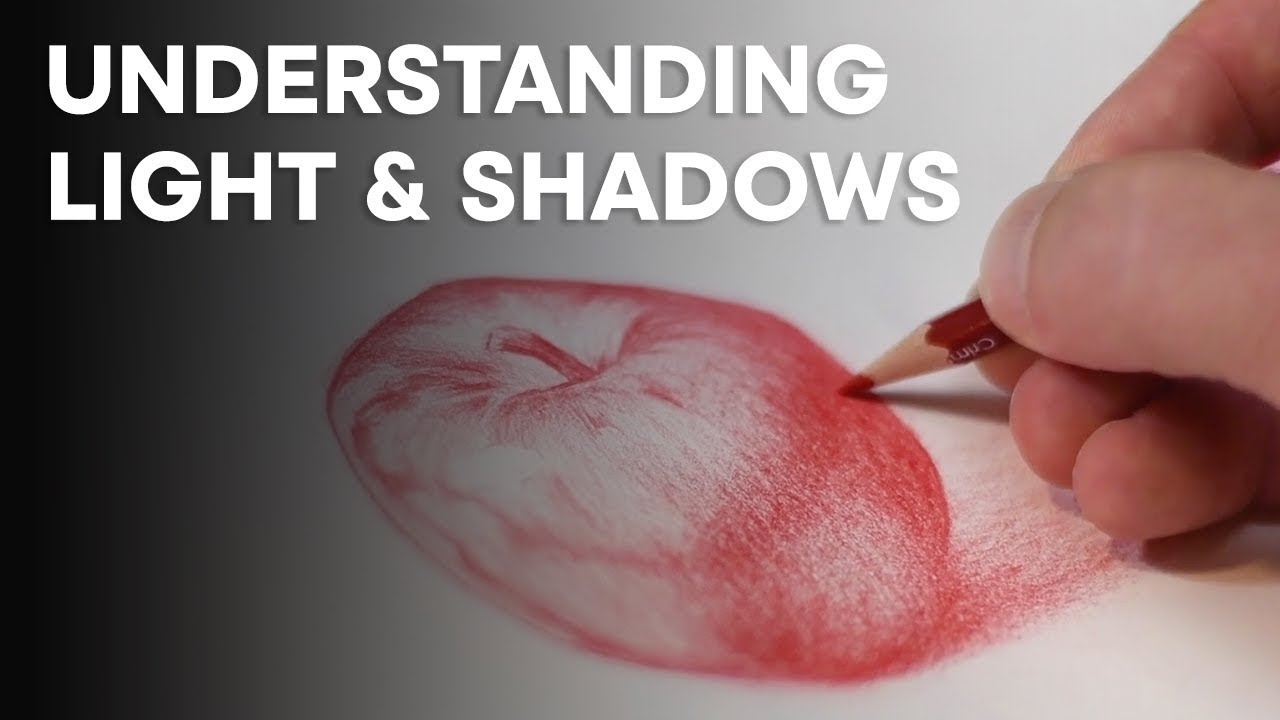
- π‘ Understanding light is crucial; knowing the difference between direct light, reflected light, core shadows, and highlights can greatly affect the realism of artwork.
- π Light behavior can be studied using a simple sphere to understand how light and shadow patterns form on different surfaces.
- π When shading an object like an apple, start with a basic sketch, determine the light source, and then add cast shadows and core shadows considering the reflective properties of the surface.
- π Highlights are the brightest points on an object and can change position depending on the viewer's perspective; they indicate direct light reflection.
- π Mid-tones are essential for creating the illusion of roundness on the light side of an object, and blending these with shadows helps to create a cohesive appearance.
Q & A
What is the main purpose of adding light and shadow to line drawings?
-Adding light and shadow to line drawings creates the illusion of form and depth, making the subject appear more lifelike and three-dimensional.
What are the three key practices Darlene suggests for better shading in art?
-The three key practices suggested are pressure control, shading smoothly, and understanding how light behaves.
How can one practice pressure control in shading?
-Pressure control can be practiced by shading from one end of a sketchbook to the other while increasing pressure to create a range of values, or by filling squares with varying values from dark to light.
Why is it important to maintain consistent pressure when shading?
-Maintaining consistent pressure ensures a smooth transition between values and helps develop muscle memory for realistic shading.
What does Darlene suggest as an alternative to using a pencil for shading?
-Darlene suggests using a burnt stick from the kitchen as an alternative to a pencil, emphasizing that any tool that can make light to dark marks can be used for shading.
How can one shade smoothly without leaving gaps between strokes?
-To shade smoothly, one should use a dull pencil tip or the side of the lead, and avoid using a writing grip, instead pivoting from the elbow and shoulder for longer strokes.
What are the two types of light that contribute to the appearance of shadows?
-The two types of light are direct light, which comes straight from the light source, and reflected light, which bounces off surfaces and illuminates shadowed areas.
What is the term used to describe the dark strip running along the boundary between the light and shadow sides of an object?
-The term is 'core shadow', which is most visible on reflective surfaces like white tables.
What is an occlusion shadow and how does it differ from a cast shadow?
-An occlusion shadow is the dark area where the object touches the surface it's resting on, while a cast shadow is the shadow the object casts on the surface, indicating the direction of the light source.
What are the three elements of the light side of a sphere that Darlene points out?
-The three elements are the core light, which is the area facing the light source directly; the highlight, which is the brightest point due to reflection of the light source; and the mid-tones, which are the darker values where the form curves away from the light.
How can one practice shading to improve their understanding of light behavior?
-One can practice by placing objects under a single light source, observing the patterns of light and shadow, and drawing the scene from different angles or even drawing from imagination based on the understanding of light behavior.
Outlines
π¨ Mastering Realistic Shading Techniques
Darlene introduces a rapid fire art tutorial focusing on adding light and shadow to line drawings to create an illusion of form and depth. She emphasizes the importance of pressure control, smooth shading, and understanding light behavior. Darlene demonstrates how varying pressure can create a range of values from light to dark, which is crucial for realistic shading. She suggests exercises to improve this skill, such as shading across a page and filling squares with a gradation of values. Additionally, she mentions that while tools can aid in shading, basic pencils are sufficient to start, and even a burnt stick can be used as a pencil. The key is to begin practicing.
π Understanding Light and Shadow Dynamics
The tutorial delves into the fundamentals of light and shadow, explaining how they interact to give a subject three-dimensionality. Darlene uses a sphere as a model to illustrate the concepts of direct light, reflected light, core shadow, and highlights. She clarifies the difference between core shadows, which are the darkest part of the shadow, and occlusion shadows, which form in tight spaces where light cannot reach. Additionally, she discusses cast shadows, which indicate the light source's direction. The importance of mid-tones in creating a rounded form is highlighted, and Darlene provides a step-by-step guide to shading an apple, considering the light source and the effects of reflected light, to demonstrate these principles practically.
π Practicing Shading with an Apple Example
In this part of the tutorial, Darlene engages the viewers in a practical exercise of shading an apple. She advises starting with a light sketch and determining the light source's position. The process involves drawing a cast shadow, considering the reflective properties of the surface underneath, and adding a core shadow. She then explains how to fill in the shadow side with a flat layer of graphite and blend the areas to avoid harsh edges, especially important for matte surfaces. The tutorial continues with adding mid-tones to the light side and using an eraser to highlight the brightest points, emphasizing the importance of exaggerating values for depth. Darlene concludes with tips on making the drawing pop by manipulating light and shadow and suggests further practice with different objects and even people as subjects.
Mindmap
Keywords
π‘Light and Shadow
π‘Pressure Control
π‘Shading Smoothly
π‘Understanding Light
π‘Core Shadow
π‘Reflected Light
π‘Occlusion Shadow
π‘Cast Shadow
π‘Highlight
π‘Mid-Tones
π‘Practice
Highlights
Adding light and shadow to line drawings can create an illusion of form and depth, making a flat drawing appear three-dimensional.
Three key practices for better shading are pressure control, smooth shading, and understanding light behavior.
Pressure control in shading involves creating a range of values from light to dark by varying the pressure on the pencil.
Portraits with a wider value range appear more realistic and less flat compared to those with a limited value range.
Practicing shading from one end of a sketchbook to the other helps develop muscle memory for pressure control.
Using a long rectangle divided into squares allows for practicing shading from the darkest to the lightest values.
Maintaining consistent pressure between strokes is crucial for realistic shading.
Any pencil can be used for shading, and special pencils are not necessary to start.
A burnt stick can be used as a pencil to demonstrate that any tool can make light to dark marks for shading.
Smooth shading involves eliminating gaps between strokes and maintaining good pressure control.
Using a dull pencil tip or the side of the lead helps in achieving smooth shading by creating thicker strokes.
An overhand grip and pivoting from the elbow and shoulder allows for longer, gap-free strokes.
Understanding light direction and behavior is fundamental to realistic shading.
A sphere is used to demonstrate the elements of light, including direct light, reflected light, core shadow, and highlights.
Core shadows are visible on reflective surfaces, while black surfaces absorb light and do not show them.
Occlusion shadows occur in tight spaces where light cannot reach, and cast shadows indicate the light source's direction.
The light side of an object has core light, highlights, and mid-tones, which contribute to the appearance of roundness.
Shading an apple involves sketching, determining light direction, drawing cast shadows, and blending light and shadow sides.
Exaggerating values can create depth and make a drawing pop, while blending outlines with shading avoids a cartoony look.
Practice shading by placing objects under a single light source and observing the patterns of light and shadow.
Drawing people you know well under a single light source can be a challenging yet effective practice for shading.
Transcripts
hey i'm darlene and you're watching a
rapid fire art tutorial
when you add light and shadow to your
line drawings you can make your subject
come to life by creating the illusion of
form and depth
you can make a flat line drawing jump
right off the page
in order to shade better you'll need to
practice three things
pressure control
how to shade smoothly
and most importantly understand how
light behaves
i'm going to walk you through all three
things and then we'll shade something
together
pressure control
realistic shading is done by creating a
series of values ranging from light to
dark
the harder i press down on the pencil
the darker the strokes
portraits displaying a limited value
range can end up looking very flat
while portraits with a wider value range
will pop
to have good pressure control practice
shading from one end of your sketchbook
to the other while pressing harder and
harder until the values get darker
gradually
another way to practice is to draw a
long rectangle and divide it into
several squares
fill the squares from right to left
start with the darkest value you can
possibly make and work your way towards
the lightest
[Music]
it's important to maintain a consistent
pressure between each back and forth
stroke or each individual stroke
this will take some practice and
concentration to develop the muscle
memory for
if you're interested in the tools i use
and want to learn more about the
different pencil types check out the
link below
some tools can make shading easier for
you but you absolutely do not need any
special pencils to get started because
you can draw and shade realistically
with pretty much anything that can make
light to dark marks
here let me show you
i'm going to draw using this random
stick i found in my kitchen once it's
burnt i can use it just like a regular
pencil
my point is that any old pencil will do
there is no reason why you can't start
shading today
really the most important thing is just
to start
how to shade smoothly
to shade smoothly try to eliminate major
gaps between your strokes while
maintaining good pressure control
now it's difficult to eliminate gaps if
your pencil is sharp so what you can do
is wear the pencil down until the tip is
dull or use the side of the lead to draw
so your strokes are thicker
if you're shading a large area and want
to avoid these dark stripes avoid using
your writing grip while pivoting at the
wrist instead use an overhand grip and
pivot from your elbow and shoulder to
achieve much longer strokes
just remember to keep those strokes
close together eliminating gaps that can
make your drawing look scratchy
[Music]
understanding light
have you ever tried shading something
over and over without it looking even
close to your subject
for most beginners shading is probably a
guessing game that's totally what it was
for me
until i learned a few basics about light
things just started making more sense
knowing where to correctly add light or
shadow can make a really big difference
in how realistic your artwork will come
across
i'm going to use a sphere to point out
the different elements of light because
the patterns are a lot easier to point
out than a complex form such as a nose
for example
[Music]
here we have a plain wooden ball with a
light source coming down from the top
left
we have two distinct sides
the light side which is facing the light
source and the shadow side which is
turned away
at the edge of our shadow we have
something called a core shadow which is
a dark strip running along the boundary
between the two sides
the core shadow is most visible on a
white table because white is highly
reflective
light rays come down bounce off the
table and illuminates the shadow side of
the ball leaving a dark band so as you
can see we have two types of light
direct light and reflected light
that's why shadows are rarely all black
there are so many things in the
environment that light can reflect off
of
walls nearby objects or even dust
particles floating around in the air
do keep in mind that black surfaces
absorb light
so in this example the core shadow is no
longer visible
going back to the image of the nose can
you tell which areas are lit by
reflections and where the core shadows
are
as mentioned earlier light can reflect
off of many things in the environment
but they have a difficult time bouncing
their way into tight spaces such as the
area where the ball touches the table
this is called an occlusion shadow
[Music]
and this is a cast shadow which appears
when a form blocks light from reaching
another in this case the ball is
blocking light from reaching the table
the cast shadow can tell you where the
light source is coming from all you have
to do is trace the edges against your
object
how many cast shadows can you find on
the
nose let's move on to the light side of
the ball
on this side there are only three things
i need to point out there's the core
light which is the area facing the light
directly
then there's the highlight which is
actually a reflection of the light
source this is the brightest point on an
object
the edges can appear soft on matte
surfaces like this wooden ball or hard
on shining surfaces such as a plastic
ball
and as unintuitive as it seems the
highlight can change position depending
on where you're standing
[Music]
the very last thing are mid-tones or
half tones
mid-tones are the darkest values on this
side of the ball where the edges start
curving away from the light source these
areas receive less and less light the
more they angle away
can you point out the coralite highlight
and mid-tones on the nose
shade with me
let's shade an apple together without
looking at any reference images with our
basic knowledge of how light behaves we
can essentially draw from our
imagination
we might not be very accurate but it's a
great way to actively think about how
light behaves first sketch your apple it
doesn't have to be perfect at all just
try to get something down on your
sketchbook
try to keep your outlines as light as
possible my sketch is extra dark so you
guys can see it better
we want it to sit on a table so draw the
edge of that table behind your apple
then erase any unneeded lines
the next step is to determine where the
light is coming from let's have one
shining down from the top left
draw a little flashlight or sun just to
remember where it is
where the apple blocks light from
reaching the table let's draw a cast
shadow you can use a ruler to find the
cast shadow's length just align it to
your light source and the edge of the
[Music]
apple now we know how long to draw the
cast shadow
i'm just going to draw a long oval shape
where the dotted lines touch the apple
we have our boundary between the light
and shadow side
let's say the apple is sitting on a
white table how do you think the shadow
side will look taking reflected light
into consideration
draw a core shadow making sure the
thickest section is the darkest
[Music]
where the apple touches the table
there's less light so let's shade that
area darker
now that i've taken care of those two
areas i'm going to fill in the rest of
the shadow side by adding a flat layer
of graphite that is lighter than the
core shadow
once you're done soften the transition
between each area to avoid that hard
edge between light and dark values
now don't forget to soften the bottom
portion as well
if you're shading an object with a matte
surface an abrupt or immediate
transition can indicate a sharp edge
while a gradual transition can indicate
a round edge
since cast shadows are darkest near the
object they're being cast from
i'm going to shade the area directly
under the apple darker than the far
right
[Music]
how bright do you want the light side of
the apple to be
it's totally up to you
pick a light value and then shade the
entire space flatly
the next thing we need to do is blend
the two distinct sides of our apple so
it all comes together nicely
where the form turns away from the
direct light add your mid-tones which
will immediately make the surface appear
rounder
[Music]
when you're done use an eraser to
indicate the highlight
if you want your drawing to pop out of
the page exaggerate some of those values
to create depth
if your drawing consists of mostly a
small range of light grays try to get a
bright highlight in there and some
darker values
[Music]
now outlines can make a drawing look
cartoony so make sure they blend in with
your shading or erase them as you go
along
definitely try to make your initial
sketches as light as possible so they
don't show through in the end
if they're too dark to erase you can
shade a dark background until they
disappear
practice
place a few objects on a table under a
single light source
observe the patterns of light and shadow
on each object understand what you're
looking at and try to draw the scene in
a fairly organized manner
it can help to pick an object up and
turn it around to study it from
different angles
if you want a bigger challenge ask a
willing friend or family member to be
your study subject
use only one light source on his or her
face it really helps to draw people that
you know very well
and that's a wrap guys
if you're already subscribed to my
channel thanks for helping me get the
silver play button
if you haven't subscribed yet hit that
big red button down below
let me know if you like this format and
if you want more shading related videos
[Music]
[Music]
[Music]
you
Browse More Related Video
5.0 / 5 (0 votes)