80% Of Photography Basics In Just 10 Minutes

Pat Kay
13 Jun 202309:50

Summary

TLDRThis video offers a concise introduction to the fundamentals of photography, focusing on the exposure triangle of shutter speed, aperture, and ISO. It explains how these elements control the amount of light in an image and influence creative outcomes such as motion blur and depth of field. The video also addresses common beginner mistakes and provides practical tips for achieving sharp images and balanced exposures, encouraging viewers to explore further photography skills and courses.

Takeaways

  • 📸 Photography is fundamentally about controlling and managing light, measured in stops of light.
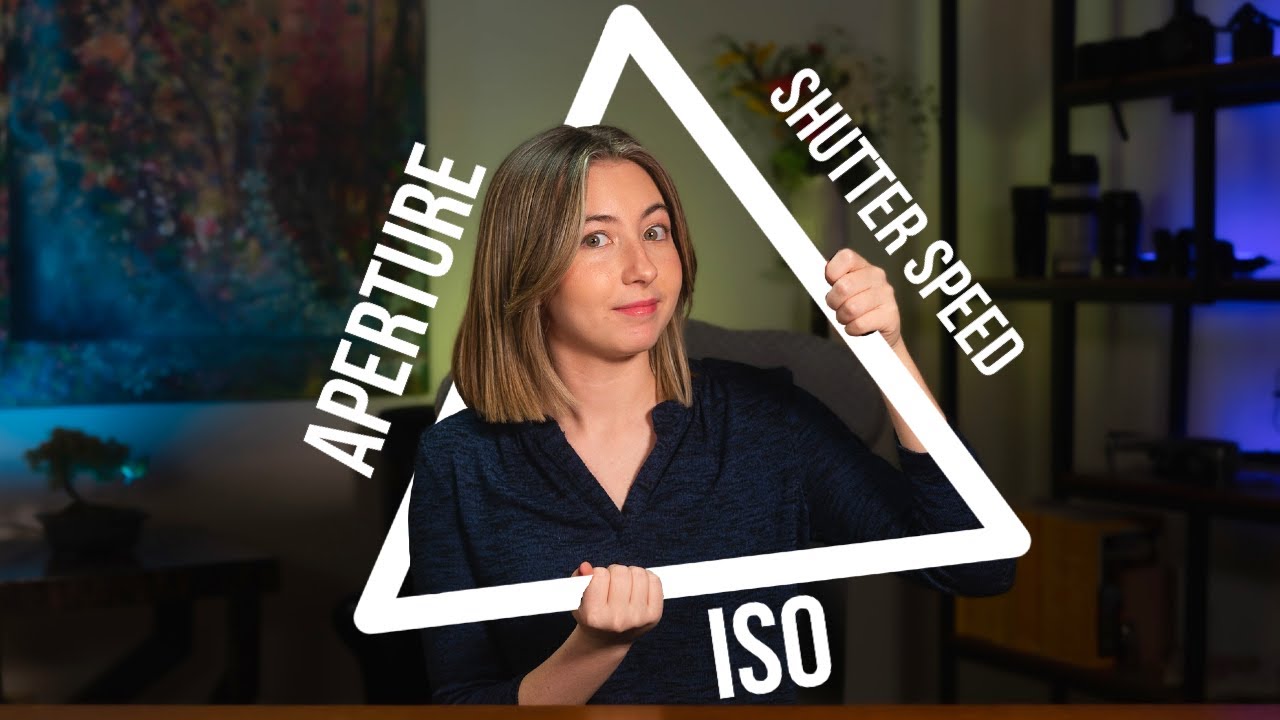
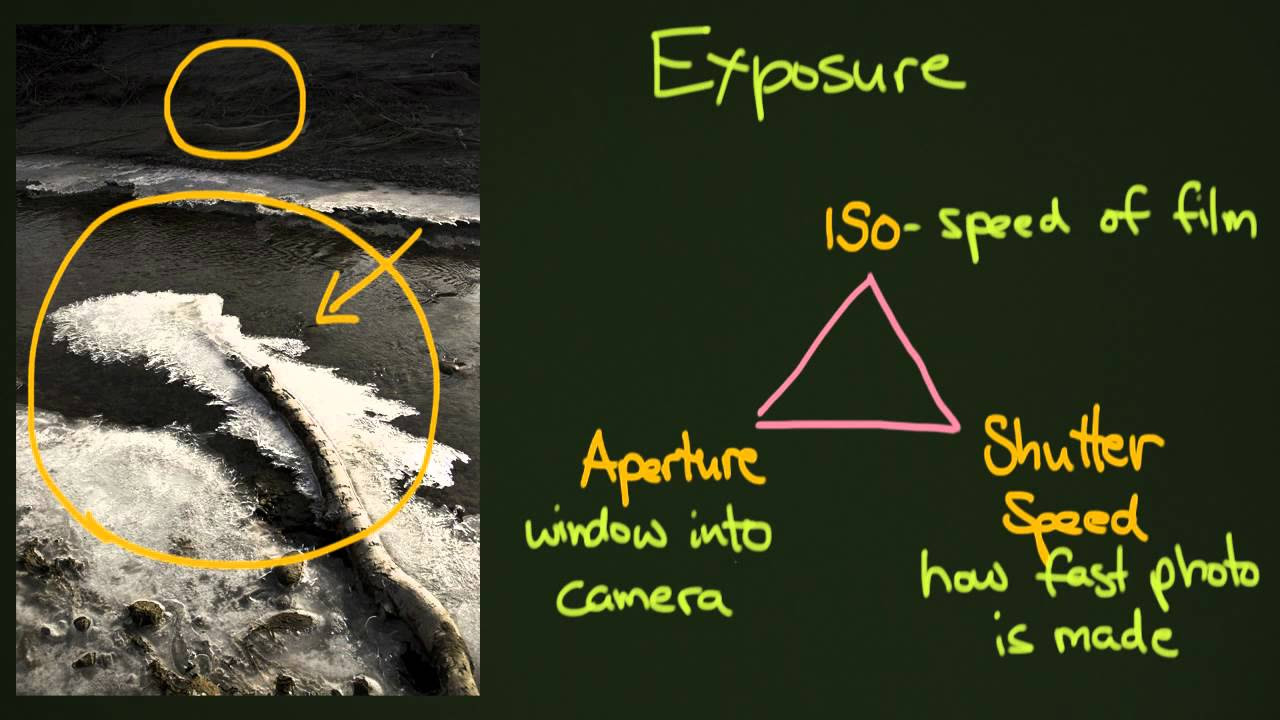
  • 🔄 The Exposure Triangle is a concept consisting of Shutter Speed, Aperture, and ISO, which control the amount of light in an image.
  • 🚦 Shutter Speed determines the duration light hits the sensor and affects whether action is frozen or blurred.
  • 🌀 Aperture, or f-stops, controls the size of the lens opening and subsequently the depth of field.
  • 👀 A larger aperture (lower f-number) results in a shallow depth of field, focusing attention on the subject with a blurred background (bokeh).
  • 🏞 For landscapes or architecture, smaller apertures (higher f-numbers) are used to capture a deeper depth of field, keeping more in focus.
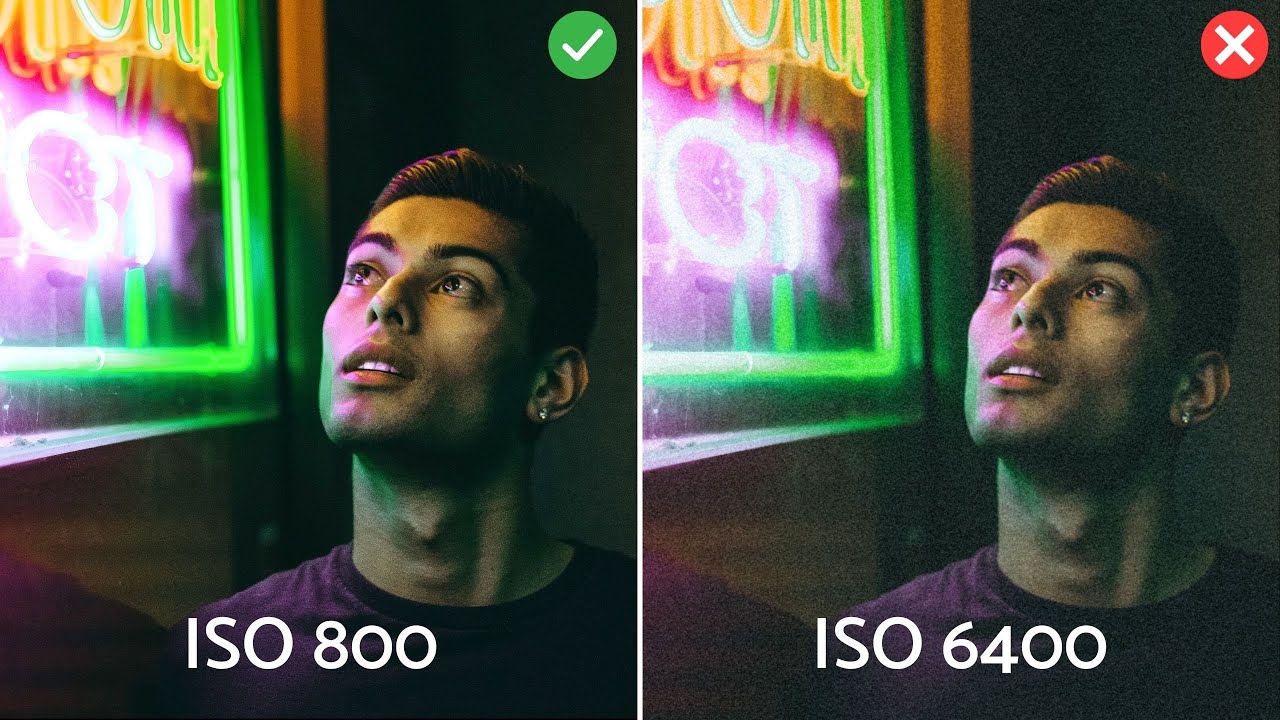
  • 🔋 ISO represents the sensor's sensitivity to light; lower ISO values are preferred to minimize noise and maintain image quality.
  • 📈 Increasing ISO brightens the image but can introduce noise; it should be adjusted last after optimizing shutter speed and aperture.
  • 🎯 When approaching a scene, prioritize freezing the action with appropriate shutter speed, then adjust aperture for desired depth of field.
  • 🔧 Use Auto ISO if available to let the camera automatically adjust ISO within a set range for convenience.
  • 📚 For a comprehensive understanding, consider enrolling in a photography fundamentals course to dive deeper into the technical and creative aspects.

Q & A

  • What is the main focus of the video?

    -The main focus of the video is to teach the basics of photography, specifically the technical principles of using a camera, by covering the exposure triangle which includes shutter speed, aperture, and ISO.

  • How does the concept of 'stops of light' relate to photography?

    -Stops of light are used to measure and control the amount of light in an image. Each stop represents a halving or doubling of light, which is crucial for achieving the desired exposure in photography.

  • What is the exposure triangle and what are its three components?

    -The exposure triangle is a concept in photography that describes the three fundamental components of exposure: shutter speed, aperture, and ISO. These components work together to control the amount of light that enters the camera and affects the exposure of the image.

  • How does shutter speed affect the image in terms of motion?

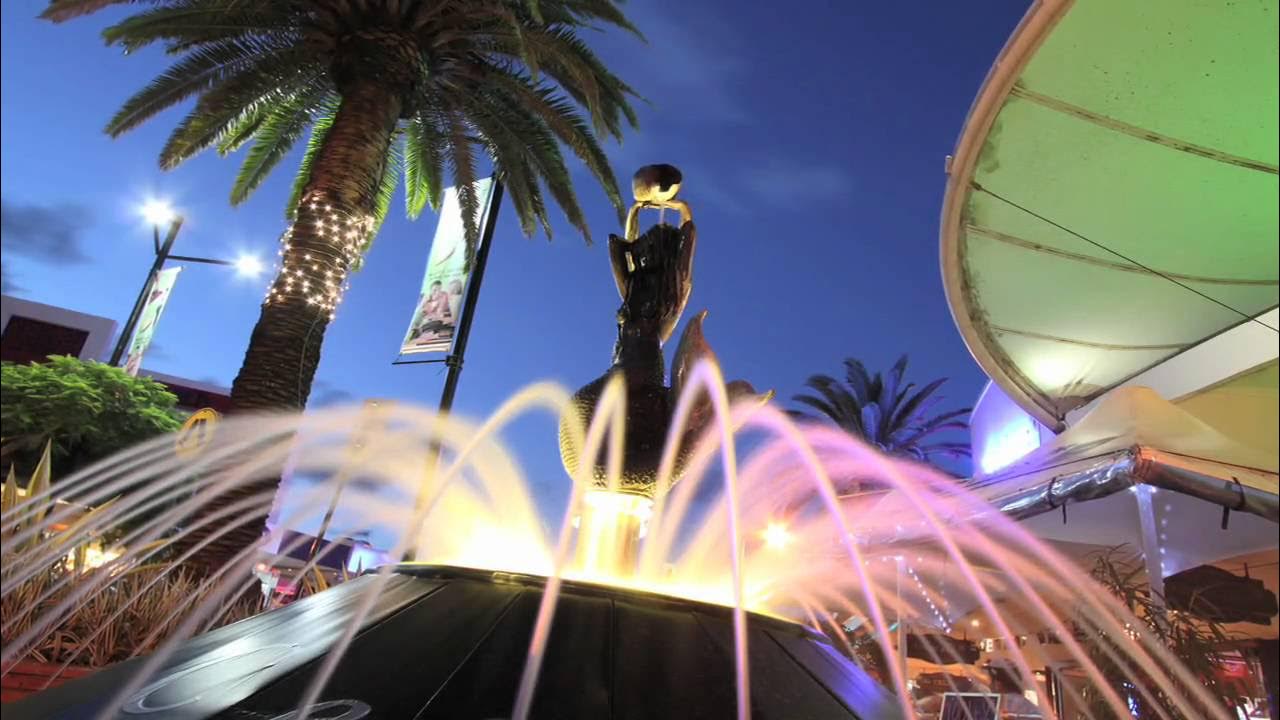
    -Shutter speed determines whether the action in the image is frozen or blurred. A faster shutter speed is used to freeze motion, which is ideal for subjects in movement like in sports or street photography. Slower shutter speeds can create a blurry effect, which can be used creatively or for long exposures in night or landscape photography.

  • What is the relationship between aperture and depth of field?

    -Aperture controls the depth of field, which is the range of distance within the image that appears sharp and in focus. A larger aperture (indicated by a lower f-number) results in a shallow depth of field, keeping the subject in focus while blurring the background. A smaller aperture (indicated by a higher f-number) increases the depth of field, keeping more of the scene in focus.

  • How does ISO affect the image quality and exposure?

    -ISO determines the camera sensor's sensitivity to light. A lower ISO results in less noise and better image quality but requires more light. A higher ISO can brighten the image in low light conditions but introduces more noise and reduces dynamic range and color quality.

  • What is a common mistake beginners make with shutter speed?

    -A common mistake beginners make is not using a fast enough shutter speed, which can introduce motion blur or camera shake into the image. Understanding the necessary shutter speed for the subject's movement is crucial for achieving sharp images.

  • How can the 'auto ISO' function help photographers?

    -The 'auto ISO' function allows the camera to automatically adjust the ISO setting based on the lighting conditions and the photographer's defined limits. This can be helpful for managing exposure without having to manually adjust ISO, especially in changing light situations.

  • What should a photographer do if the image is too dark or too bright?

    -If the image is too dark, the photographer can increase the ISO or use a slower shutter speed to allow more light into the camera. If the image is too bright, adjusting the shutter speed to a faster setting can help reduce the amount of light without compromising the desired depth of field.

  • What is the significance of the 'f-stop' in relation to aperture?

    -The f-stop refers to the lens aperture settings. A lower f-stop number indicates a larger aperture, allowing more light into the camera and creating a shallow depth of field. A higher f-stop number indicates a smaller aperture, which lets in less light and results in a deeper depth of field.

  • What are the next steps for someone who wants to continue learning about photography?

    -For those who wish to further their photography skills, they can enroll in a 30-day photography fundamentals course or explore playlists on creative aspects of photography such as visual patterns to deepen their understanding and application of the principles taught in the video.

Outlines

00:00

📸 Introduction to Photography Basics

This paragraph introduces the video's purpose, which is to teach the basics of photography in a short time span. It emphasizes the technical principles of using a camera and the importance of understanding these to dive deeper into the art of photography. The video is part of a new series called 'Beginner's Guide 2' aimed at teaching creative skills for new content creators. The video also mentions a 30-day photography fundamentals course for those wanting to fast track their learning. The main theme revolves around the control and management of light, measured in 'stops of light', and introduces the concept of the 'exposure triangle' consisting of shutter speed, aperture, and ISO.

05:02

🚀 Understanding Shutter Speed and Aperture

This paragraph delves into the first two components of the exposure triangle: shutter speed and aperture. Shutter speed is described as the duration for which the camera's shutter is open, affecting the amount of light that reaches the sensor. It discusses how faster shutter speeds can freeze action, while slower ones can create blur, which is useful for certain types of photography like landscapes. Aperture is then explained as the size of the lens opening that controls the amount of light entering the camera. It is linked to 'f-stops' and how different apertures affect the depth of field, which determines what parts of the image are in focus. The paragraph also touches on the creative use of a shallow depth of field for drawing attention to the subject and the aesthetic appeal of bokeh.

🌟 Mastering ISO and Balancing Exposure

The final component of the exposure triangle, ISO, is discussed in this paragraph. ISO is described as the sensor's sensitivity to light, with lower ISOs providing less noise and higher ISOs brightening the image but introducing more noise and reducing dynamic range. The paragraph advises on the order of adjusting the exposure triangle settings when approaching a scene: starting with the desired motion (freeze or blur), then depth of field, followed by aperture for light gathering, and finally ISO as the last resort for exposure adjustments. It also suggests using auto ISO functions for convenience. The paragraph concludes with a reminder that these are foundational rules for beginners and encourages viewers to explore further resources for a deeper understanding of photography.

Mindmap

Keywords

💡Photography

Photography is the art, practice, or process of creating durable images by recording light, either electronically by means of an image sensor, or chemically by means of a light-sensitive material such as photographic film. In the context of the video, photography is presented as a creative skill that can be learned and developed, with a focus on understanding the technical principles that underpin it.

💡Exposure Triangle

The Exposure Triangle is a fundamental concept in photography that describes the relationship between three core components: shutter speed, aperture, and ISO. These elements work together to control the amount of light that reaches the camera sensor and thus determine the exposure of a photograph. Balancing these settings is essential for achieving the desired brightness and mood in an image.

💡Shutter Speed

Shutter Speed refers to the length of time that the camera's shutter remains open, allowing light to reach the image sensor. It is one of the key elements of the exposure triangle and can be adjusted to capture motion either as a sharp, frozen image or as a blurred, dynamic representation. Faster shutter speeds are typically used to freeze action, while slower speeds can create an effect of motion blur.

💡Aperture

Aperture refers to the opening in the camera lens through which light passes to enter the camera. It is measured in f-stops and determines the amount of light that reaches the sensor, as well as the depth of field in the resulting photograph. A larger aperture (designated by a lower f-number) allows more light in and creates a shallow depth of field, while a smaller aperture (higher f-number) allows less light and results in a deeper depth of field.

💡ISO

ISO measures the sensitivity of the camera's image sensor to light. A lower ISO value indicates less sensitivity and results in a cleaner, noise-free image, while a higher ISO value increases sensitivity, allowing for better performance in low-light conditions but introduces more digital noise. The ISO setting is the third component of the exposure triangle and can be adjusted to control the exposure of an image.

💡Depth of Field

Depth of Field refers to the range of distance within a scene that appears acceptably sharp in a photograph. It is influenced by the aperture setting, with a shallow depth of field typically resulting from a large aperture (low f-number), keeping the subject in focus while blurring the background. Conversely, a deeper depth of field, achieved with a smaller aperture (high f-number), keeps more of the scene in focus.

💡Bokeh

Bokeh is a term used to describe the aesthetic quality of the blur in out-of-focus areas of an image, especially as produced by a lens with a large aperture. It is often characterized by a soft, smooth, and pleasing blur that can enhance the visual appeal of a photograph by drawing attention to the in-focus subject.

💡Dynamic Range

Dynamic Range in photography refers to the ratio of the maximum luminance (brightness) to the minimum luminance (darkness) that can be distinguished in an image. A higher dynamic range indicates a greater ability to capture detail in both bright and dark areas of a scene. Increasing ISO can reduce dynamic range, leading to loss of detail in extreme highlights or shadows.

💡Noise

Noise in digital photography refers to the random variation of brightness or color information in the image that degrades the quality of the photo. It typically appears as grainy, speckled, or snowy patterns, especially in shadow areas. Noise is often a byproduct of increasing the ISO setting, as it amplifies the sensor's signal, which also amplifies the inherent electronic noise.

💡Creative Intention

Creative Intention in photography refers to the photographer's purpose or goal in capturing a particular image. It involves making deliberate choices about the visual elements, such as composition, lighting, and subject matter, to convey a specific mood, message, or artistic style. Understanding one's creative intention helps guide the technical settings needed to achieve the desired outcome.

💡Auto ISO Function

Auto ISO Function is a camera feature that allows the camera to automatically adjust the ISO setting within a pre-defined range to achieve the correct exposure. This can be particularly useful when shooting in changing lighting conditions, as it helps to ensure that the image is properly exposed without the photographer having to manually adjust the ISO.

Highlights

The video teaches 80 basics of Photography in 10 minutes, covering technical principles of camera usage.

Photography is about control and management of light, measured in stops of light.

The exposure triangle is a concept used to control stops of light, consisting of shutter speed, aperture, and ISO.

Shutter speed determines the amount of time the camera sensor is exposed to light, affecting motion capture.

Fast shutter speeds (e.g., 1/250, 1/400, 1/800, 1/1600) are used to freeze action in various scenarios like street, portraits, sports, and wildlife.

Slow shutter speeds (e.g., 1 second, 2 seconds, 4 seconds, 8 seconds) are used for effects like night photography and landscapes.

Shutter speed affects image sharpness, with slower speeds introducing blur if the camera is not stabilized.

Aperture refers to the lens opening size and controls the amount of light that passes through, known as f-stops.

Aperture affects the depth of field, with larger apertures (smaller f-numbers) creating a shallow depth of field and smaller apertures (larger f-numbers) a deeper one.

Depth of field can be manipulated to focus attention on the subject with bokeh (out of focus blur) for aesthetic appeal.

ISO controls the sensor's sensitivity to light, with higher ISO values increasing brightness but also introducing noise.

A low ISO setting is ideal, but adjustments may be necessary based on the creative needs of the shot.

The video introduces a method for approaching a scene by prioritizing shutter speed, then aperture, and finally ISO.

Auto ISO function can be used to let the camera automatically adjust ISO within a set range for convenience.

If an image is too dark, increase the ISO until the desired exposure is achieved, unless aperture and shutter speed are already optimized.

For overexposed images, adjust the shutter speed to a faster setting if the ISO is at its minimum and aperture is set for creative purposes.

The video emphasizes the importance of understanding and applying the exposure triangle principles for photographic success.

The 30-day Photography Fundamentals Course and Visual Patterns playlist are recommended for further learning on photography basics and the creative side.

Transcripts

play00:00

in this video I'm going to teach you 80

play00:01

of the basics of Photography in just 10

play00:05

minutes these are the technical

play00:07

principles of how to use your camera and

play00:10

hopefully by learning this you'll be

play00:11

inspired to dive into all the other

play00:13

wonderful skills about learning

play00:15

photography because there's so much to

play00:17

learn this video is the very first video

play00:19

on my new series called beginner's guide

play00:21

2 which is a new series teaching

play00:24

creative skills for the new content

play00:26

creator and if you're a beginner

play00:28

photographer really wanting to Fast

play00:30

Track Your development when it comes to

play00:32

skills then check out my 30-day

play00:33

photography fundamentals course which I

play00:36

will leave a link to in the description

play00:37

box below so photography is all about

play00:40

the control and the management of light

play00:43

and we measure that light in what's

play00:45

called stops of light Now to control

play00:49

these stops of lightning no images we

play00:50

use a concept called the exposure

play00:52

triangle now the exposure triangle has

play00:54

three main components shutter speed

play00:56

aperture and ISO all three of these

play00:59

components have different different

play01:00

technical ways of changing how much

play01:03

light is in our image but they all share

play01:05

the same thing in common in that they

play01:08

all control stops of light that we have

play01:10

in our image so they share a common

play01:12

language now let's talk about the first

play01:13

component of the exposure triangle

play01:15

shutter speed and when we take a photo

play01:18

light comes through the end of the lens

play01:21

hits the shutter and then hits the

play01:23

sensor the shutter is the thing in front

play01:25

of the sensor that opens and allows the

play01:28

light to come through onto the sensor

play01:30

and then it closes making our exposure

play01:33

and the faster the shutter speed you

play01:35

have the faster that shutter opens and

play01:37

then closes and this means that less

play01:40

light is able to make its way onto the

play01:42

sensor because it's open for less time

play01:45

now the slower shutter speed you have

play01:47

the longer the shutter is open for and

play01:50

the more light is then able to make its

play01:52

way onto the sensor now creatively the

play01:55

way to think about shutter speed is to

play01:57

think about whether or not you want to

play01:59

freeze the action in your image or

play02:02

whether you want your image to be blurry

play02:04

to freeze the action which is going to

play02:06

be most of the time especially if you're

play02:08

shooting you know Street or portraits or

play02:10

sport or Wildlife Etc you want a faster

play02:13

shutter speed typically so you know one

play02:16

over 250 one over 400 one over 800 one

play02:18

over 1600 and so on when it comes to

play02:21

freezing the action there's no such

play02:24

thing as too fast of a shutter speed

play02:26

now if you have a tripod to rest your

play02:29

camera on then you might be doing night

play02:31

photography or Landscapes and you might

play02:34

use slower shutter speeds such as one

play02:36

second two seconds four seconds eight

play02:38

seconds or more

play02:39

now all of these denominations are

play02:41

actually One Stop of light difference

play02:43

between each other and for shutter speed

play02:46

this is how we talk about it in time one

play02:50

common mistake that people make when

play02:51

they first start out with photography is

play02:53

that they complain that their images

play02:54

just aren't sharp and most of the time

play02:57

that isn't because they don't have good

play03:00

gear you know most cameras are actually

play03:02

pretty good nowadays but actually it's

play03:04

because they don't have a fast enough

play03:07

shutter speed and they're introducing

play03:08

micro Jitters and therefore blur into

play03:11

their images check out this video I made

play03:14

here if you want to ensure that your

play03:15

images are absolutely tack sharp every

play03:18

single time the second component of the

play03:19

exposure triangle is called aperture the

play03:22

aperture refers to the size of the

play03:24

opening at the end of the lens the

play03:27

larger this Iris the more light comes

play03:29

through the smaller the RS the less

play03:31

light comes through for aperture we

play03:34

refer to stops of light that it produces

play03:36

as What's called f-stops the closer to 0

play03:40

that number the larger the aperture will

play03:42

be the larger the number the smaller the

play03:44

aperture will be so common aperture

play03:46

stops look like f 1.4 F2 F 2.8 F4 F 5.6

play03:51

f8 f11 F16 and so on

play03:54

and for example lenses that have a

play03:56

maximum aperture of f01.4 will have a

play03:59

very large aperture like this one

play04:02

now creatively aperture is most commonly

play04:05

associated with controlling What's

play04:07

called the depth of field simply put

play04:10

depth of field refers to how much of the

play04:14

image can be in Focus so large apertures

play04:17

like f 1.4 will produce what's called a

play04:19

very shallow depth of field this means

play04:22

that the area of focus is quite thin or

play04:25

is quite shallow and it's typically used

play04:27

to draw your eye into the thing that's

play04:30

the most important thing in the

play04:31

composition while the rest of the image

play04:33

goes out of focus and this out of focus

play04:36

blur is commonly known as bokeh and many

play04:40

people find it to be very aesthetically

play04:42

pleasing these effects are very often

play04:45

found in a genres such as portrait or

play04:48

fashion photography now on the opposite

play04:50

end if you do Landscapes or architecture

play04:53

for example you'll probably want a much

play04:55

deeper depth of field so you would use

play04:57

smaller apertures such as F 5.6 f8 f11

play05:02

so that you can get everything in focus

play05:05

now depth of field can get really really

play05:07

detailed and complicated because it has

play05:09

many many other factors such as subject

play05:11

distance focal length and so on but this

play05:13

is definitely enough to get you started

play05:15

just remember if you want less things in

play05:17

Focus but more available light than a

play05:20

lower f-stop number like f 1.4 will do

play05:23

the trick if you want more things in

play05:25

Focus but less available light than a

play05:28

higher f-stop number like f11 will do

play05:30

the trick okay if you're enjoying this

play05:31

video so far I would really appreciate

play05:33

it if you would hit that like button for

play05:34

me so that I know it's good enough to

play05:36

make even more free videos like this in

play05:38

the future and the last component of the

play05:40

exposure triangle is ISO so ISO refers

play05:43

to the amount of gain the image has so

play05:46

think of it like giving the sensor more

play05:49

power to brighten up the image if need

play05:51

be common stops of iso are ISO 100 200

play05:55

400 800 1600 3200 to 6400 and so on

play06:00

now ISO doesn't have an implicit

play06:02

creative effect on our images like

play06:04

shutter speed or aperture have and so it

play06:07

should also be treated in that way with

play06:10

ISO the more you increase it the

play06:12

brighter your image becomes but also the

play06:15

more noise or visual artifacts you

play06:17

introduce as well you also end up

play06:19

decreasing dynamic range and color as

play06:21

well but that's a very Advanced topic

play06:23

for perhaps another time

play06:25

ideally you want to have as low of an

play06:28

ISO setting as possible so long as your

play06:31

other two settings are correct first one

play06:34

very common mistake that beginners make

play06:35

is that they think ISO and noise is a

play06:38

huge huge deal so they keep it really

play06:40

really low at the sake of getting their

play06:42

shutter speed or their aperture

play06:43

Incorrect and this is a mistake you know

play06:47

messing up your shutter speed or your

play06:48

aperture means that you may get an

play06:50

unintentionally blurry image and you can

play06:53

never unblur a blurry shot but you can

play06:57

remove noise from a noisy shot and

play07:00

because of this think of iso last when

play07:02

it comes to setting up your shots and

play07:05

that leads me to bringing all of this

play07:08

together so when I'm approaching a scene

play07:10

I want to take a photo of I'll always

play07:11

think about doing it in this order first

play07:13

I will think about whether or not I want

play07:15

my subject in my image to be blurry or

play07:18

be frozen 99 of the time it's going to

play07:21

be frozen so that's my decision made for

play07:23

me and I'll adjust my shutter speed

play07:25

according to the scene and usually I

play07:27

will go a little bit faster than I think

play07:29

I'll need just to be on the safe side

play07:31

then I'll think about depth of field do

play07:34

I want many things to be in Focus or do

play07:37

I just want one thing to be in focus and

play07:39

usually this change will happen

play07:41

depending on what I'm shooting like

play07:43

whether or not it's a landscape or it's

play07:44

a portrait or if I have a subject in the

play07:46

foreground and so on most of the time I

play07:49

actually shoot as large as I can get in

play07:51

terms of aperture because I like to have

play07:53

as much light Gathering as possible and

play07:55

I'm either using prime lenses for

play07:57

portraits or I'm shooting things very

play07:59

far away with Landscapes and then lastly

play08:01

a look at the image and I'll adjust the

play08:04

iso accordingly a tip here if your

play08:06

camera has it is to use the auto ISO

play08:09

function and have your isos set in a

play08:11

bracket so that you don't even need to

play08:13

think about it and you can let your

play08:14

camera handle it all now what do you do

play08:16

if the image is either too bright or too

play08:19

dark now if the image is too dark you

play08:22

need more light so usually I will have

play08:24

my shutter speed in aperture dialed in

play08:25

and based on my creative intention which

play08:28

means all I need to do is just turn my

play08:30

ISO up until I get the exposure I want

play08:32

if the image is too bright however and

play08:35

my aperture is locked in from a creative

play08:37

standpoint and my ISO was already at the

play08:39

lowest that it can go then I'll actually

play08:41

adjust my shutter speed to go even

play08:43

faster because remember if you're

play08:45

freezing the action there's no such

play08:47

thing as too fast of a shutter speed

play08:49

okay and that's the technical basics of

play08:51

photography of course we're just

play08:53

scratching the surface here really but

play08:55

when it comes to the beginner Basics

play08:57

these are the basic rules to follow and

play09:00

over time you'll be able to deeply

play09:01

understand them and see where you can

play09:03

stretch and bend these rules as I'm sure

play09:05

some of you people in the comments are

play09:07

going to point out but these are the

play09:09

rules that I teach to all of my

play09:10

beginners and I think that they're a

play09:12

great place to start and again if you

play09:13

want to learn the rest of the

play09:15

photography Basics then check out my 30

play09:17

day photography fundamentals course

play09:18

where I talk about focus and shooting

play09:20

modes and light and gear and all of that

play09:23

other good stuff or if you want to learn

play09:24

about vision and creative side of

play09:27

Photography then check out my visual

play09:28

patterns playlist for some free videos

play09:30

about that over there otherwise stay

play09:33

tuned for the next videos on this

play09:35

beginner's guide 2 Series and I will see

play09:37

you in the next video peace

Rate This

5.0 / 5 (0 votes)

Related Tags
Photography BasicsExposure TriangleShutter SpeedAperture ControlISO SettingsLight ManagementCreative PhotographyBeginner's GuideOnline TutorialImage Quality