6. License Activation and Initial Setup Wizard || F5 Big-IP LTM
Summary
TLDRThis tutorial guides viewers on configuring the management IP address of an F5 Big-IP appliance using the CLI and accessing it via GUI. It covers initial setup, changing the default IP, and resetting admin passwords. The video also demonstrates activating licenses manually due to lack of internet access on the appliance and completing the setup wizard, including configuring internal and external network interfaces.
Takeaways
- 💻 The tutorial covers configuring the management IP address of an F5 BIG-IP appliance using the CLI.
- 📝 The default management IP address can be checked using the command `tmsh list sys management-ip`.
- 🛠️ The traffic management shell (tmsh) is a command-line interface for managing the BIG-IP system.
- 🔄 To change the IP address, use the `config` utility and specify the new IP, netmask, and route as per the lab topology.
- 🔐 The default credentials for the appliance are 'admin' for both username and password.
- 🔒 If the admin password is forgotten, it can be reset using the `modify auth user admin prompt-for-password` command in the CLI.
- 🌐 Issues with accessing the appliance through the GUI can be resolved by running specific commands in the CLI.
- 📧 Licenses can be activated manually if the appliance does not have internet access by using a base registration key.
- 💾 The tutorial explains resource provisioning, including CPU and memory allocation for management and TMM (traffic management microkernel).
- 🌐 The initial setup wizard is used to configure network settings, hostname, time zone, and user administration.
- 🔄 The tutorial also covers the configuration of internal and external network interfaces with their respective IP addresses and VLAN settings.
Q & A
What is the default management IP address for the F5 big-ip Appliance?
-The default management IP address for the F5 big-ip Appliance is 192.168.1.245.
What does 'tmsh' stand for and what is its purpose?
-'tmsh' stands for Traffic Management Shell, which is a command-line interface for managing the big-IP system.
How can you check the management IP address using the CLI?
-To check the management IP address using the CLI, you would type 'tmsh', then 'list sys management-ip' and hit enter.
What is the command to change the management IP address in the F5 big-ip Appliance?
-The command to change the management IP address is 'config CU and fij' followed by entering the new IP address and net mask.
What should you do if you forget the admin password for the F5 big-ip Appliance?
-If you forget the admin password, you can reset it using the CLI with the command 'modify auth user admin prompt-for-password'.
How do you access the F5 big-ip Appliance through the GUI after changing the management IP?
-After changing the management IP, you can access the appliance through the GUI by opening a web browser and typing 'https://<new-ip-address>' followed by logging in with the default credentials.
What is the significance of the TMM in the context of the F5 big-ip Appliance?
-TMM stands for Traffic Management Micro Kernel, which processes all load balanced traffic on the big-ip system and runs as a real-time user process within the big-IP operating system called tmos.
What is the purpose of the initial setup wizard in the F5 big-ip Appliance?
-The initial setup wizard is used to configure the basic settings of the appliance such as management IP, hostname, time zone, and network configurations.
How can you activate the license on the F5 big-ip Appliance if it doesn't have internet access?
-If the F5 big-ip Appliance doesn't have internet access, you can activate the license manually by copying the base registration key and license key from the F5 website after manually entering the key on the appliance.
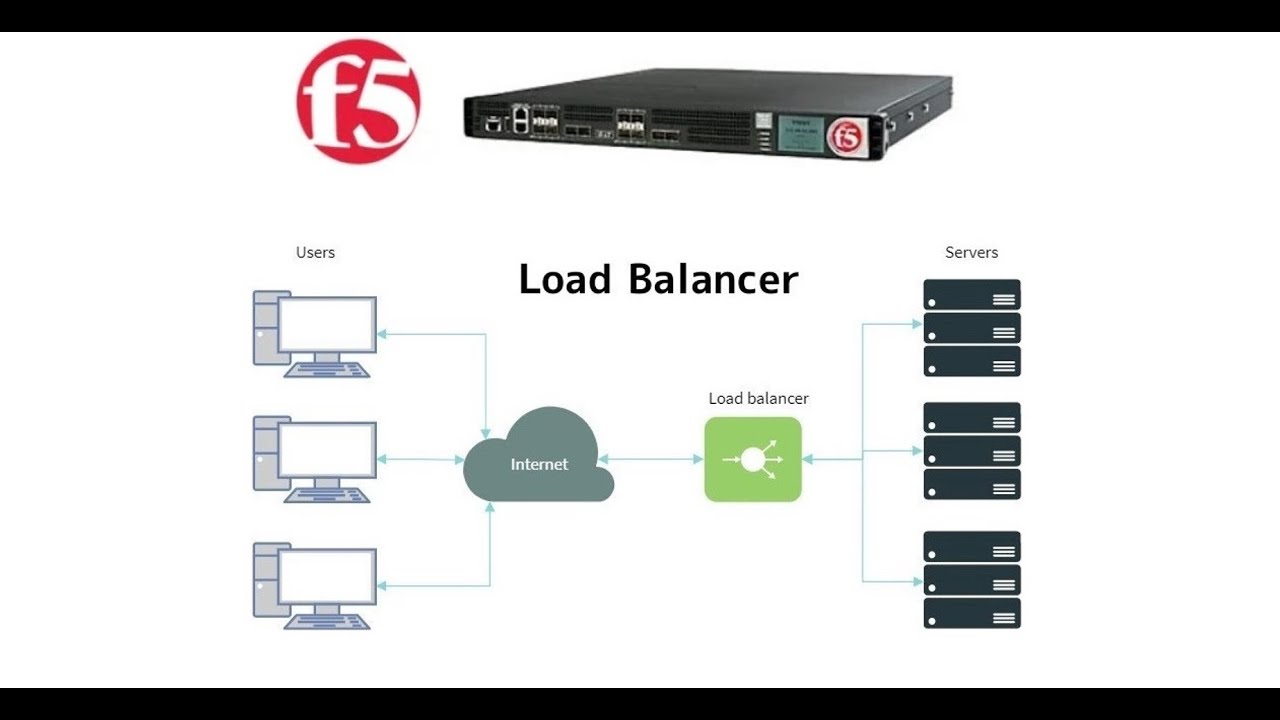
What is the role of the internal and external network configuration in the F5 big-ip Appliance setup?
-The internal network configuration is used to set up the network interface for internal traffic, while the external network configuration is for external traffic. They are essential for defining how the appliance will handle traffic for different networks.
Why is it necessary to configure the DNS settings on the F5 big-ip Appliance?
-Configuring DNS settings is necessary for the appliance to resolve domain names to IP addresses, which is required for accessing external resources over the internet.
Outlines
💻 Configuring Management IP and Initial Access
The tutorial begins with an introduction to configuring the management IP address on an F5 Big-IP appliance using the CLI. The presenter explains the significance of the Traffic Management Shell (tmsh) for managing the system and demonstrates how to check the default management IP address with the 'list sys management-ip' command. The default IP is shown as 192.168.1.245. The presenter guides through changing the IP address using the 'config' utility, specifying a new IP as per the lab topology, which is 192.168.0.100/24. The process includes setting a net mask and deciding not to create a default route at this stage. The video also mentions the absence of a license and the appliance being in standalone mode, not configured for high availability.
🌐 Testing New IP and GUI Access
After changing the management IP, the presenter tests the new IP address by pinging it from the physical host. They then proceed to access the appliance through a web browser using the new IP address with HTTPS, navigating through security warnings to log in with default credentials (admin/admin). An additional note is provided on how to reset the admin password if forgotten, using the 'modify auth user admin prompt-for-password' command in the CLI. The presenter also addresses potential issues with accessing the appliance through the GUI, offering a workaround involving two specific CLI commands to resolve common login problems.
🔑 Activating Licenses and Completing Setup Utility
The presenter discusses the process of activating licenses on the F5 Big-IP appliance. Initially, an automatic activation method is attempted, but due to the lack of internet access on the appliance, a manual activation method is used instead. The presenter guides through the steps of manual activation, including entering a base registration key and manually inputting a license key obtained from the F5 licensing server. Once the licenses are activated, the change is reflected in the CLI, moving from 'no licenses' to 'inoperative, Standalone'. The presenter also touches on resource provisioning, explaining the allocation of CPU and memory resources between management and TMM (Traffic Management Micro Kernel), and the default selection of LTM (Local Traffic Manager) in the licensing modules.
🛠️ Resource Allocation and Initial Setup Wizard
This section delves into resource allocation, detailing the division of CPU and memory resources between management and TMM processes. The presenter provides an overview of the current resource allocation and explains the roles of TMM and LTM. They then guide through the initial setup wizard, discussing the selection and deselection of various modules, and the importance of memory allocation for different modules. The setup process includes configuring the management IP, IPv6 settings, time zone, hostname, and user administration settings. The presenter also covers the network configuration, including setting up internal and external network interfaces with specific IP addresses and VLAN configurations.
🔄 Network Configuration and Completing the Wizard
The tutorial continues with the configuration of internal and external network interfaces. The presenter specifies IP addresses, net masks, and VLAN settings for both interfaces, emphasizing the importance of correct tagging in network design. They demonstrate adding the internal network interface with an IP of 10.1.1.100 and the external network interface with an IP of 172.16.1.100. The presenter also discusses the 'put lockdown' option and the tagging of interfaces. After configuring the network settings, the presenter completes the initial setup wizard, resulting in the appliance being ready for use with options for LTM, iApps, DNS, and local traffic management now available.
🏁 Recap and Future Tutorials
In the concluding part of the tutorial, the presenter recaps the steps covered, including the initial configuration of the management IP, accessing the appliance, activating licenses, and completing the initial setup wizard. They also mention the upcoming tutorials that will delve into important terms and concepts related to server load balancing and other aspects of F5 technology. The presenter encourages viewers to subscribe to the YouTube channel for further learning.
Mindmap
Keywords
💡CLI
💡GUI
💡Management IP Address
💡Traffic Management Shell (tmsh)
💡IPv4
💡Default Route
💡License Activation
💡Resource Provisioning
💡Traffic Management Micro Kernel (TMM)
💡Initial Setup Wizard
Highlights
Introduction to configuring management IP address through CLI
Accessing the appliance through GUI and initial setup wizard
Default IP address for F5 big-ip Appliance is 192.168.1.245
Using 'tmsh' (Traffic Management Shell) to manage the big-ip system
Command to display the management IP address: 'list sys management-ip'
Changing the management IP address according to lab topology
CLI command 'config CU' to configure the management IP address
Setting a new static management IP address of 192.168.0.100/24
Ability to ping the new management IP address from the host
Accessing the appliance through a web browser using the new IP
Default credentials for F5 big-ip Appliance are admin/admin
How to reset the admin password through the command line
CLI commands to resolve connection issues with the appliance
Activation of the F5 license using a base registration key
Manual activation of the license when automatic fails due to no internet access
Resource provisioning and understanding CPU and memory allocation
Explanation of TMM (traffic management micro kernel) and its role
Initial setup wizard steps including hostname and time zone configuration
Internal and external network configuration as part of the setup wizard
Completion of the initial setup wizard and availability of LTM statistics
Summary of the tutorial's key learnings and预告 of upcoming content
Transcripts
hello everyone welcome to my YouTube
channel neural networks
in this tutorial we are going to
configure management IP address through
a CLI and moving on we will be accessing
the appliance through a GUI
and completing the initial setup wizard
so guys let's begin with the
configuration
we will go to our VMware Workstation
over here we will be going to the F5
big-ip console we will log into the
appliance
and the very first thing what we are
going to see is what is the default IP
address for the F5 big-ip Appliance so
guys for doing so the very first thing
what you have to do is you have to type
tmsh
tmsh
stands for traffic Management Shell
what is traffic management this all
things we will be
going in detail in the coming time but
for now just understand that
traffic Management Shell it is a command
line interface for managing the big IP
system
we will be using the TA message to
configure and manage the big-ip system
in conjunction with the Configuration
utility
which is the browser-based big-ip system
and network management tool
so going to the command line you will
type tmsh and hit enter
to check the
management IPA does the default
management IP address of the appliance
the command is
list
sys
management hyphen IP
it is giving you the default IP address
which is 192.168.1.245
I will note down the command for you
over here so that you can have a better
understanding so
the very first thing on the CLA after
taking the login you type e msh
hit enter and then you have given a
command list
sys for system
management hyphen IP this was the
command to display the IP address on the
management interface and we have seen
that the default a management IP is
192.168.1.245
now we are going to
change this IP address as per our lab
topology
just quit from this prompt and hit enter
and one more thing I would like to show
you that if you are seeing that the name
on the command line root at the red
localhost further it is saying no
license since we haven't activated the
license till yet that is the reason it
is giving you no licenses and of course
it is a standalone machine not in
configured in ha that's why it is saying
standalone so to configure the
management IP address you will type
config CU and fij and hit enter
it will open a
prompt for you and it is saying that
using this utility uses utility to add
an IP address net mask and default route
for the management port on this system
hit enter
now it is saying Select Management IP
family type
so in our case we are using ipv4 so we
will hit enter on itv4
configure IP address use automatic
configuration of IP address no we will
configure our own IP address as per our
laptopology so just using the arrow key
you can move to no right arrow key and
move to no and hit enter
here you can put the IP address so as
per our lab topology the Management Port
IP address will be
192.168.0.00 24.
so let's put that IP address over here
192.168.0.00.
192.168 0.00
use the Tab Key and hit enter on OK
this will be our net mask
okay do you want to create a default
route for Management Port this is
required if you want to connect to the
Management Port from another subnet so
you will say no for now
and proceed further
it is giving you the details which you
have configured the IP address and the
net mask hit enter on yes
you will be again prompted to the CLI
over here
so guys now we have changed the IP
address of our
big IP Appliance on the management port
so from the physical host we are going
to
just try to the IP address and it should
be able to Ping 192.168.0.100
it is pinging now let's open the web
browser and we will be
accessing the appliance through the GUI
just type the IP address with https
colon double slash
192.168.0 Dot 100 enter
Advanced and then accept this can
continue
over here the default credentials will
be
admin
admin
and click on login
uh guys over here I would like to add
one more thing now let's say for example
if in case you have forgot the admin
username and password
I did this purposely over here so that I
can add one more command for you the
default username and password will be
admin and admin only but if in case
let's say you forgot the admin password
so what you are going to do we will
learn over here that how you will reset
the password for the admin through the
command line
so guys let's go to the command line of
our F5 big IP over here you will be
going to
PA message and I believe that now you
know what is TMS TMS stands for traffic
Management Shell
to enter
over here you are going to give the
command this will be you this command
you are using to
reset the admin password if in case you
forgot
modify
authentic auth
user
the username which will be admin
and prompt for
password
I will just write this
command over here
command is modify
a u t h
user
admin
if you have resetting the password for
admin it will be admin or if you are
resetting it for some other user instead
of admin that in this place it will be
that particular user and
prompt
for
password
so as soon as you will hit enter over
here
it will ask you to configure your new
password for admin user so let's
configure the new password
and now your password is saved
foreign
the command to save the configuration
saves this config
the configuration is saved now let me
note down this command as well for you
save
this Ys
on freak sorry
so this command will help you to save
the password
now if in case you want to just quit
from this uh tmos then you will
type quit and
hit enter
now we will try to log in to our new
password
and we are now login to the Appliance
through the GUI
foreign
to the Appliance through a GUI
I would like to add a note over here
maybe if in case you face a issue like
when you are able to when you are trying
to access the appliance uh let's say for
example you have entered the credentials
the admin user name and password uh you
there is a possibility in some of your
like for some of you
you may get a prompt like
um
unable to contact big IP device or it
may say something like you know please
wait by the Configuration utility
utility start so if in case you face
such issue over here and you are not
able to login I am giving a solution
guys just in the go to
this what we say command line going to
command line uh in the VMware
Workstation through a command line you
have to add these two commands uh just
go to
a message okay
command line going to the traffic
Management Shell these two commands you
have to add
the command and then hit enter this
second command you have to hit and you
can hit and once you do this uh that
particular error which you are getting
on the browser that will be wipe out
what you have to do after giving this
command in the command line uh you have
to just close the browser and again open
and you will be able to access the
appliance it won't be for everyone but
if in some cases you face the issue I am
adding this note this is a workaround
for that particular issue okay
so guys the very first thing what we are
going to do over here is we will
activate the license and after
activating the licenses we will complete
the setup utility so you would have
received an email this way okay this is
basically a license which is sent by FY
uh when it was sent in the tutorial when
we have downloaded the file from F5 you
remember we have received a notification
on the website saying that the licenses
will be sent to you within 30 minutes
and I told you over there that yes uh
zero license is completed we will be
proceeding with the
another downloading of the file and the
installation so this is the email which
you have received right so this
particular license key uh we will be
using for our activation purpose Okay so
just going to licenses over here from
the left side you can see the license
over here right click on activate
over here uh base registration key is
the thing which you require right so we
will be using this one
you can see this one so I have copied
the
is over here we will just copy this and
paste it over there
once you have you have done with this
so after copying this you will see like
activation method over here activation
method is automatic which requires
outbound connectivity which means you
will require internet access and the
second option you can find is manual we
have entered access on our machine okay
so we will say automatic and click on
next button over here
it will take some time so you have to
wait
guys we just we miss out one thing that
we haven't what we say
we haven't
figured that DNS setting in all so this
device won't be able to reach to the
internet right the F5 Appliance won't be
able to restore the internet we will do
that configuration later but for now we
don't need that what we are going to do
is we will go with the manual
activation method for now okay so the
base registration key is the one which
we have received from F5 this one w a t
d l okay this you will put over here and
then the activation method let's select
manual over here and selecting this
option next button
okay once you are done with this
then
you will get this page over here
and then over here what you have to do
is
here to access F5 licensing server over
here and it will take you to the F5 site
okay if you will see over here it is
asking you to enter your dose here so
this is the one which you have to copy
press Ctrl a select all
Ctrl C to copy
and simply you have to paste it over
here
once you have pasted this over here
click on next button
the end user agreement so just check
this box I have read and agree to
the terms of this license click on next
over here you will see cut and paste
your license key from the below from the
form below so what you do
either you can download it or you can
simply select all copy it
and step a is the license paste it over
here
and click on next button
okay so guys what you have learned over
here since we were not having internet
access on our F5 box uh I'm in the F5
virtual Appliance so we were not able to
go with the automatic process okay so we
have changed the method and we opted for
the manual method uh using the manual
method we have seen that we were asked
to put the Dozier first of all it has
taken to the FY side where we have
copied the Dozier and then we got a
license and we have copied that over
here now
our
F5 Appliance must be
activated the licenses are activated on
our Appliance
so guys click on continue over here
so we have activated the licenses now
and if you will go to the CLI you would
be able to see that now over here
as you can see over here earlier it was
no licenses but now uh it is saying
inoperative
Standalone okay
the next thing what we are going to do
is we will proceed with the initial
setup wizard
but before we proceed with the initial
setup wizard let me explain you about
the resource provisioning
as you can see over here uh the current
resource allocation in CPU it is divided
into two OS 1 is management and another
is TMM
so guys TMM stands for traffic
management micro kernel
TMM processes all load balanced traffic
on the big-ip system
TMM runs as a real-time user process
within the big IP operating system
which is called tmos
so over here you can see CPU and memory
the third one you can see the first is
CPU the third one is memory CPU and
memory resources are explicitly present
in the big-ip configuration
so when we talk about the CPU 10 percent
is allocated to management that is about
89 is allocated to TMM
just remember that mm stands for traffic
management micro kernel
and LTM is one percent the disk is fully
allocated to management
and the memory the memory is you can say
like around 1594 MB is allocated to the
management and
26 MB is allocated to TMM
so what is TMM memory
the amount of memory in use by the TMM
process
TMM processes the traffic management
this was all about the current resource
allocation in your F5 big-ip LTM
Appliance
coming down you will see like the
provisioning of management local traffic
LTM you can see the LTM is by default
selected right and it is on the nominal
value
apart from that you have other licensing
modules like Asm
and Global traffic
access policy manager APM and so on so
if you want to like let's say in future
time if you want to enable any one of
those
module simply you have to check this box
and this particular model will be
enabled at the same time you can see
over here like the memory allocation is
also given to Asm
but for now in this lab we only require
LTM so we will simply uncheck this box
this was all about the resource
provisioning
we will click on next
you can see the details over here the
certificate details the certificate
properties are being shown over here
then you can simply click on
next over here if you want to
import something some certificate you
can do it from here but for now we will
say click on next we will give the
default settings
over here in the general properties you
have to be bit careful when you are
configuring the things
see the management IP will be the one
which we have already configured and it
will be the manual which is
192.168.0.100 this we have initially
configured in the command line
IPv6 we are not using in our lab
topology that we will rule out
time zone
we will be offering the time zone for
our time zone
so I will be selecting my time zone over
here
after selecting the time zone
one more thing hostname we have to give
so
I will give like
five big IP Dot
local domain this is what I will choose
the host name will be F5 big IP dot a
local domain
host IP address use the Management Port
IP address only
we will keep the setting as it is and we
have selected the time zone now user
Administration you can disable the login
for the root account from here or if you
want to reset the password that also you
can do through a GUI from here exercise
access is enabled so like using a third
party tool like a putty or something you
can do a SSH if you want to disable that
just uncheck this box
from where you want to allow the SSH
access then also you can Define from all
address or you can specify a range that
from specify address only I want to
allow the SSH access
that's that's all in this particular
page let's click on next
it is saying that
some field below certain errors correct
before continuing okay
foreign
account okay we will just set the
password over here for the root account
before we proceed further you know the
password which we have like in the
initial configuration through a CLI we
have
taken the login and it enforce us to
change the password that password will
put over here for the root account and
then we will click on next
now it is asking for some standard
network configuration okay
click on next
configuration sync High availability we
don't need for now we'll just uncheck
both the boxes just what you have to do
and check first it will uncheck the
second one also click on next
internal network configuration
so guys when I talk about internal
network configuration the very first
thing I will take you to the uh our lab
topology
so this is our lab topology and internal
Network it will be 10.1.1.100.
internal one
let's put the IP address uh 10.1.1 Dot
100
the net mask will be 255.255.255.0
over here in the Pod lockdown keep it as
allow default
foreign
tag ID will be Auto villain interface
will be one dot in our let's take the
lab topology it is supposed to be one
dot right so we will say the internal
line where an interface will be 1.2
again option over here in the tagging
option you have to
say unpack
add it over here
see this we can change later also I will
show you but we are doing the initial
set of wizard so the initial
configuration we will complete over here
itself we are going to do the internal
network configuration I mean uh we are
doing this particular configuration so
we have for the IP address 10.1.1.100 we
have said that the interface will be
will will end tagging one dot then
interface will be one dot over here for
the internal IP select so we have
selected that one dot over here and
taking we have set and tag after doing
this we have added this okay so 1.2 is
tagged as per our Network design click
on next button over here
foreign
external network configuration it is
asking
so we will put the external interface IP
which will be 172.16.1.00
172.16.1.100 and the net mask will be
255.255.255 Dot zero
in the put
lock down option over here it is the
external interface right so say allow
none
and default gateway we will not be
putting over here for now
VLAN name is external with an ID Auto
and the VLAN interface will be 1.1
band and click on ADD button so now we
have added we have configured the
external interface IP address and with
an interface
as one dot one over here and untagged
and click on finish buttons
let me show you before I click finish
let's let me show you why we have added
1.2 AC in our Network design on the
external
site
1.1 we have tag right so in the
design is 1.1 for internal it was 1.2
that we have done now for the external
it is 1.1 we have added over here and
click on finish button
so guys basically now what we have done
is we have completed with our setup
initial setup Wizard and you can see now
you're getting the options for your fi
LTM Appliance statistics
I apps DNS local traffic and all the
options now they are available with you
over here
so guys uh let's quickly recall what we
have done in this lab
basically we have done the
initial configuration wizard but before
that we have activated the licenses okay
at the beginning of this tutorial we
have configured the management IP we
have seen the commands how to
set up the management IP like starting
from here we are going to the DMS TM
shell we have seen how you will check
the management IP address then we have
seen that how if required how you will
change the admin password if you have
forgot from the CLI and uh we have taken
the login to the Appliance through the
newly configured management IP address
but yes before that I would like to add
that
I have shown you if in case uh you are
facing a difficulty in login uh through
a GUI so this command you have to use I
didn't phase in in our lab when I was
showing I didn't face but if it in case
you faced very rarely these two commands
you have to run into tmsh in the CLI
then thereafter taking the log into the
appliance very first we have activated
the licenses yes we were uh on the wrong
track where I have said you that we will
go with the automatic licensing
activation but the appliance doesn't
have the internet access so we're not
able to do so then what we did we have
tried to activate through a manual and
yes we were able to do it by copying the
Dozier than copying the license Keys
through going to the F5 website then
thereafter we have completed the initial
setup wizard for the appliances where we
have added the internal interface
external interface and many things over
there so that's all guys in this
tutorial so in the coming tutorial we
will be learning about some important
terms and terminologies we will see what
is server load balancing this all terms
and terminologies which will be we will
be learning in the coming tutorial will
be very much helpful to for you to go
through the entire series of this F5 so
that's all guys in this tutorial thanks
for watching if you haven't subscribed
to my YouTube channel yet please
subscribe it now
see you in the next tutorial
Weitere ähnliche Videos ansehen
5. Setup F5 Big-IP LAB || Configuring VM Network Adapters || F5 Big-IP LTM
3. Prerequisites to setup F5 lab || How to install Webserver on windows 10 machine || F5 Big-IP LTM
Applying Subnet Networks to Network Devices - CCNA 2: Day 2
Konfigurasi DHCP Server dan DHCP Client pada Router Mikrotik RB 951Ui-2HnD
How to configure DHCP server | DHCP server configuration step by step
Cara Setting IP Camera Hikvision Dari Nol
5.0 / 5 (0 votes)